Hydra Mac 8A (Gehl 2500) restoration... or "Oh No... What have I done?"

Help Support SkidSteer Forum:

OP
OP
vinito

vinito

Well-known member
Joined
Nov 19, 2015
Messages
199
Looks good.
The only concern i'd have is if the filler neck could be bumped, is there something to prevent you rubbing it against something while using the machine?
I know how easy it is to touch a tree after it's painted.....
Well I dunno. I could add a piece of bent rod as a bumper thing, but it's not much above the tires which will stick out a good 6 or 7 inches outside of the filler neck once they are back on the machine. I was kind of thinking that something would have to jut in past the tires but just over the top of them to contact this filler neck and while not impossible, maybe not very likely.
Plus, since the tank is a foot and a half below the neck and connected by rubber, it could totally rip off the filler neck unnoticed and still not spill fuel before I got to feel the dissapointment of having to go find the missing, buried neck I spent so much time making ;)
Does it seem to be a safety hazard? I could swear I've seen similar configurations on other machines, but sometimes I remember seeing things that were never there, so...
 
OP
OP
vinito

vinito

Well-known member
Joined
Nov 19, 2015
Messages
199
Well I dunno. I could add a piece of bent rod as a bumper thing, but it's not much above the tires which will stick out a good 6 or 7 inches outside of the filler neck once they are back on the machine. I was kind of thinking that something would have to jut in past the tires but just over the top of them to contact this filler neck and while not impossible, maybe not very likely.
Plus, since the tank is a foot and a half below the neck and connected by rubber, it could totally rip off the filler neck unnoticed and still not spill fuel before I got to feel the dissapointment of having to go find the missing, buried neck I spent so much time making ;)
Does it seem to be a safety hazard? I could swear I've seen similar configurations on other machines, but sometimes I remember seeing things that were never there, so...
When I decided to locate the filler tube where I did, it was a matter of selecting a simple angle to work with (45°) while not interfering with other components like belts, hoses and stuff. Well it turns out that Gehl must have done a similar thing. Not saying it's correct or a good idea necessarily, but looky here what I found.
 photo Hydra-Mac8cS.jpg
I have "corrected" or improved several things thus far and nothing says their filler neck location, though updated from mine, won't cause a problem,. But it sure looks pretty close to where I ended up poking mine through. I thought I stuck mine out a bit further than maybe I should have, but theirs surprisingly (to me) looks about the same. So you think it might have enough potential for problem that I should address something? I'm getting dang tired of working on the dang thing, but it's still not painted yet either so...
 
OP
OP
vinito

vinito

Well-known member
Joined
Nov 19, 2015
Messages
199
When I decided to locate the filler tube where I did, it was a matter of selecting a simple angle to work with (45°) while not interfering with other components like belts, hoses and stuff. Well it turns out that Gehl must have done a similar thing. Not saying it's correct or a good idea necessarily, but looky here what I found.

I have "corrected" or improved several things thus far and nothing says their filler neck location, though updated from mine, won't cause a problem,. But it sure looks pretty close to where I ended up poking mine through. I thought I stuck mine out a bit further than maybe I should have, but theirs surprisingly (to me) looks about the same. So you think it might have enough potential for problem that I should address something? I'm getting dang tired of working on the dang thing, but it's still not painted yet either so...
Hey, maybe I could add some 1" thick fenders which would also boost my lifting capacity !!
OK that's a little goofy. I think I'm tired and punchy.
 

Tazza

Moderator
Staff member
Joined
Dec 7, 2004
Messages
16,838
Hey, maybe I could add some 1" thick fenders which would also boost my lifting capacity !!
OK that's a little goofy. I think I'm tired and punchy.
With the wheels on, it is pretty well protected, you'd have to have some bad luck to knock it off.
 
OP
OP
vinito

vinito

Well-known member
Joined
Nov 19, 2015
Messages
199
With the wheels on, it is pretty well protected, you'd have to have some bad luck to knock it off.
OK, glad you think it's good to go then. I'll just try not to run it with the wheels off ;)
I mostly glad that I won't be stepping back more. I already found out today that my lift arms are tweaked a little and I'll now have to spend more time on them, getting it tweaked back straight. Holy h*ll. I'm almost ready to just load everything in the truck and throw it off a cliff.
 

mmsllc

Well-known member
Joined
Dec 29, 2015
Messages
715
OK, glad you think it's good to go then. I'll just try not to run it with the wheels off ;)
I mostly glad that I won't be stepping back more. I already found out today that my lift arms are tweaked a little and I'll now have to spend more time on them, getting it tweaked back straight. Holy h*ll. I'm almost ready to just load everything in the truck and throw it off a cliff.
I can see where adding an external filler neck would be very ideal. Where was the fill point before adding the external neck? Did you have to open the rear door , or lift the cab just to add fuel??
 

Tazza

Moderator
Staff member
Joined
Dec 7, 2004
Messages
16,838
I can see where adding an external filler neck would be very ideal. Where was the fill point before adding the external neck? Did you have to open the rear door , or lift the cab just to add fuel??
Do you have a port-a power setup that you can use to spread the arms a little bit? Hopefully it will be an easy one to get right.
I wouldn't call it a step back, you are still moving forward.
 
OP
OP
vinito

vinito

Well-known member
Joined
Nov 19, 2015
Messages
199
Do you have a port-a power setup that you can use to spread the arms a little bit? Hopefully it will be an easy one to get right.
I wouldn't call it a step back, you are still moving forward.
The filler used to just stick straight up with a long pipe so you had to climb inside the cramped interior with a big gas can and lift it over the back of the seat to try to fill it while spilling as little as you could. Couldn't reach it from the back, and in fact the back door wasn't hinged until I added that a couple weeks ago, so it was bolt-off only, made even more difficult with the add-on weights hung over it.
Well Tazza, turns out that's about exactly what I'm going to do. At work we have a big welding table and we (I actually had some help) had it sitting on that clamped down to start tweaking when we noticed one of the arms was kinda warped, so dropped back and straightened that out first. Didn't help the twist any, but that's next on the agenda and will probably be straightened out tomorrow.
You're right, I guess all this is progress since it's fixing things that aren't right. It's just a little frustrating that I think I'm close to being "ready for paint" when I find one or few things more that need attention, constantly pushing the finish date back. A smart feller would have found that cliff I mentioned a way long time ago. It ain't quite lipstick on a pig - more like rocket surgery maybe.
 

mmsllc

Well-known member
Joined
Dec 29, 2015
Messages
715
The filler used to just stick straight up with a long pipe so you had to climb inside the cramped interior with a big gas can and lift it over the back of the seat to try to fill it while spilling as little as you could. Couldn't reach it from the back, and in fact the back door wasn't hinged until I added that a couple weeks ago, so it was bolt-off only, made even more difficult with the add-on weights hung over it.
Well Tazza, turns out that's about exactly what I'm going to do. At work we have a big welding table and we (I actually had some help) had it sitting on that clamped down to start tweaking when we noticed one of the arms was kinda warped, so dropped back and straightened that out first. Didn't help the twist any, but that's next on the agenda and will probably be straightened out tomorrow.
You're right, I guess all this is progress since it's fixing things that aren't right. It's just a little frustrating that I think I'm close to being "ready for paint" when I find one or few things more that need attention, constantly pushing the finish date back. A smart feller would have found that cliff I mentioned a way long time ago. It ain't quite lipstick on a pig - more like rocket surgery maybe.
I know the overwhelming sense of a huge project that seems to keep snow-balling. I think everything you are doing is going to help once it is finally going. It takes a ton of work to revive an older machine. It takes a lot of time to repair all of these issues. When you get done with it, it will be worth it. Try to take some time off of it for a little bit. I tend to be better off when I walk away every so often. Another huge stressor for me is when I am the only floating a huge repair bill / long list of parts / constant delays. It is so much harder to even have a schedule or finish time in mind because it simply adds as another stressor that can seem too much. So, don't drop it off a cliff. Do walk away from it. Do remember that it is going to be a BAD-@$$ when you get it right!!!
 
OP
OP
vinito

vinito

Well-known member
Joined
Nov 19, 2015
Messages
199
I know the overwhelming sense of a huge project that seems to keep snow-balling. I think everything you are doing is going to help once it is finally going. It takes a ton of work to revive an older machine. It takes a lot of time to repair all of these issues. When you get done with it, it will be worth it. Try to take some time off of it for a little bit. I tend to be better off when I walk away every so often. Another huge stressor for me is when I am the only floating a huge repair bill / long list of parts / constant delays. It is so much harder to even have a schedule or finish time in mind because it simply adds as another stressor that can seem too much. So, don't drop it off a cliff. Do walk away from it. Do remember that it is going to be a BAD-@$$ when you get it right!!!
I got the lift arms tweaked back straight today. I ended up using a small chain hoist rather than a porta-power because there wasn't anywhere convenient to push against. But once I figured out where to attach and pull from it wasn't too bad at all. Now the arms drop back into place pretty well centered. I would think that it shouldn't bend itself out like that in regular use too easily. I guess we'll find out eventually.
So I just have to weld in a little pipe coupler for the fuel pickup tube (I'm glad I remembered that before it got painted rather than realizing I forgot afterward) and it's ready to blast and paint.
Almost there guys.
Whew!
 
OP
OP
vinito

vinito

Well-known member
Joined
Nov 19, 2015
Messages
199
I got the lift arms tweaked back straight today. I ended up using a small chain hoist rather than a porta-power because there wasn't anywhere convenient to push against. But once I figured out where to attach and pull from it wasn't too bad at all. Now the arms drop back into place pretty well centered. I would think that it shouldn't bend itself out like that in regular use too easily. I guess we'll find out eventually.
So I just have to weld in a little pipe coupler for the fuel pickup tube (I'm glad I remembered that before it got painted rather than realizing I forgot afterward) and it's ready to blast and paint.
Almost there guys.
Whew!
OK. I surrender...
... to the painters baby!!
Dropped the parts off at the blasting booth. Woohooo!
I have a few pictures I can show but I don't have it together tonight. Next phase of pictures should be showing shiny new yellow paint on the sub-midget beast. Not sure how long it will take, but if they aren't already busy it will probably have a coat by Thursday. I'll let it sit there for a couple days or so for curing if they can spare the room, but if not I can haul it home and let it sit. That will be one of those things I'll have to keep going out to take a look at every half hour or so until it sinks in. Wow. Kind of like having a thorn pulled out of your foot. What a relief to finally be here.
Lots of work left, but it's all half-hour projects so it's all potential for instant gratification compared to the previous drawn out torture.
 

hydra-mac-8b

Member
Joined
Jun 13, 2016
Messages
7
OK. I surrender...
... to the painters baby!!
Dropped the parts off at the blasting booth. Woohooo!
I have a few pictures I can show but I don't have it together tonight. Next phase of pictures should be showing shiny new yellow paint on the sub-midget beast. Not sure how long it will take, but if they aren't already busy it will probably have a coat by Thursday. I'll let it sit there for a couple days or so for curing if they can spare the room, but if not I can haul it home and let it sit. That will be one of those things I'll have to keep going out to take a look at every half hour or so until it sinks in. Wow. Kind of like having a thorn pulled out of your foot. What a relief to finally be here.
Lots of work left, but it's all half-hour projects so it's all potential for instant gratification compared to the previous drawn out torture.
Looks like excellent progress. Can you tell me the part numbers/ types of valves you used in your main block? I am thinking of doing a similar thing to my Hydra Mac 8B. Thanks
 

Tazza

Moderator
Staff member
Joined
Dec 7, 2004
Messages
16,838
Looks like excellent progress. Can you tell me the part numbers/ types of valves you used in your main block? I am thinking of doing a similar thing to my Hydra Mac 8B. Thanks
This is where it gets fun, you get to watch as it all comes together to a machine that works just as it should.
 
OP
OP
vinito

vinito

Well-known member
Joined
Nov 19, 2015
Messages
199
Looks like excellent progress. Can you tell me the part numbers/ types of valves you used in your main block? I am thinking of doing a similar thing to my Hydra Mac 8B. Thanks
Here's a few "before" pics as promised. These are last minute snapshots of everything sitting in the blast room.
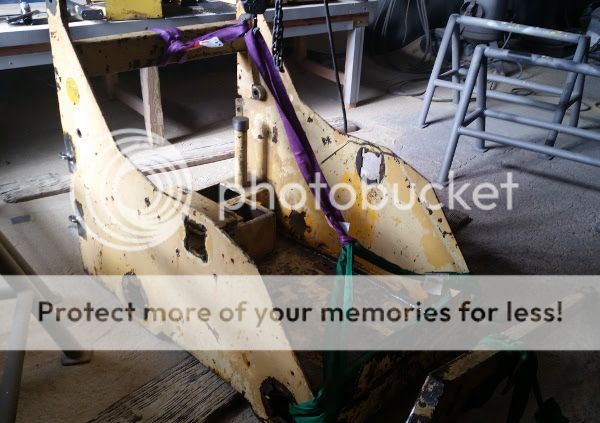
The tub:
 photo tub1.jpg
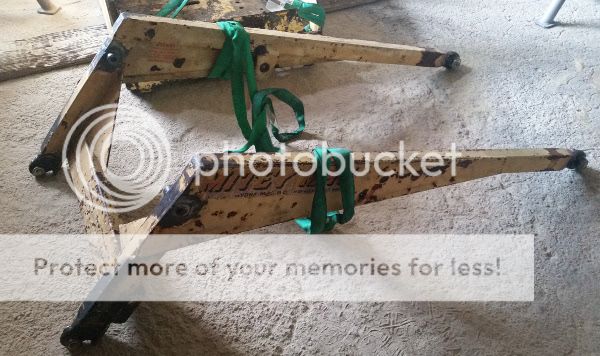
Lift arms:
 photo lift1.jpg
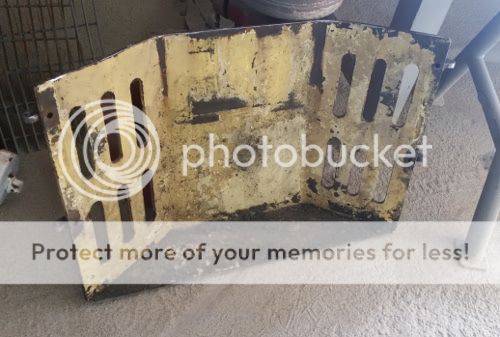
Back door:
 photo back1.jpg
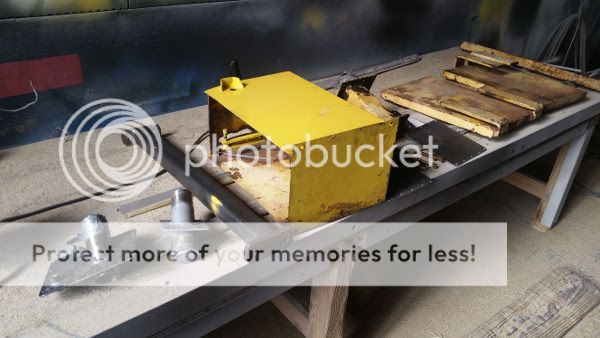
And the smaller parts:
 photo parts1.jpg
They said they'll start on it tomorrow, which I'm pretty sure means blast and prime. Then Friday it will get paint, and I guess it's complete that day apparently. So it can sit for the weekend and cure a bit and I'll be dragging it home with a chain on Monday... or more likely I'll nestle it in swaddling cotton balls safely in the bed of the truck.
The new valve was this one: (link) It's from Surplus Center and they have about the best price out there for this valve... I looked around. And they'll stand by it too like a good brick & mortar does, which for me means that I can return it if unmolested for any reason at all or if it's defective they'll replace it. So it's cheap with service is a good deal I think. I had it hooked up before I tore things all apart and it worked very well. Much nicer than the original, which admittedly had problems, but I liked the feel of it a fair bit better too.
For the spools I chose D section with float for one (for lift) and B section with spring to center for the other two (for tilt and aux.). Pretty standard for skidsteers, but there are several to choose from with other add-on options if you so desire. Also, since it's a stack, if you want to add another spool for some reason in the future or change the end blocks or whatever, you just buy what you need and a longer bolt kit if there are more sections, and you just slip it in and it will go right back together.
 

hydra-mac-8b

Member
Joined
Jun 13, 2016
Messages
7
Here's a few "before" pics as promised. These are last minute snapshots of everything sitting in the blast room.
The tub:

Lift arms:

Back door:

And the smaller parts:

They said they'll start on it tomorrow, which I'm pretty sure means blast and prime. Then Friday it will get paint, and I guess it's complete that day apparently. So it can sit for the weekend and cure a bit and I'll be dragging it home with a chain on Monday... or more likely I'll nestle it in swaddling cotton balls safely in the bed of the truck.
The new valve was this one: (link) It's from Surplus Center and they have about the best price out there for this valve... I looked around. And they'll stand by it too like a good brick & mortar does, which for me means that I can return it if unmolested for any reason at all or if it's defective they'll replace it. So it's cheap with service is a good deal I think. I had it hooked up before I tore things all apart and it worked very well. Much nicer than the original, which admittedly had problems, but I liked the feel of it a fair bit better too.
For the spools I chose D section with float for one (for lift) and B section with spring to center for the other two (for tilt and aux.). Pretty standard for skidsteers, but there are several to choose from with other add-on options if you so desire. Also, since it's a stack, if you want to add another spool for some reason in the future or change the end blocks or whatever, you just buy what you need and a longer bolt kit if there are more sections, and you just slip it in and it will go right back together.
Thanks for the info. I wish mine was ready for blasting. A guy can dream I guess.
 

Tazza

Moderator
Staff member
Joined
Dec 7, 2004
Messages
16,838
Thanks for the info. I wish mine was ready for blasting. A guy can dream I guess.
The first scratch is the hardest. After i painted my 743 that i built from the ground up, the first mark was followed with a few choice words, the others it got later weren't as bad :)
 
OP
OP
vinito

vinito

Well-known member
Joined
Nov 19, 2015
Messages
199
Thanks for the info. I wish mine was ready for blasting. A guy can dream I guess.
When I first bought this thing, I also assumed having it blasted and repainting was a long way off. It'd definitely for the feint of heart. But the difficult, tortuous part is over I think (hope). It was blasted on Thursday morning, then I guess they got tied up doing other stuff (the boss's personal stuff I think) and it sat through friday and this weekend. I hope efforts resume Monday morning. At any rate, I imagine that it will be painted and ready to bring home next weekend. In the meantime, there are a dozen (or maybe a dozen dozen?) smaller projects the machine needs done anyway so it doesn't really slow down anything at all. It's just a slight delay of that "ahh" feeling of seeing it painted which is not a big deal.
Tazza, I'm almost fully expecting that as clumsy as I can be, the machine will quite possibly get that first deep scratch or two even before it's put back together, hehe. Is there a such thing as pre-christening?
And what is culturally fitting for the christening of a skidsteer anyway. Champagne definitely doesn't fit. Maybe just a 40 of malt liquor?
 

Tazza

Moderator
Staff member
Joined
Dec 7, 2004
Messages
16,838
When I first bought this thing, I also assumed having it blasted and repainting was a long way off. It'd definitely for the feint of heart. But the difficult, tortuous part is over I think (hope). It was blasted on Thursday morning, then I guess they got tied up doing other stuff (the boss's personal stuff I think) and it sat through friday and this weekend. I hope efforts resume Monday morning. At any rate, I imagine that it will be painted and ready to bring home next weekend. In the meantime, there are a dozen (or maybe a dozen dozen?) smaller projects the machine needs done anyway so it doesn't really slow down anything at all. It's just a slight delay of that "ahh" feeling of seeing it painted which is not a big deal.
Tazza, I'm almost fully expecting that as clumsy as I can be, the machine will quite possibly get that first deep scratch or two even before it's put back together, hehe. Is there a such thing as pre-christening?
And what is culturally fitting for the christening of a skidsteer anyway. Champagne definitely doesn't fit. Maybe just a 40 of malt liquor?
Been there too, i marked things when putting it to gether, that is where an air brush comes in handy, touck up any bits you scratch, no one will ever know :)
Go the malt, as long as you plan on drinking it and not wasting smashing it over your fresh paint, just do it before you decide to give it it's maiden voyage or you may have more scratches to repair the next day.
 
OP
OP
vinito

vinito

Well-known member
Joined
Nov 19, 2015
Messages
199
Been there too, i marked things when putting it to gether, that is where an air brush comes in handy, touck up any bits you scratch, no one will ever know :)
Go the malt, as long as you plan on drinking it and not wasting smashing it over your fresh paint, just do it before you decide to give it it's maiden voyage or you may have more scratches to repair the next day.
I might could touch up, but it seems maybe a bit of a waste of time since I'm sure the thing will start to get marked pretty regularly just using it I would guess.
I started designing the pump mount today. It's prolly good to know dimensions of everything anyway, but it's been quite a project just drawing it up. I use CAD a lot at work so I laid it all out that way so I'd have a good idea where it all lines up and (hopefully) not screw up and miss something important. I will probably tighten it up a bit on the length - the spaces between pulleys & couplers is probably wider than it needs to be while still being easy enough to assemble. I'll do a quick trial & error on that before finalizing my dimensions.
 photo Motor Shaft Assy.jpg
This is to help align the mount for the add-on alternator as you can see. It will be a pretty simple pump/alternator bracket, but having to consider all the dimensions of everything makes it a bit of a head-scratcher. Drawing it up washes many of the doubts clean. The shaft adapter is part of this too (upper left). Once it's finalized, I can upload the real drawing somewhere if anybody wants me to.
 
OP
OP
vinito

vinito

Well-known member
Joined
Nov 19, 2015
Messages
199
I might could touch up, but it seems maybe a bit of a waste of time since I'm sure the thing will start to get marked pretty regularly just using it I would guess.
I started designing the pump mount today. It's prolly good to know dimensions of everything anyway, but it's been quite a project just drawing it up. I use CAD a lot at work so I laid it all out that way so I'd have a good idea where it all lines up and (hopefully) not screw up and miss something important. I will probably tighten it up a bit on the length - the spaces between pulleys & couplers is probably wider than it needs to be while still being easy enough to assemble. I'll do a quick trial & error on that before finalizing my dimensions.

This is to help align the mount for the add-on alternator as you can see. It will be a pretty simple pump/alternator bracket, but having to consider all the dimensions of everything makes it a bit of a head-scratcher. Drawing it up washes many of the doubts clean. The shaft adapter is part of this too (upper left). Once it's finalized, I can upload the real drawing somewhere if anybody wants me to.
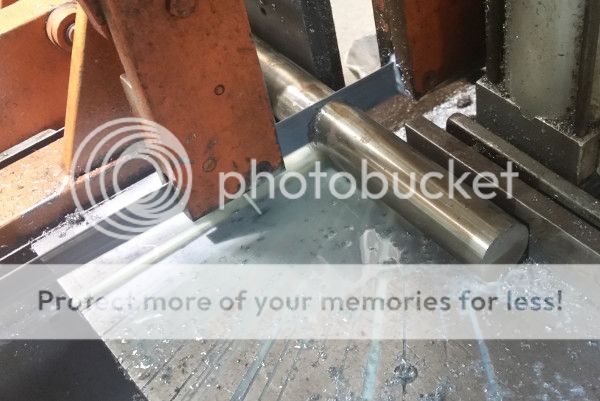
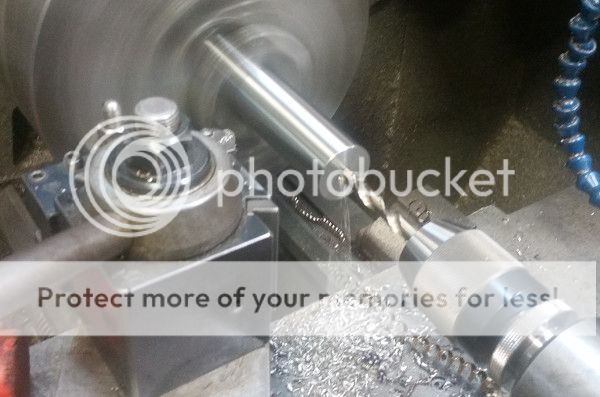
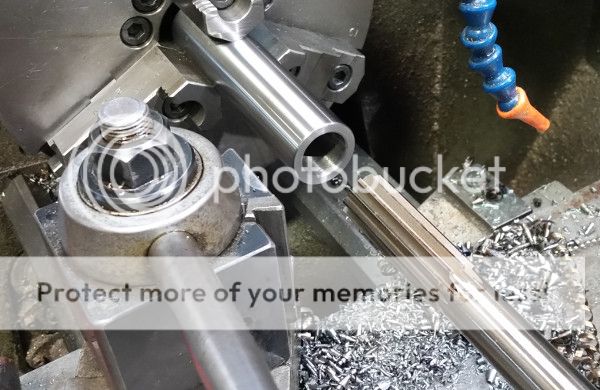
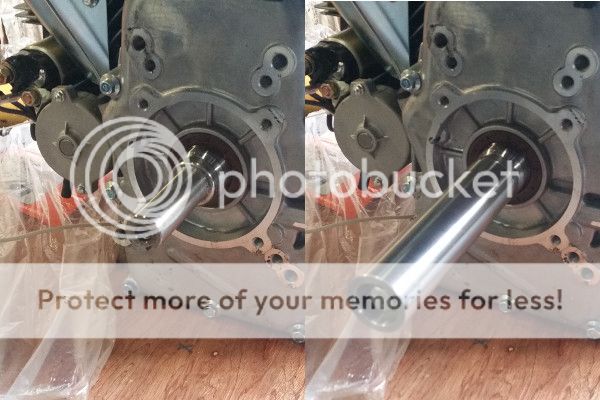
Started pm the shaft adapter for the new Predator repower today. Have to cut keyways and it will be done.
Saw raw material:
 photo 4_1.jpg
Faced to length, then drill pilot:
 photo 3_3.jpg
Drilled, then ream to 1":
 photo 2_4.jpg
Finish it up. Done except for keyways (ran out of time this afternoon. Going to see Joe Walsh & Bad Co. tonight). Stock on left, with adapter fitted on right:
 photo 1_5.jpg
This is all so the original 1-7/16" stuff will fit on the 1" Predator shaft. It's cheaper (free) than buying new pulley bushings and coupler halves, and was necessary anyway since the shaft has to be longer to accomodate the additional alternator pulley.
 
Top