Hydra Mac 8A (Gehl 2500) restoration... or "Oh No... What have I done?"

Help Support SkidSteer Forum:

vinito

Well-known member
Joined
Nov 19, 2015
Messages
199
I have a thread started for the hydrostat rebuild, but that has become a sub-project now so I thought I'd start a thread to document the full restoration.
I just snapped this photo !!
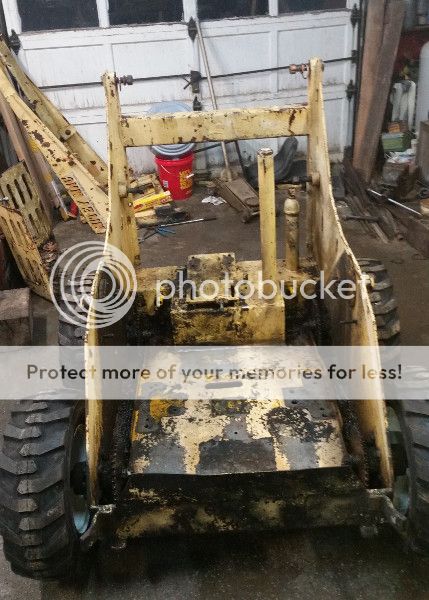
 photo Bare Shell1.jpg
What the hell have I done? !!!
The only reason the wheels are still there is it makes it handy to move around until I rig up some kind of dolly thing. I guess I've really stepped in it now, haven't I? Fortunately this little old machine is all pretty simple. There are a few ball pivots that I'm leaving alone because they are worn but not too awful. And for now I'm going to just tune the engine up a little and see if it lasts a couple seasons. I don't know if I'm deciding right, but rather than re-power it I think I might like to rebuild the old Onan instead maybe next winter. Feel free to advise me on that. I don't mind if the cost is kind of high IF the quality of the Onan is worth the effort. After all, it has lasted 40 years so far and it still operates the machine, though it is showing some minor signs of being a little tired (thus the rebuild plans).
Other than those two details, this thing is pretty much getting the complete mechanical once-over plus paint. I'm not going to give it a "show car" paint job, but it will be thorough. I've got the new valve stack and I'm working on rebuilding the hydrostats to work like new. The sprockets and chains will be replaced, new bearings on all the final drive stuff, new hoses save 3 that are obviously recent, new belt just because, new tires & wheels as mentioned before, the fuel pump and filter are hacky so I'll replace those and tidy it up along with all the wiring. Of course I still need to fabricate a ROPS. Uugh. If I can get a buddy to help I figure I'm looking at at least a couple weeks, otherwise probably more like 6 or so.
At least now I have reached a point where I can hardly dig in further and find more problems.
I tell ya, right now I feel like I need to join a support group or something. I'm a little depressed and a bit overwhelmed, but once it's back together this thing ought to be pretty sweet. I guess I'll be in a better mood then.
HELP !!!
 

Tazza

Moderator
Staff member
Joined
Dec 7, 2004
Messages
16,837
It's a good start, it will look great when you get some paint on it.
It doesn;t look like much when it's pulled down that far hey?
 
OP
OP
vinito

vinito

Well-known member
Joined
Nov 19, 2015
Messages
199
It's a good start, it will look great when you get some paint on it.
It doesn;t look like much when it's pulled down that far hey?
Not much of an update but I was jonesing to write something.
The machine is as apart as I want to get it so far, which is almost as much as I can get it. The only two bits unscathed are the engine (next winter's project... I hope) and the gear reduction boxes which seem to be in pretty good shape.
I ordered all the axle and idler bearings today totaling $200 which doesn't seem too bad for Timken rather than Chinese, that is, as long as Timken isn't Chinese now which isn't clear anymore. Back in the day those bearings would only have been $40 but I was bracing for $400 so I feel OK. I have all the parts for the hydrostats and they totaled similar but a little less. The valve and swash plates are OK but not perfect so I want to go ahead and lap them. Once that's done it's just a matter of making sure everythings nice and clean then lubed for assembling them back together. A complete set of sprocket blanks and chain will also cost another $200 which seems pretty good to me really. Of course if I couldn't do my own machining and welding to reuse the hubs & shafts that would be a bigger problem, but it's not, so...
I have a friend who has a pretty high pressure washer he uses to prep his big machinery to paint them and I'm hoping he doesn't mind if I use it to prep mine. That would be easier and more convenient than hauling it to the car wash to rush through. It's higher pressure than a car wash too so should do a better job of it. I've picked a color and type of paint. This machine will be stored inside most of the time and though I'm sure I'll use it often, it won't be anything near "professional" use so I'm just going to use Sunburst Yellow Rustoleum. It's not a show car so doesn't need $300 paint, and with the use it will see, even Rustoleum should look OK for at least a decade and maybe two.
I've been considering a couple upgrades but I'm not sure it would be worth it. I'd like to move the fuel filler to the side of the machine instead of straight up the middle of the cab. The fuel tank is welded into the thing though, all the way around every edge and corner, so the best way I figure I could do that is to cut a hole large enough to fit my hand through and close it back up with a cover plate & gasket I could attach stuff to, such as a rubber hose connecting the tank to the filler cap. If I did that, I could also get into the tank and clean it if necessary, which is impossible the way it is. I could also maybe find some kind of sending unit to put in it so I could put a fuel gauge on the ROPS somewhere. I think that would be very handy rather than just having it run dry in the wrong place and time every few starts. But like I said, I'm not sure that would be worth it or not, I mean it works now it just doesn't have any bells & whistles.
Well we'll see what I can get done in the next few days as long as the family stays relatively healthy and no other surprises pop up. There's been a whole lotta that recently.
Oh yea, I've been pretty good at taking the first hour in the shop to just pick an area to clean up and put stuff away, so I've been claiming more and more working space as I go. There'a s looong way to go with that but it's a TON better than it was a couple weeks ago.
 

SkidRoe

Well-known member
Joined
Dec 10, 2009
Messages
1,885
Not much of an update but I was jonesing to write something.
The machine is as apart as I want to get it so far, which is almost as much as I can get it. The only two bits unscathed are the engine (next winter's project... I hope) and the gear reduction boxes which seem to be in pretty good shape.
I ordered all the axle and idler bearings today totaling $200 which doesn't seem too bad for Timken rather than Chinese, that is, as long as Timken isn't Chinese now which isn't clear anymore. Back in the day those bearings would only have been $40 but I was bracing for $400 so I feel OK. I have all the parts for the hydrostats and they totaled similar but a little less. The valve and swash plates are OK but not perfect so I want to go ahead and lap them. Once that's done it's just a matter of making sure everythings nice and clean then lubed for assembling them back together. A complete set of sprocket blanks and chain will also cost another $200 which seems pretty good to me really. Of course if I couldn't do my own machining and welding to reuse the hubs & shafts that would be a bigger problem, but it's not, so...
I have a friend who has a pretty high pressure washer he uses to prep his big machinery to paint them and I'm hoping he doesn't mind if I use it to prep mine. That would be easier and more convenient than hauling it to the car wash to rush through. It's higher pressure than a car wash too so should do a better job of it. I've picked a color and type of paint. This machine will be stored inside most of the time and though I'm sure I'll use it often, it won't be anything near "professional" use so I'm just going to use Sunburst Yellow Rustoleum. It's not a show car so doesn't need $300 paint, and with the use it will see, even Rustoleum should look OK for at least a decade and maybe two.
I've been considering a couple upgrades but I'm not sure it would be worth it. I'd like to move the fuel filler to the side of the machine instead of straight up the middle of the cab. The fuel tank is welded into the thing though, all the way around every edge and corner, so the best way I figure I could do that is to cut a hole large enough to fit my hand through and close it back up with a cover plate & gasket I could attach stuff to, such as a rubber hose connecting the tank to the filler cap. If I did that, I could also get into the tank and clean it if necessary, which is impossible the way it is. I could also maybe find some kind of sending unit to put in it so I could put a fuel gauge on the ROPS somewhere. I think that would be very handy rather than just having it run dry in the wrong place and time every few starts. But like I said, I'm not sure that would be worth it or not, I mean it works now it just doesn't have any bells & whistles.
Well we'll see what I can get done in the next few days as long as the family stays relatively healthy and no other surprises pop up. There's been a whole lotta that recently.
Oh yea, I've been pretty good at taking the first hour in the shop to just pick an area to clean up and put stuff away, so I've been claiming more and more working space as I go. There'a s looong way to go with that but it's a TON better than it was a couple weeks ago.
Looks like your project is on it's way!! For clean-up, I like to use foaming engine degreaser, followed by the pressure washer hooked up to a hot water tap. Poor man's steam cleaner, and gets things squeaky clean. Cheers - SR
 
OP
OP
vinito

vinito

Well-known member
Joined
Nov 19, 2015
Messages
199
Looks like your project is on it's way!! For clean-up, I like to use foaming engine degreaser, followed by the pressure washer hooked up to a hot water tap. Poor man's steam cleaner, and gets things squeaky clean. Cheers - SR
The song remains the same...
I inspected a few things today and found a few sub-projects that need doing on the dang thing. Turns out that it would behoove me greatly to cut a large access hole and make a cover plate for both the fuel and hydraulic tanks. I stuck a metal rod down into the hydraulic tank and there is 1-1/2" of thick much on the bottom. I don't expect the fuel tank is quite that bad but there is absolutely no access in there so I can't tell either way. So I'm going to do add the access holes to both so I can get in and clean them up well. This also facilitates and easy way to extend the fuel filler to the side of the machine in stead of up the middle, as well as an easy way to add a fuel gauge sensor, which will be much liked by me. It will be nice to have it done, but it's more work.
Then I was looking at the pivot point where the back end of the arms mount and it dug deeply into the frame. Why it wore material away is kind of another matter, but what I found is that the width of the mounts on the arm ends is 3/8 wider than the frame. I checked it out and the frame is correct. So I guess I'll be cutting those ball joints off the arms and replacing them after all because not only are they worn anyway, but that will allow me to correct the width to be proper. They don't exactly look like they were replaced after-market, but they are definitely aren't attached with welding skills up to the level of the rest of the machine, so I guess it's been hacked in its life. So I'll just hack it better. Yea.... more, more work.
One step forward, two steps back. I'm hoping that if I just stay with it consistently, the damned thing will eventually be back together and working no matter what.
So I wonder what more work it needs that I will find tomorrow that I don't know about yet tonight. I'm sure it will be sumthin', er a few more sumthin's. Aaargh.
 

Tazza

Moderator
Staff member
Joined
Dec 7, 2004
Messages
16,837
The song remains the same...
I inspected a few things today and found a few sub-projects that need doing on the dang thing. Turns out that it would behoove me greatly to cut a large access hole and make a cover plate for both the fuel and hydraulic tanks. I stuck a metal rod down into the hydraulic tank and there is 1-1/2" of thick much on the bottom. I don't expect the fuel tank is quite that bad but there is absolutely no access in there so I can't tell either way. So I'm going to do add the access holes to both so I can get in and clean them up well. This also facilitates and easy way to extend the fuel filler to the side of the machine in stead of up the middle, as well as an easy way to add a fuel gauge sensor, which will be much liked by me. It will be nice to have it done, but it's more work.
Then I was looking at the pivot point where the back end of the arms mount and it dug deeply into the frame. Why it wore material away is kind of another matter, but what I found is that the width of the mounts on the arm ends is 3/8 wider than the frame. I checked it out and the frame is correct. So I guess I'll be cutting those ball joints off the arms and replacing them after all because not only are they worn anyway, but that will allow me to correct the width to be proper. They don't exactly look like they were replaced after-market, but they are definitely aren't attached with welding skills up to the level of the rest of the machine, so I guess it's been hacked in its life. So I'll just hack it better. Yea.... more, more work.
One step forward, two steps back. I'm hoping that if I just stay with it consistently, the damned thing will eventually be back together and working no matter what.
So I wonder what more work it needs that I will find tomorrow that I don't know about yet tonight. I'm sure it will be sumthin', er a few more sumthin's. Aaargh.
Think of it this way, it's better to fix all the worn parts now than find them later, after you have painted it. If you take your time, it will be an awesome machine when it's done.
As for bearings, they probably are made in china but i'd like to think they wouldn't risk their name by letting the quality go. I know other companies are getting their bearings made in china, but they ensure it's made to their strict quality control.
 
OP
OP
vinito

vinito

Well-known member
Joined
Nov 19, 2015
Messages
199
Think of it this way, it's better to fix all the worn parts now than find them later, after you have painted it. If you take your time, it will be an awesome machine when it's done.
As for bearings, they probably are made in china but i'd like to think they wouldn't risk their name by letting the quality go. I know other companies are getting their bearings made in china, but they ensure it's made to their strict quality control.
What is this? the "Keystone Cops"?
My buddy brought his "5000 psi" washer over today and turns out it's only 3000psi just like everybody else's. No big deal, it should still do the trick right? But only if it starts, which it wouldn't. No spark. And I'm just not going to spend a day fixing another tool project just so I can work on another, there's just been waaay too much of that already and I'm sick of it. SO I purchased one today which I will have to wait for a while to be delivered to the store for pickup. Not a big deal even ehough I was looking forward to starting on the body, but hell, there's a ton of other stuff to do anyway.
I guess I lied a little about fixing a tool, but I freshened up my parts washer (so at least it's my own tool) today and it was just replacing the hardened hoses and fix the leaky connections. That went smoothly at least, so now I don't have to haul stuff to work to wash parts. It was low on solvent and that stuff is priced through the roof these days. Last I bought some it was only $20 or so per 5-gal bucket (yea I'm old) and now it's over $80. But I found something good from the local Tractor Supply for half that and it works well. I like solvents best as I have never had much satisfaction from the tree-hugger cleaners. They don't factor in raising all the cows it takes to make the hamburgers to feed the worker burning calories using up all that unnecessary extra elbow grease, so the useless bio-safe cleaners are false economy anyway I think. So the parts cleaner is good to go again.
I guess attention will go back to the hydrostats which will feel good to get back together after all. And for today, there are plenty of things I can clean up in the parts washer, plus some ongoing garage organization I can do as well. So I'm now in a holding pattern on the repaint until I get the pressure washer. By the way, it's a 3600psi Generac, which I hope was a good choice. I can still return it if I change my mind for any reason, but a little online looking seemed to reveal that it's could be pretty good and have better staying power. A lot has been touted about their "professional grade triplex pump". I dunno what that even means, but that's what is on it and hopefully it's a thing.
@Tazza, that's what I was thinking about the bearings as well. There is a lot of crap and a lot of high wuality stuff coming from Asian manufacturers, and the difference is pretty much about the quality control. I'm pretty sure it was appropriate to go for the Timken.
This machine better be awesome when it's done. I'll have $40K of labor into it even if the parts only cost a couple grand, hehe.
 
OP
OP
vinito

vinito

Well-known member
Joined
Nov 19, 2015
Messages
199
What is this? the "Keystone Cops"?
My buddy brought his "5000 psi" washer over today and turns out it's only 3000psi just like everybody else's. No big deal, it should still do the trick right? But only if it starts, which it wouldn't. No spark. And I'm just not going to spend a day fixing another tool project just so I can work on another, there's just been waaay too much of that already and I'm sick of it. SO I purchased one today which I will have to wait for a while to be delivered to the store for pickup. Not a big deal even ehough I was looking forward to starting on the body, but hell, there's a ton of other stuff to do anyway.
I guess I lied a little about fixing a tool, but I freshened up my parts washer (so at least it's my own tool) today and it was just replacing the hardened hoses and fix the leaky connections. That went smoothly at least, so now I don't have to haul stuff to work to wash parts. It was low on solvent and that stuff is priced through the roof these days. Last I bought some it was only $20 or so per 5-gal bucket (yea I'm old) and now it's over $80. But I found something good from the local Tractor Supply for half that and it works well. I like solvents best as I have never had much satisfaction from the tree-hugger cleaners. They don't factor in raising all the cows it takes to make the hamburgers to feed the worker burning calories using up all that unnecessary extra elbow grease, so the useless bio-safe cleaners are false economy anyway I think. So the parts cleaner is good to go again.
I guess attention will go back to the hydrostats which will feel good to get back together after all. And for today, there are plenty of things I can clean up in the parts washer, plus some ongoing garage organization I can do as well. So I'm now in a holding pattern on the repaint until I get the pressure washer. By the way, it's a 3600psi Generac, which I hope was a good choice. I can still return it if I change my mind for any reason, but a little online looking seemed to reveal that it's could be pretty good and have better staying power. A lot has been touted about their "professional grade triplex pump". I dunno what that even means, but that's what is on it and hopefully it's a thing.
@Tazza, that's what I was thinking about the bearings as well. There is a lot of crap and a lot of high wuality stuff coming from Asian manufacturers, and the difference is pretty much about the quality control. I'm pretty sure it was appropriate to go for the Timken.
This machine better be awesome when it's done. I'll have $40K of labor into it even if the parts only cost a couple grand, hehe.
In case anybody has any thoughts/warnings about the pressure washer I picked:
http://www.generac.com/all-products/pressure-washers/professional-grade/3600psi-commercial-6855
If it's not a good pick, please let me know.
 

Tazza

Moderator
Staff member
Joined
Dec 7, 2004
Messages
16,837
In case anybody has any thoughts/warnings about the pressure washer I picked:
http://www.generac.com/all-products/pressure-washers/professional-grade/3600psi-commercial-6855
If it's not a good pick, please let me know.
Looks good to me, that is some good pressure, if it was hot it would be even better.
3,600 PSI is nothing to turn your nose up at. Mine does about 1,200 PSI i believe, it does pretty well, yours will do even better. WIth the right nozzle, the grease won't stand a chance.
I generally use diesel or old petrol/gas for cleaning parts. It's cheap and works pretty well.
 

jon_schram

Member
Joined
Feb 24, 2016
Messages
12
Looks good to me, that is some good pressure, if it was hot it would be even better.
3,600 PSI is nothing to turn your nose up at. Mine does about 1,200 PSI i believe, it does pretty well, yours will do even better. WIth the right nozzle, the grease won't stand a chance.
I generally use diesel or old petrol/gas for cleaning parts. It's cheap and works pretty well.
This is quite an ambitious project! Can't wait to see it completed. My Gehl 2500 is sitting in the grove after I punctured a hose cleaning up some old barbwire fence...hydraulic fluid EVERYWHERE. I haven't been ambitious enough to throw a new hose on yet, and here you've torn yours completely apart! Good luck man, and I can't wait to see the upgrades when they are done.
 
OP
OP
vinito

vinito

Well-known member
Joined
Nov 19, 2015
Messages
199
This is quite an ambitious project! Can't wait to see it completed. My Gehl 2500 is sitting in the grove after I punctured a hose cleaning up some old barbwire fence...hydraulic fluid EVERYWHERE. I haven't been ambitious enough to throw a new hose on yet, and here you've torn yours completely apart! Good luck man, and I can't wait to see the upgrades when they are done.
So that's where you've been Jon. I was looking forward to seeing yours with the new tires, but you went and got it stuck in the muck!
I don't know if this is any help, but so far the cheapest place I've found pre-made hose assemblies for standard-ish lengths is Surplus Center. I'm sure there are better hoses out there, but I picked up a couple from them for my auxiliary and they seem fine.
Click Here.
I nixed the pressure washer purchase for now. It's hard to read reviews on anything and not get shy to blow the money. I got cold feet - maybe I'll get one later for just general household use. BUT I have a likely line on just getting the thing sand blasted for free so I'm going to try to work that out over the next couple days. I never knew that restoring a toy would involve so much politics, negotiation and generally being social. I'm a hermit at heart and don't really like being around people much so it's wearing me out. But I think the end result might be worth it.
 
OP
OP
vinito

vinito

Well-known member
Joined
Nov 19, 2015
Messages
199
So that's where you've been Jon. I was looking forward to seeing yours with the new tires, but you went and got it stuck in the muck!
I don't know if this is any help, but so far the cheapest place I've found pre-made hose assemblies for standard-ish lengths is Surplus Center. I'm sure there are better hoses out there, but I picked up a couple from them for my auxiliary and they seem fine.
Click Here.
I nixed the pressure washer purchase for now. It's hard to read reviews on anything and not get shy to blow the money. I got cold feet - maybe I'll get one later for just general household use. BUT I have a likely line on just getting the thing sand blasted for free so I'm going to try to work that out over the next couple days. I never knew that restoring a toy would involve so much politics, negotiation and generally being social. I'm a hermit at heart and don't really like being around people much so it's wearing me out. But I think the end result might be worth it.
Seems like I only get two or three hour chunks of free time to work on the thing, and all my potential helpers are ghosts - I need a new set of friends... seriously.
But I did fill the tank with water in preparation for cutting a hole in it. Of course my die grinder went kaput right at the beginning of it so I switched to the sawzall which worked OK until the blade dulled, and all my blades are at my brother's house for a project of his. Anyway, I'll take another shot at it tomorrow.
But I did find that the condition of the gas tank is about as bad as the hydraulic tank. Looks like it's caked with rust, but the worst of it is the thing is completely welded into the frame so I can't do the typical "rotate the can around" thing with a sealer kit. I wonder if I just buy some good rubber gloves if it would do any good to spread the stuff around with a sponge or something (for "forever" I suppose until it's done). Every turn I take with this machine is a total pain in the A$$. I figure once I get the hole cut into it, I can get in there with a better die grinder and a ton of sanding wheels and clean it out the best I can. It's about 3/8" thick steel so there's not much chance of grinding through the tank walls. Then maybe I can do some kind of tank sealer thing. Anybody tried the POR 15 kits, and if so are they a good thing to do? Maybe if I clean it with the die grinder and sandpaper instead of chemically, I can just get the sealer? Whatever it takes to do it right. I just don't know what is right. Maybe there's a better fuel tank sealer product out there? Maybe it would be better not to use any of it? I could use some advice here if anybody knows sumthin'.
So tomorrow I'll should have an access hole in the gas tank and maybe the hydraulic tank too.
Oh, yea, I did get the official OkeeDokee to have the whole thing sand blasted fer nuthin, so at least that seems to be going right. That there is a pretty good windfall.
Sigh.... Well OK, more later. This is all really stale so far. I promise to have some actual progress to show with pictures as soon as possible.
 
OP
OP
vinito

vinito

Well-known member
Joined
Nov 19, 2015
Messages
199
Seems like I only get two or three hour chunks of free time to work on the thing, and all my potential helpers are ghosts - I need a new set of friends... seriously.
But I did fill the tank with water in preparation for cutting a hole in it. Of course my die grinder went kaput right at the beginning of it so I switched to the sawzall which worked OK until the blade dulled, and all my blades are at my brother's house for a project of his. Anyway, I'll take another shot at it tomorrow.
But I did find that the condition of the gas tank is about as bad as the hydraulic tank. Looks like it's caked with rust, but the worst of it is the thing is completely welded into the frame so I can't do the typical "rotate the can around" thing with a sealer kit. I wonder if I just buy some good rubber gloves if it would do any good to spread the stuff around with a sponge or something (for "forever" I suppose until it's done). Every turn I take with this machine is a total pain in the A$$. I figure once I get the hole cut into it, I can get in there with a better die grinder and a ton of sanding wheels and clean it out the best I can. It's about 3/8" thick steel so there's not much chance of grinding through the tank walls. Then maybe I can do some kind of tank sealer thing. Anybody tried the POR 15 kits, and if so are they a good thing to do? Maybe if I clean it with the die grinder and sandpaper instead of chemically, I can just get the sealer? Whatever it takes to do it right. I just don't know what is right. Maybe there's a better fuel tank sealer product out there? Maybe it would be better not to use any of it? I could use some advice here if anybody knows sumthin'.
So tomorrow I'll should have an access hole in the gas tank and maybe the hydraulic tank too.
Oh, yea, I did get the official OkeeDokee to have the whole thing sand blasted fer nuthin, so at least that seems to be going right. That there is a pretty good windfall.
Sigh.... Well OK, more later. This is all really stale so far. I promise to have some actual progress to show with pictures as soon as possible.
I wonder if it would be best to make a whole new tank and just cut this one out and toss it. IT actually might be easier than trying to salvage this one in place. I don't know.
 

Tazza

Moderator
Staff member
Joined
Dec 7, 2004
Messages
16,837
I wonder if it would be best to make a whole new tank and just cut this one out and toss it. IT actually might be easier than trying to salvage this one in place. I don't know.
If you have the gear, it may be best to make a new one. Best to do it right than have to do it later....
 
OP
OP
vinito

vinito

Well-known member
Joined
Nov 19, 2015
Messages
199
If you have the gear, it may be best to make a new one. Best to do it right than have to do it later....
Thanks Tazza. But today I caught a bit of luck finally. I brought my good tools home and it took just a few minutes with the right stuff to cut the access hole. And once open to better inspection, the inside of the tank is a LOT better than it looked at first. The bottom half is clean as a whistle, and the upper half has rust, but it's not bad at all, certainly much better than I thought it was. So I think I'll just get an angle die grinder in there to remove that rust, wash out the inside really good and get on with it. This is a big relief because I figured a couple full days work cutting the old out, designing and building a new one to fit right and installing it. Instead I think I'm looking at about an hour. Yaaay!
Also, more good news. The guy who offered to blast my machine for me assured me it would just be easier for them to paint it for me too instead of me having to do it. What the heck! I guess I'll let them do that, huh ?!!! Also, rather than rustoleum I was going to use, the paint they use (by the hundreds of gallons at a time, thus the reason this is an insignificant no-big-deal to them) is PSX and the stuff is some bad mutha shut-yo-mouth paint that stands up to about anything the world throws at it. It's good stuff. The only downside is it will be safety yellow instead of starburst yellow since that's what they've got. Oh, the humanity! I do believe I can live with that.
So I guess it's indeed darkest before the dawn. I just have to get the welding and stuff done that needs to happen before it's painted and it will just be a matter of trailering it to the blast booth and wait for a phone call a couple days or so later. These guys buzz like bee's wings so it's not a "round tuit" kind of situation. They'll have it done in a hurry. What a thing to have happen. I'm not used to this kind of good. I've done they guy several machining favors in the past so I guess it's just my turn.
Also, I actually assembled a part today! It's the first thing to go back together since I hooked up the auxiliary hydraulic system (before I took it all back apart). It was just a new bearing in a pulley thing that goes on one of the hydrostats, but it felt good to do some assembly for a change.
 

Tazza

Moderator
Staff member
Joined
Dec 7, 2004
Messages
16,837
Thanks Tazza. But today I caught a bit of luck finally. I brought my good tools home and it took just a few minutes with the right stuff to cut the access hole. And once open to better inspection, the inside of the tank is a LOT better than it looked at first. The bottom half is clean as a whistle, and the upper half has rust, but it's not bad at all, certainly much better than I thought it was. So I think I'll just get an angle die grinder in there to remove that rust, wash out the inside really good and get on with it. This is a big relief because I figured a couple full days work cutting the old out, designing and building a new one to fit right and installing it. Instead I think I'm looking at about an hour. Yaaay!
Also, more good news. The guy who offered to blast my machine for me assured me it would just be easier for them to paint it for me too instead of me having to do it. What the heck! I guess I'll let them do that, huh ?!!! Also, rather than rustoleum I was going to use, the paint they use (by the hundreds of gallons at a time, thus the reason this is an insignificant no-big-deal to them) is PSX and the stuff is some bad mutha shut-yo-mouth paint that stands up to about anything the world throws at it. It's good stuff. The only downside is it will be safety yellow instead of starburst yellow since that's what they've got. Oh, the humanity! I do believe I can live with that.
So I guess it's indeed darkest before the dawn. I just have to get the welding and stuff done that needs to happen before it's painted and it will just be a matter of trailering it to the blast booth and wait for a phone call a couple days or so later. These guys buzz like bee's wings so it's not a "round tuit" kind of situation. They'll have it done in a hurry. What a thing to have happen. I'm not used to this kind of good. I've done they guy several machining favors in the past so I guess it's just my turn.
Also, I actually assembled a part today! It's the first thing to go back together since I hooked up the auxiliary hydraulic system (before I took it all back apart). It was just a new bearing in a pulley thing that goes on one of the hydrostats, but it felt good to do some assembly for a change.
It's fairny normal for blasters to put at least a priming coat on the machine, this way it's not going to rust after being blasted. They will be all geared up to do the painting, so it would be easier and safer than you doing it. If it's two pack, that is some nasty stuff to put on, but it's tough stuff.
 
OP
OP
vinito

vinito

Well-known member
Joined
Nov 19, 2015
Messages
199
It's fairny normal for blasters to put at least a priming coat on the machine, this way it's not going to rust after being blasted. They will be all geared up to do the painting, so it would be easier and safer than you doing it. If it's two pack, that is some nasty stuff to put on, but it's tough stuff.
I was determined to make a little progress today, so I decided to start working on the hydrostat rebuld again. A while back I took apart the "extra" one I acquired, mostly for a little practice and to get a parts list together. Bonus that it turned out to be in really good condition with hardly any wear at all, so lots of good parts if I needed them. Today I took apart the two that came from the loader to make a good inspection. Turns out they weren't too bad. Just a couple parts that I think I'll go ahead and switch out with the new one, but those parts can be made well enough for later. I just figure I'll put the best of the crop back in the loader and the rest will be benched unless I need them.
I have some decent lapping equipment - small lapping plate and a good range of grits of compounds. So just to make it simple I picked 400 and 800 for rough and finish. I got through all but one cylinder assembly and it's all looking pretty good with just minimal material removal. This thing ought to scoot around like new.
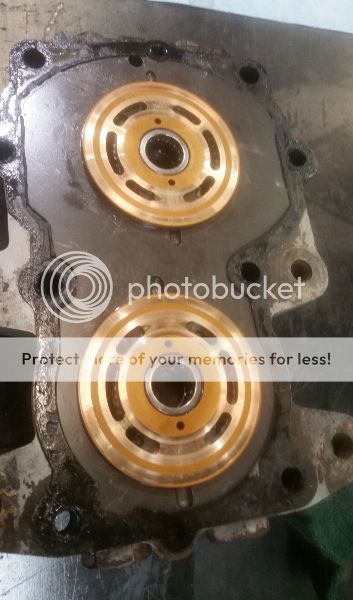
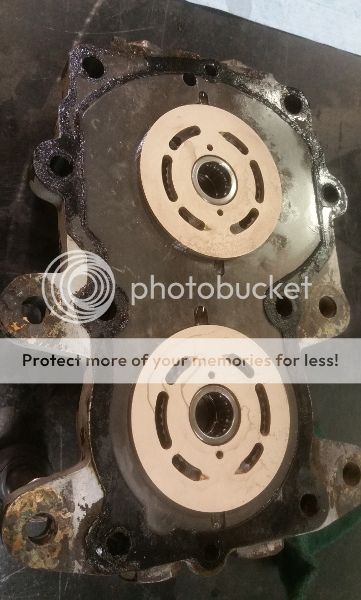
Here's a sample of a couple parts. It's the valve plates for one of the hydrostats.
Before on left: Not too bad but there is some wear just deep enough reduce performance slightly.
After lapping on right: The "spots" is just drip left after the solvent rinse dried. It's actually a flawless, flat bronze surface now. Sure looks purdy.
 photo Lap 1.jpg. . photo Lap 2.jpg
So there is a small pile of other stuff that has been lapped nicely. One more session of lapping and all the parts will be ready. I'll just have to clean the case, polish the seal areas of the shafts, install new bearings, seals and gaskets (all of which I've already amassed) and these babies will be ready to fill with oil and put into service.
I don't have pictures, but I've rebuilt the check and relief valves for one of the hydrostats already. They aren't bad at all and work like new now. As usual, the first one always takes longer so the other set will be quick and easy. It's really just replacing O-rings as long as the rest survives inspection, but you have to turn off a ridge using a lathe to access a cap, then TIG tack-weld that back on once it's all stacked back together. Still, it's pretty simple. I'll get some pictures of the next attempt.
All in all, these particular little hydrostats are extremely simple to work with without scrimping on quality. I was very surprised of the condition of them considering they've been used and put away wet since somewhere around 1974. This next phase should certainly outlast me.
 
OP
OP
vinito

vinito

Well-known member
Joined
Nov 19, 2015
Messages
199
I was determined to make a little progress today, so I decided to start working on the hydrostat rebuld again. A while back I took apart the "extra" one I acquired, mostly for a little practice and to get a parts list together. Bonus that it turned out to be in really good condition with hardly any wear at all, so lots of good parts if I needed them. Today I took apart the two that came from the loader to make a good inspection. Turns out they weren't too bad. Just a couple parts that I think I'll go ahead and switch out with the new one, but those parts can be made well enough for later. I just figure I'll put the best of the crop back in the loader and the rest will be benched unless I need them.
I have some decent lapping equipment - small lapping plate and a good range of grits of compounds. So just to make it simple I picked 400 and 800 for rough and finish. I got through all but one cylinder assembly and it's all looking pretty good with just minimal material removal. This thing ought to scoot around like new.
Here's a sample of a couple parts. It's the valve plates for one of the hydrostats.
Before on left: Not too bad but there is some wear just deep enough reduce performance slightly.
After lapping on right: The "spots" is just drip left after the solvent rinse dried. It's actually a flawless, flat bronze surface now. Sure looks purdy.
. .
So there is a small pile of other stuff that has been lapped nicely. One more session of lapping and all the parts will be ready. I'll just have to clean the case, polish the seal areas of the shafts, install new bearings, seals and gaskets (all of which I've already amassed) and these babies will be ready to fill with oil and put into service.
I don't have pictures, but I've rebuilt the check and relief valves for one of the hydrostats already. They aren't bad at all and work like new now. As usual, the first one always takes longer so the other set will be quick and easy. It's really just replacing O-rings as long as the rest survives inspection, but you have to turn off a ridge using a lathe to access a cap, then TIG tack-weld that back on once it's all stacked back together. Still, it's pretty simple. I'll get some pictures of the next attempt.
All in all, these particular little hydrostats are extremely simple to work with without scrimping on quality. I was very surprised of the condition of them considering they've been used and put away wet since somewhere around 1974. This next phase should certainly outlast me.
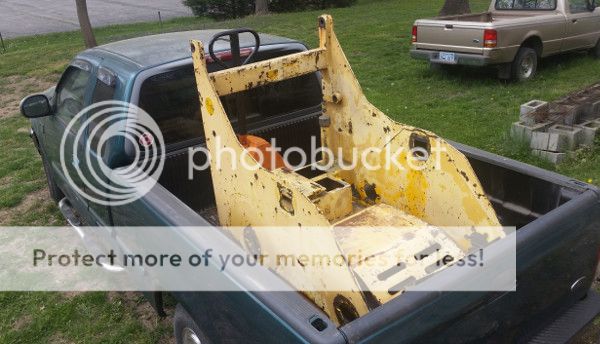
A lot of family stuff has been taking my time, but today I caught a little to work on the machine. Below you see it has been loaded into the bed of the pickup truck to transport to where I work since it can more easily and quickly do what I need to next. If you look close, you can see a couple holes I cut into the hydraulic and fuel tanks so I can reach in and get them clean. They both had a fair amount of muck and rust and no way to get in, so I just made myself some access. My only regret now is that I hope I didn't mess up the strength since it looks like the hydraulic tank was structural too, which is common but something I didn't think of 'til after I cut the holes. Regret is pretty common for me too.
But the vertical parts of the tank, which should be providing most of the gusset structure anyway, are untouched and there is still an inch or so of top remaining around the holes too. Just a feeling, but I think it should be OK. So today I'm going to make some covers with holes around the perimeter to cover these holes back up with a gasket sandwiched in. I also will be building up around the wallered bolt holes for the arm pivot and drilling them larger to fit the new ball joints, installing a fuel filler end on the side of the machine rather than the deep inside the middle arrangement it had before, then adding some hinge pins to the back cover to replace the straight bolt-on method it had before. Hopefully I'll finish this stuff today - it's mostly all a list of little projects.
Soon I'll do the next step, which is hauling the lift arms down to replace the worn ball ends and correct the length of the bolt-on cross member, which is 3/8" too long for some reason.
In the meantime, I'll figure out and install the gauge sensor stuff and then it should be ready to blast and paint. A lot of things to do, but hopefully it will go smooth and be ready for paint soon.
 photo truckin1.jpg
 

Tazza

Moderator
Staff member
Joined
Dec 7, 2004
Messages
16,837
A lot of family stuff has been taking my time, but today I caught a little to work on the machine. Below you see it has been loaded into the bed of the pickup truck to transport to where I work since it can more easily and quickly do what I need to next. If you look close, you can see a couple holes I cut into the hydraulic and fuel tanks so I can reach in and get them clean. They both had a fair amount of muck and rust and no way to get in, so I just made myself some access. My only regret now is that I hope I didn't mess up the strength since it looks like the hydraulic tank was structural too, which is common but something I didn't think of 'til after I cut the holes. Regret is pretty common for me too.
But the vertical parts of the tank, which should be providing most of the gusset structure anyway, are untouched and there is still an inch or so of top remaining around the holes too. Just a feeling, but I think it should be OK. So today I'm going to make some covers with holes around the perimeter to cover these holes back up with a gasket sandwiched in. I also will be building up around the wallered bolt holes for the arm pivot and drilling them larger to fit the new ball joints, installing a fuel filler end on the side of the machine rather than the deep inside the middle arrangement it had before, then adding some hinge pins to the back cover to replace the straight bolt-on method it had before. Hopefully I'll finish this stuff today - it's mostly all a list of little projects.
Soon I'll do the next step, which is hauling the lift arms down to replace the worn ball ends and correct the length of the bolt-on cross member, which is 3/8" too long for some reason.
In the meantime, I'll figure out and install the gauge sensor stuff and then it should be ready to blast and paint. A lot of things to do, but hopefully it will go smooth and be ready for paint soon.
The image didn't work :(
I'd doubt that the parts you cut will weaken it too much. As you do need to weld them back up to hold fluid again.
 
Top