Hydra Mac 8A (Gehl 2500) restoration... or "Oh No... What have I done?"

Help Support SkidSteer Forum:

OP
OP
vinito

vinito

Well-known member
Joined
Nov 19, 2015
Messages
199
The image didn't work :(
I'd doubt that the parts you cut will weaken it too much. As you do need to weld them back up to hold fluid again.
Hmmm. Photobucket has been down all weekend. Hopefully it will be fixed - I've been using it to host my pictures for years so it will create a ton of broken links if it got nuked.
I accomplished several things this weekend. Sorry I can't show a pic right now. I made all three tank covers, straightened a bunch of bent stuff and welded several cracks, built and welded in some hinge pins and latches for the back door (just like the BIG boys not, hehe). I filled the wallered out faces for the arm pivots and a few other tidbits.
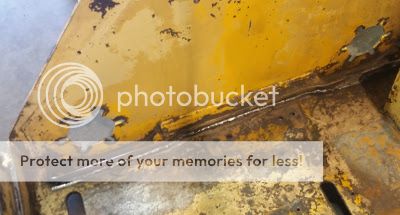
One thing I think might help a lot is that there is about a 1/8" strap 3/4" wide that runs on edge along the chain "well". Turns out it is only tack welded in a few places so it functions as more just a bumper for the bottom of the fiberglass chain cover. This means that if water or anything else gets on the floor of the machine, it can just seep under the strap and get into the chain oil cavities, so I just ran a bead all along the length to seal it up. Honestly I don't see much function for the strap if it isn't sealed, so now it is and that may do a good job of keeping most any chance of water and dirt from getting into the chain "sump" area.
So I didn't complete what I hoped to, which was to get all the welding complete so I could start prepping for paint. But it's a fairly short list remaining. 1) have to drill the arm pivot holes to match the new ball joint bolt hole size 2) cut a hole and weld an angled fuel filler end to the side of the machine and make and weld the fuel filler hose fitting to the lid I made today and 3) weld on the 2 pairs of new ball joints to the opposite ends of the lift arm. That seems like a pretty short list after what I've been looking at. It's another day's work so it will probably have to wait until next Saturday. But I'll yell "woohoo!" once that's done because the next step is PAINT baby! And we all know that once it gets painted, it's mostly just putting things back together. What a treat that will be!
I'll post a couple pictures once (if?) photobucket get's their chitlins together.
 

Tazza

Moderator
Staff member
Joined
Dec 7, 2004
Messages
16,838
Hmmm. Photobucket has been down all weekend. Hopefully it will be fixed - I've been using it to host my pictures for years so it will create a ton of broken links if it got nuked.
I accomplished several things this weekend. Sorry I can't show a pic right now. I made all three tank covers, straightened a bunch of bent stuff and welded several cracks, built and welded in some hinge pins and latches for the back door (just like the BIG boys not, hehe). I filled the wallered out faces for the arm pivots and a few other tidbits.
One thing I think might help a lot is that there is about a 1/8" strap 3/4" wide that runs on edge along the chain "well". Turns out it is only tack welded in a few places so it functions as more just a bumper for the bottom of the fiberglass chain cover. This means that if water or anything else gets on the floor of the machine, it can just seep under the strap and get into the chain oil cavities, so I just ran a bead all along the length to seal it up. Honestly I don't see much function for the strap if it isn't sealed, so now it is and that may do a good job of keeping most any chance of water and dirt from getting into the chain "sump" area.
So I didn't complete what I hoped to, which was to get all the welding complete so I could start prepping for paint. But it's a fairly short list remaining. 1) have to drill the arm pivot holes to match the new ball joint bolt hole size 2) cut a hole and weld an angled fuel filler end to the side of the machine and make and weld the fuel filler hose fitting to the lid I made today and 3) weld on the 2 pairs of new ball joints to the opposite ends of the lift arm. That seems like a pretty short list after what I've been looking at. It's another day's work so it will probably have to wait until next Saturday. But I'll yell "woohoo!" once that's done because the next step is PAINT baby! And we all know that once it gets painted, it's mostly just putting things back together. What a treat that will be!
I'll post a couple pictures once (if?) photobucket get's their chitlins together.
The links work now :)
Lots of little things to do before it starts to really look like you are getting somewhere hey? I found welding cracks to take up a fair bit of time. I had one machine that had a good 3m or so of cracks just in the lift arms, sure was beat up. I cut the cracks with the plasma, then welded them up.
 
OP
OP
vinito

vinito

Well-known member
Joined
Nov 19, 2015
Messages
199
The links work now :)
Lots of little things to do before it starts to really look like you are getting somewhere hey? I found welding cracks to take up a fair bit of time. I had one machine that had a good 3m or so of cracks just in the lift arms, sure was beat up. I cut the cracks with the plasma, then welded them up.
Some pics.
First is one of my sloppy bead welded to the strap. I'm normally not this bad, but the MIG was acting up. Worked good enough to get it over with.
 photo seam.jpg
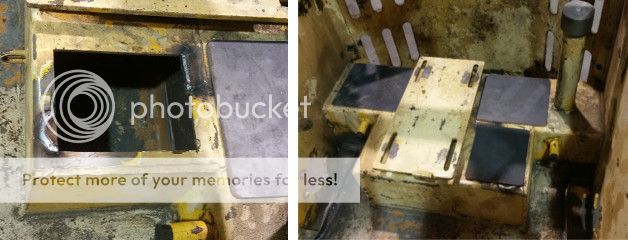
Here's one of the replacement covers. I'm just going to make gaskets then drill & tap for close-spaced bolts. The way the machine is made and as light-duty (relatively) as it is, I don't think it will disturb the structure. Just a feeling because the math would be too hard, but I think it will work OK, and it makes it easy to gain access later.
 photo 1_4.jpg
Left is the fuel tank where I had to cut past the hole to remove some previous fittings, shown with the patches welded in but not smoothed down yet. Right is the placement of all three 3/16" thick cover plates over their respective holes. Note that the fuel tank provides no structure except for itself anyway and all vertical surfaces (which provides the "gusset" structure) of the hydraulic tank behind it are unchanged.
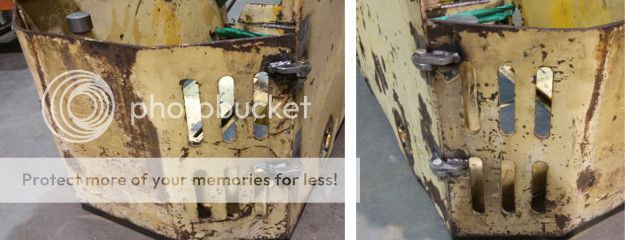
Last is the back door. Left picture is the right side and on right is the left, hehe. I'm putting the hinges on the right side and latch pins on the left, but actually it could be switched by mirroring the bolts if a guy wanted to.
 photo 2_3.jpg
So that's it for now. In a few days I'll finish up the fuel filler stuff and the lift arms, then it's about time for paint.
 

Tazza

Moderator
Staff member
Joined
Dec 7, 2004
Messages
16,838
Some pics.
First is one of my sloppy bead welded to the strap. I'm normally not this bad, but the MIG was acting up. Worked good enough to get it over with.

Here's one of the replacement covers. I'm just going to make gaskets then drill & tap for close-spaced bolts. The way the machine is made and as light-duty (relatively) as it is, I don't think it will disturb the structure. Just a feeling because the math would be too hard, but I think it will work OK, and it makes it easy to gain access later.

Left is the fuel tank where I had to cut past the hole to remove some previous fittings, shown with the patches welded in but not smoothed down yet. Right is the placement of all three 3/16" thick cover plates over their respective holes. Note that the fuel tank provides no structure except for itself anyway and all vertical surfaces (which provides the "gusset" structure) of the hydraulic tank behind it are unchanged.
Last is the back door. Left picture is the right side and on right is the left, hehe. I'm putting the hinges on the right side and latch pins on the left, but actually it could be switched by mirroring the bolts if a guy wanted to.

So that's it for now. In a few days I'll finish up the fuel filler stuff and the lift arms, then it's about time for paint.
I've laid worse welds than that before, don't be concerned as long as it holds :) My mig can be fussy too, the the steel isn't spotless you get rough welds. Even if the handpiece hose isn't straight enough and has a bend or two, you can get the wire jumping.
I spent years not using my MIG much over my stick welder, i now do the opposite, the MIG is my go to welder.
 
OP
OP
vinito

vinito

Well-known member
Joined
Nov 19, 2015
Messages
199
I've laid worse welds than that before, don't be concerned as long as it holds :) My mig can be fussy too, the the steel isn't spotless you get rough welds. Even if the handpiece hose isn't straight enough and has a bend or two, you can get the wire jumping.
I spent years not using my MIG much over my stick welder, i now do the opposite, the MIG is my go to welder.

Yea I think that could be what was heppening. When the line would bend a little sharper, it would start feeding kinda sticky.
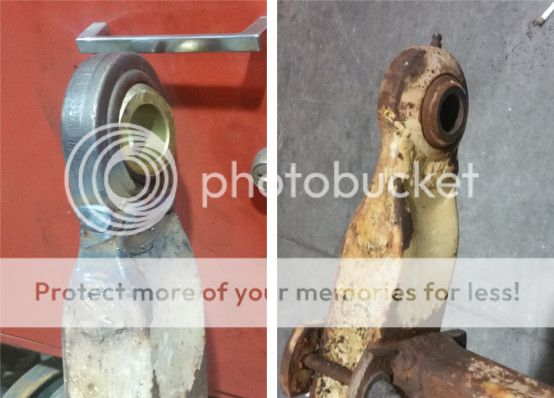
Fabricating isn't my forte so it goes really slow for me. But today I was able to weld on two of the ball ends to the lift arms.
 photo Ends.jpg
I keep messing up my picture order. Before is on the right and after on the left. If it lookes crooked, that's an optical delusion. The ball ends are teardrop shaped so I aligned one side flush to the opposite face and the angled face tilts toward the opposite face, which matched the original ones and it worked out pretty well. My welds still aren't great but they were much better today. It took 3+1 passes and the last one I did wide and flat just to smooth it out. The root passes were 100% penetration so I'm confident it should work fine. Still have to weld the ball ends to the other end of the lift arms. These two got me primed so the next ones ought to go a little faster, though the cutting will be a little more complex so we'll see how that works out.
True to form, I noticed that one of the lift cylinder mount holes was egged out pretty bad and both of them are beat up more than I like. I'll just remake and replace them both.
So would it have been easier just to make my own skidsteer from scratch? Every little thing on this machine was beat to death. Sigh.
 

Tazza

Moderator
Staff member
Joined
Dec 7, 2004
Messages
16,838
Yea I think that could be what was heppening. When the line would bend a little sharper, it would start feeding kinda sticky.
Fabricating isn't my forte so it goes really slow for me. But today I was able to weld on two of the ball ends to the lift arms.

I keep messing up my picture order. Before is on the right and after on the left. If it lookes crooked, that's an optical delusion. The ball ends are teardrop shaped so I aligned one side flush to the opposite face and the angled face tilts toward the opposite face, which matched the original ones and it worked out pretty well. My welds still aren't great but they were much better today. It took 3+1 passes and the last one I did wide and flat just to smooth it out. The root passes were 100% penetration so I'm confident it should work fine. Still have to weld the ball ends to the other end of the lift arms. These two got me primed so the next ones ought to go a little faster, though the cutting will be a little more complex so we'll see how that works out.
True to form, I noticed that one of the lift cylinder mount holes was egged out pretty bad and both of them are beat up more than I like. I'll just remake and replace them both.
So would it have been easier just to make my own skidsteer from scratch? Every little thing on this machine was beat to death. Sigh.
It never ends does it?
There are days that I feel I could have saved time by just starting from scratch too. But you can fix these things as you go, at least you found it now and not after it was painted, ready to assemble.
 

mmsllc

Well-known member
Joined
Dec 29, 2015
Messages
715
It never ends does it?
There are days that I feel I could have saved time by just starting from scratch too. But you can fix these things as you go, at least you found it now and not after it was painted, ready to assemble.
Was this machine a rental unit or a farmer's?? Either way, you are now finding all of the failure prone areas of this machine. I think that once you get it back together, you will notice a huge improvement over what it was before you started.
 
OP
OP
vinito

vinito

Well-known member
Joined
Nov 19, 2015
Messages
199
Was this machine a rental unit or a farmer's?? Either way, you are now finding all of the failure prone areas of this machine. I think that once you get it back together, you will notice a huge improvement over what it was before you started.
Yea you're probably right. Makes me wish I had left it functional longer and used it a bit more so I could better remember the old condition and better appreciate the improvement.
By the way, I've run into a decent deal on a new engine which might suit this machine OK, so I may be looking at a repower on top of everything else. But because the original engine needed a few things anyway if I continued using it, and because I was going to extend the throttle and choke up front somewhere anyway, and the new one shouldn't need much more than a shaft adapter and maybe a simple riser, the repower would be about as much work as not and very likely to run better. It's just a Predator V-twin so I won't have the ideal amperage output. But I can't imagine that for my use I'd need lights much at all and they could run off what's in the battery for a while. Hopefully it will put out enough to run a couple gauges because that's about all the additional load it should have beyond starting and keeping itself running. If it's a problem, I'll deal with that then. If nothing else, this engine could buy me a couple years or so for me to diddle with the Onan in no hurry and make it strong again. Things are always cheaper when you're not in a rush.
I'm hoping to dig back into the lift arms and have them complete Saturday and spend this Sunday trying to complete the remaining bits of the chassis, which is possible if new commitments don't pop up between now and then. Wish me luck.
 

Brad460

Member
Joined
Mar 13, 2016
Messages
12
Yea you're probably right. Makes me wish I had left it functional longer and used it a bit more so I could better remember the old condition and better appreciate the improvement.
By the way, I've run into a decent deal on a new engine which might suit this machine OK, so I may be looking at a repower on top of everything else. But because the original engine needed a few things anyway if I continued using it, and because I was going to extend the throttle and choke up front somewhere anyway, and the new one shouldn't need much more than a shaft adapter and maybe a simple riser, the repower would be about as much work as not and very likely to run better. It's just a Predator V-twin so I won't have the ideal amperage output. But I can't imagine that for my use I'd need lights much at all and they could run off what's in the battery for a while. Hopefully it will put out enough to run a couple gauges because that's about all the additional load it should have beyond starting and keeping itself running. If it's a problem, I'll deal with that then. If nothing else, this engine could buy me a couple years or so for me to diddle with the Onan in no hurry and make it strong again. Things are always cheaper when you're not in a rush.
I'm hoping to dig back into the lift arms and have them complete Saturday and spend this Sunday trying to complete the remaining bits of the chassis, which is possible if new commitments don't pop up between now and then. Wish me luck.
Great thread..love these restorations. I have a 1992 Gehl 4625 I plan on restoring later this summer after I am done landscaping my yard. I'll be following this one for some tips. That PSX sounds like a very robust paint from what I find online- let use know which color code you use and how well it matches the original Gehl yellow..
 
OP
OP
vinito

vinito

Well-known member
Joined
Nov 19, 2015
Messages
199
Great thread..love these restorations. I have a 1992 Gehl 4625 I plan on restoring later this summer after I am done landscaping my yard. I'll be following this one for some tips. That PSX sounds like a very robust paint from what I find online- let use know which color code you use and how well it matches the original Gehl yellow..
Thanks. Yea I've been around that PSX paint and it's amazing stuff. I hope it works out. But if it does, unfortunately I won't have much choice on the color since it will be the excess left over after their commercial work, so it will just be safety yellow. On the flip side, if it doesn't work out then I'll be painting it myself and using Rustoleum or the stuff they sell at Tractor Supply, which would still be fine if not as bulletproof and I can pick whatever colors they offer. But the safety yellow PSX is more likely. There are so many layers and colors of faded paint on this machine that there isn't much of anything to match, so I don't think I'd be much help there anyway.
I have new inspiration to get this thing done soon as possible. I picked up a hoe attachment yesterday !!! You never know until you actually try it of course, but it appears that I will just be able to hook it up and put it to work. And obviously I can't try this thing out at all until the machine is running again. I'm chomping at the bit. It seems like a good size match for this little machine.
This weekend has proven to be short on free time as usual. There was a bad news family crisis yet again - those are waaay to frequent for us lately and I'd really like to not go through any more for a while. All of us could use a break from that just to settle in for a bit - maybe we've met our quota and have some calm seas once we get pas this one.
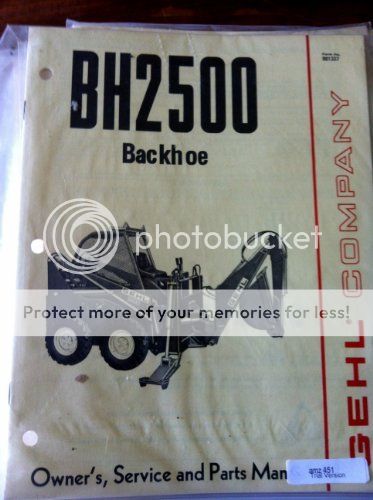
Here's a pic of the manual cover for the one that's made for this machine:
 photo BH 1.jpg
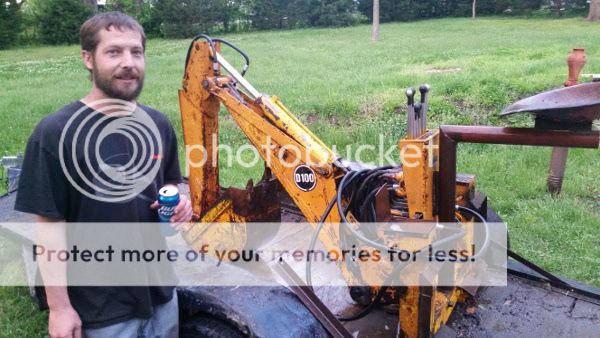
And here's the one I just brought home with my cousin standing next to it for some sense of scale:
 photo hoe1.jpg
Looks like the boom and bucket are pretty dang similar.
Whadda ya think?
 

Brad460

Member
Joined
Mar 13, 2016
Messages
12
Thanks. Yea I've been around that PSX paint and it's amazing stuff. I hope it works out. But if it does, unfortunately I won't have much choice on the color since it will be the excess left over after their commercial work, so it will just be safety yellow. On the flip side, if it doesn't work out then I'll be painting it myself and using Rustoleum or the stuff they sell at Tractor Supply, which would still be fine if not as bulletproof and I can pick whatever colors they offer. But the safety yellow PSX is more likely. There are so many layers and colors of faded paint on this machine that there isn't much of anything to match, so I don't think I'd be much help there anyway.
I have new inspiration to get this thing done soon as possible. I picked up a hoe attachment yesterday !!! You never know until you actually try it of course, but it appears that I will just be able to hook it up and put it to work. And obviously I can't try this thing out at all until the machine is running again. I'm chomping at the bit. It seems like a good size match for this little machine.
This weekend has proven to be short on free time as usual. There was a bad news family crisis yet again - those are waaay to frequent for us lately and I'd really like to not go through any more for a while. All of us could use a break from that just to settle in for a bit - maybe we've met our quota and have some calm seas once we get pas this one.
Here's a pic of the manual cover for the one that's made for this machine:

And here's the one I just brought home with my cousin standing next to it for some sense of scale:

Looks like the boom and bucket are pretty dang similar.
Whadda ya think?
Nice score on the back hoe attachment! I can think of a lot of uses for that thing!
 
OP
OP
vinito

vinito

Well-known member
Joined
Nov 19, 2015
Messages
199
Nice score on the back hoe attachment! I can think of a lot of uses for that thing!
It's been a long dry spell. Haven't had a minute of free time for weeks now. But today some progress was made finally.
The lift arms were just clapped out, so now the ball joint ends and the cylinder bolt hole have been replaced with new minty steel. It's been quite the rarity with this project to be able to say anything at all is "done", but it looks like at least the lift arms are at least structurally complete. It was a simple project, but it just took forever to get around to it. Just needs paint now.
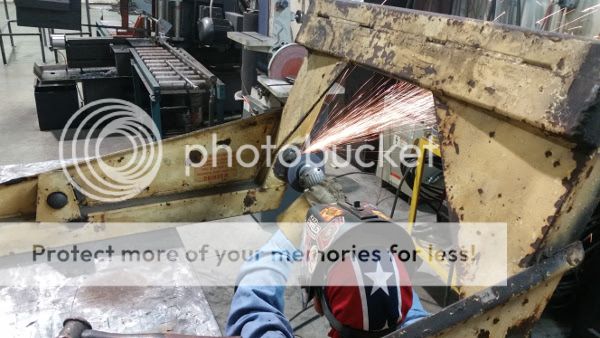
I wasn't very good at taking pics today, but I can snap some "after" pics later and show you how it turned out. The following one is a shot of grinding the culinder mount tube off in preparation for welding a new replacement in. The new part was a simple lathe project - pretty much a straight steel bushing.
 photo LA1.jpg
Hopefully more progress to show soon.
 
OP
OP
vinito

vinito

Well-known member
Joined
Nov 19, 2015
Messages
199
It's been a long dry spell. Haven't had a minute of free time for weeks now. But today some progress was made finally.
The lift arms were just clapped out, so now the ball joint ends and the cylinder bolt hole have been replaced with new minty steel. It's been quite the rarity with this project to be able to say anything at all is "done", but it looks like at least the lift arms are at least structurally complete. It was a simple project, but it just took forever to get around to it. Just needs paint now.
I wasn't very good at taking pics today, but I can snap some "after" pics later and show you how it turned out. The following one is a shot of grinding the culinder mount tube off in preparation for welding a new replacement in. The new part was a simple lathe project - pretty much a straight steel bushing.

Hopefully more progress to show soon.
Just a quick, boring update.
I finished carefully flattening the welded repairs on the tub today. It's getting closer to paint time, and turning out pretty good. Next on the list, and about the last step before blasting, is to arrange the fuel filler hose ends.... hmmmm. Yep, that's about it! Blast and paint should start this week. Holy cow!
There's an upcoming machining project with the axles which should prove to be kind of educational and informative. But they aren't needed until a few steps into re-assembly. Plus I machine stuff for a living and it will be straightforward to get it done even if it's not a totally simple project.
Oh yea... yesterday I checked out the new engine, filled with oil, wired, hooked up fuel and started it up for a bench test. It runs just fine. Very well really. I read several reports that they are assembled at the factory with the valve gap set too close, and sure enough mine was too. Apparently that screws up the idle and whatever you would expect from being out of adjustment. So before I even tried it I got in there and set them right and it just fired right up and ran as good as I could have wanted. I think I'll like this new engine too even if it is rated a couple horsepower lower than the original. Gives me some comfortable breathing room for powering it anyway. I will probably arrange an extra pulley on it in the likely event I'll want to add an alternator. At least that way it will be extra simple to add it in later.
 

Brad460

Member
Joined
Mar 13, 2016
Messages
12
Just a quick, boring update.
I finished carefully flattening the welded repairs on the tub today. It's getting closer to paint time, and turning out pretty good. Next on the list, and about the last step before blasting, is to arrange the fuel filler hose ends.... hmmmm. Yep, that's about it! Blast and paint should start this week. Holy cow!
There's an upcoming machining project with the axles which should prove to be kind of educational and informative. But they aren't needed until a few steps into re-assembly. Plus I machine stuff for a living and it will be straightforward to get it done even if it's not a totally simple project.
Oh yea... yesterday I checked out the new engine, filled with oil, wired, hooked up fuel and started it up for a bench test. It runs just fine. Very well really. I read several reports that they are assembled at the factory with the valve gap set too close, and sure enough mine was too. Apparently that screws up the idle and whatever you would expect from being out of adjustment. So before I even tried it I got in there and set them right and it just fired right up and ran as good as I could have wanted. I think I'll like this new engine too even if it is rated a couple horsepower lower than the original. Gives me some comfortable breathing room for powering it anyway. I will probably arrange an extra pulley on it in the likely event I'll want to add an alternator. At least that way it will be extra simple to add it in later.
Looking forward to more pictures! I am debating if I should sandblast the rust off mine or wire wheel it prior to paint. A co-worker of mine spent many years as a airplane mechanic and he tells me to never sandblast rust off metal because it actually drives the rust into the metal. He claims wire wheel and rust treatment is the best. Only issue with wire wheel is that its labor intensive...ugh
 

Tazza

Moderator
Staff member
Joined
Dec 7, 2004
Messages
16,838
Looking forward to more pictures! I am debating if I should sandblast the rust off mine or wire wheel it prior to paint. A co-worker of mine spent many years as a airplane mechanic and he tells me to never sandblast rust off metal because it actually drives the rust into the metal. He claims wire wheel and rust treatment is the best. Only issue with wire wheel is that its labor intensive...ugh
It depends on how much rust is in it and where it is. If there are just spots, i'd wire wheel it, but if it's also in hard to get at places, you may need to blast it.
I have a 763 that i have had for.... 8 or so years now that has a rusty chain case, but the frame is pretty good. My plan is to blast the chain case, but spot blast or wire wheel the rusty spots on the frame. If you go this route, you may need to build up the blasted spots to make it smooth again, if you want to go that far.
Not sure how the blaster would push the rust into the steel, it could be the prep he used or had seen being used on other parts.
 

bill7101

Member
Joined
Apr 3, 2016
Messages
12
Just a quick, boring update.
I finished carefully flattening the welded repairs on the tub today. It's getting closer to paint time, and turning out pretty good. Next on the list, and about the last step before blasting, is to arrange the fuel filler hose ends.... hmmmm. Yep, that's about it! Blast and paint should start this week. Holy cow!
There's an upcoming machining project with the axles which should prove to be kind of educational and informative. But they aren't needed until a few steps into re-assembly. Plus I machine stuff for a living and it will be straightforward to get it done even if it's not a totally simple project.
Oh yea... yesterday I checked out the new engine, filled with oil, wired, hooked up fuel and started it up for a bench test. It runs just fine. Very well really. I read several reports that they are assembled at the factory with the valve gap set too close, and sure enough mine was too. Apparently that screws up the idle and whatever you would expect from being out of adjustment. So before I even tried it I got in there and set them right and it just fired right up and ran as good as I could have wanted. I think I'll like this new engine too even if it is rated a couple horsepower lower than the original. Gives me some comfortable breathing room for powering it anyway. I will probably arrange an extra pulley on it in the likely event I'll want to add an alternator. At least that way it will be extra simple to add it in later.
Did you go with the predator engine from HF? I put one in my 3410 and it worked out quite well, only thing I had to do was add a gm alt, otherwise it wouldnt have enough charging power to run the lights.
 
OP
OP
vinito

vinito

Well-known member
Joined
Nov 19, 2015
Messages
199
Did you go with the predator engine from HF? I put one in my 3410 and it worked out quite well, only thing I had to do was add a gm alt, otherwise it wouldnt have enough charging power to run the lights.
Yes I did. A buddy had a coupon and I got it for $550 and I figured it would buy me some time at least, and maybe just work great as long as I have it if I'm lucky.
Just yesterday I decided to do like you and many others have done and ordered one of those mini alternators to add to it, so that increases the cost another $65 already, but this thing has been a steady stream of "one step forward, two steps back" since the beginning so I'm used to it by now, hehe. I have looked it over and discovered that it would be easiest to just make a whole new hydraulic pump cage mount rather than try to adapt the original one, but that should just be a fairly simple welding/machining project too.
I got the fuel filler parts made yesterday so it's ready to submit to the painters for blasting. Hopefully they can start on it right away and I can keep moving forward. With these guys there's a chance they are busy with another project and if so I'll have to wait until they can squeeze it in, but for free I don't mind. I should be able to make the additonal engine mounts while I'm waiting to get it back.
Sorry I haven't added pictures the past couple posts. I'll snap some before blasting and post the last of the "before" pictures here soon.
 

jerry

Well-known member
Joined
May 3, 2007
Messages
2,043
Nice score on the back hoe attachment! I can think of a lot of uses for that thing!
Looks like a davis 100 hoe, they were also made for case. I have one and several others here have then. Only thing most have found is that the swing is too fast unless you put a restrictor orifice in the line. you will have to also make a solid link from the machine frame to the hoe frame as the quick tach will not be solid enough. look on the media section here for photos of different methods of attaching it.
 
OP
OP
vinito

vinito

Well-known member
Joined
Nov 19, 2015
Messages
199
Looks like a davis 100 hoe, they were also made for case. I have one and several others here have then. Only thing most have found is that the swing is too fast unless you put a restrictor orifice in the line. you will have to also make a solid link from the machine frame to the hoe frame as the quick tach will not be solid enough. look on the media section here for photos of different methods of attaching it.
Thanks jerry. I'm on top of it! Other than it will have to wait until after I'm done with this restoration first.
Well I have pictures as promised.
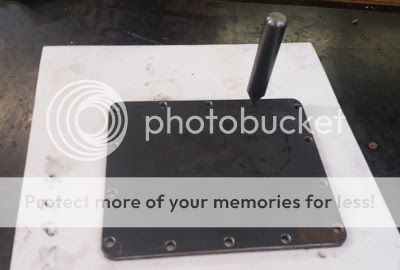
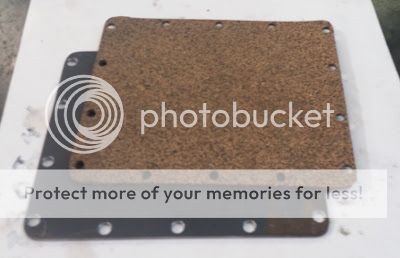
First, I finished the cover plates and it was a lot of tedious drilling and tapping. Then I turned a punch on the lathe and it made quick work of cutting the proper sized holes in the gasket material.
 photo punch.jpg photo gasket.jpg
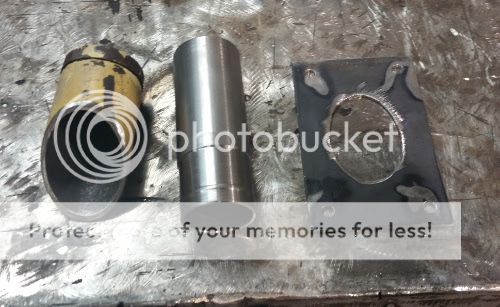
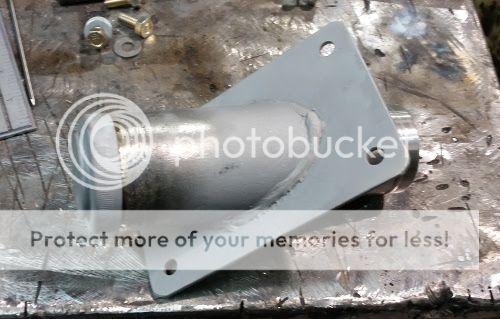
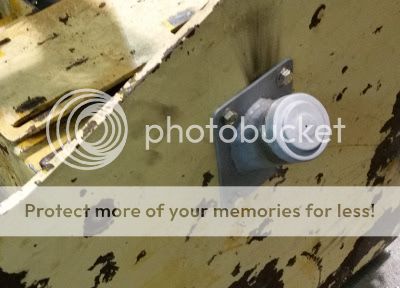
Then I moved on to remoting the fuel filler. Cut and turned the parts from some scrap tubing, then welded it together, cut, drilled & tapped and attached it to the machine. Whadda ya think?
 photo parts.jpg
 photo parts assy.jpg
 photo filler.jpg
 photo full filler.jpg
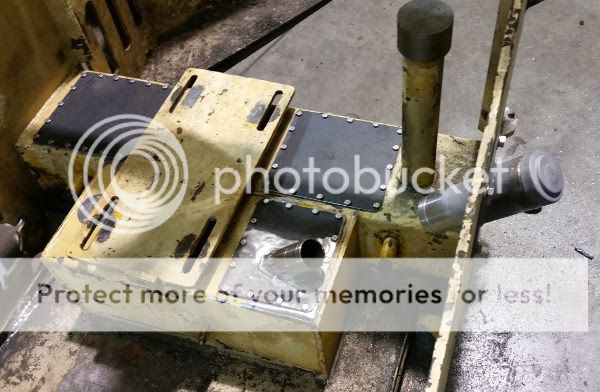
Last one shows the cover plates and filler ends installed. It will just take a 12" piece of 2" diameter fuel filler tube to connect it up. Soo much more convenient than climbing into the tight little machine and lifting the can to fill and spill gasoline where it needs and wants to go.
So that's it for now. I found a couple tweaks I need to do before I blast it, dangit. It's pretty small stuff though so still shouldn't be long. Progress is happening at least and it feels good.
 

Tazza

Moderator
Staff member
Joined
Dec 7, 2004
Messages
16,838
Thanks jerry. I'm on top of it! Other than it will have to wait until after I'm done with this restoration first.
Well I have pictures as promised.
First, I finished the cover plates and it was a lot of tedious drilling and tapping. Then I turned a punch on the lathe and it made quick work of cutting the proper sized holes in the gasket material.

Then I moved on to remoting the fuel filler. Cut and turned the parts from some scrap tubing, then welded it together, cut, drilled & tapped and attached it to the machine. Whadda ya think?


Last one shows the cover plates and filler ends installed. It will just take a 12" piece of 2" diameter fuel filler tube to connect it up. Soo much more convenient than climbing into the tight little machine and lifting the can to fill and spill gasoline where it needs and wants to go.
So that's it for now. I found a couple tweaks I need to do before I blast it, dangit. It's pretty small stuff though so still shouldn't be long. Progress is happening at least and it feels good.
Looks good.
The only concern i'd have is if the filler neck could be bumped, is there something to prevent you rubbing it against something while using the machine?
I know how easy it is to touch a tree after it's painted.....
 
Top