


I‘ve had good luck with heating the cylinder, yes with a torch, and letting it cool several times. The expansion and contraction of the two different metals will break the threads free. I normally do it with the cylinder removed from the machine but if you put a heat shield behind the cylinder to protect the cab it should work fine. You will have to repaint the cylinder when done.I agree... I'm kind of saving that for the last resort. It has to come off, but not right away. I have time if need be. My pal has a plan of attack. He used to do them at his job as a commercial plant mechanic.
You are using an out of date browser. It may not display this or other websites correctly.
You should upgrade or use an alternative browser.
You should upgrade or use an alternative browser.
Going to pick up an old 632
- Thread starter Ster1
- Start date
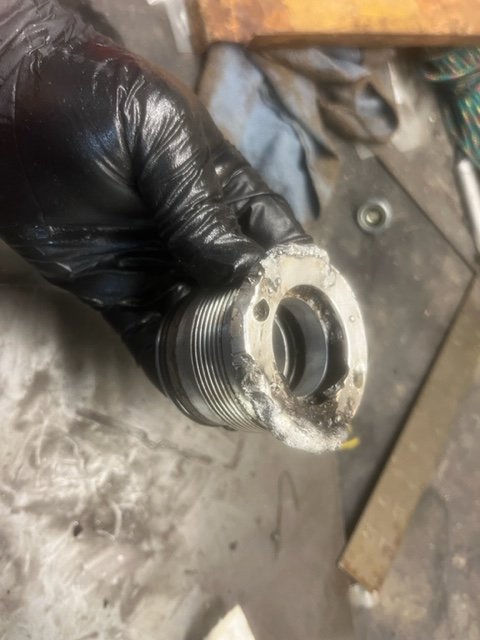
I finally had some success. No pin spanner would budge it, especially after the first time I tried and stripped the pin holes. That rendered the holes about useless. So, I tried for several days to heat-n-beat with penetrant and no luck, so I tried the pipe wrench approach, and that's the first pic. Pretty boogered, but still mostly intact. No luck though. I decided to try to weld some blocks to it, and use a wrench on the blocks, but because it was either just too dirty, or my aluminum welding skills are aweful, or most likely a combination of the 2, the blocks just fell off. I then realized I had a fairly decent bead on the edge of the gland nut. I put a better bead on the other side, and went after it with a pipe wrench again, and off she went! I'm not worried about the nut, because I can just fill it back in and clean it up on the lathe. It'll be fine. Also a GIANT F-YOU to Bobcat / Clark for doing this. It's almost like this was intended to happen and cause customers to buy new cylinders. UGH that pisses me off when I see that. Now all I have to do is take that cylinder apart, fix the nut, re-seal it, and it'll be good. The whole seal kit per cylinder is around $20. I'm happy.
Attachments
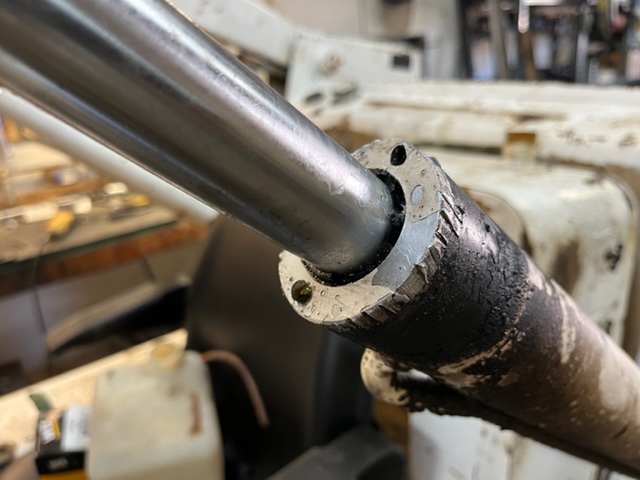
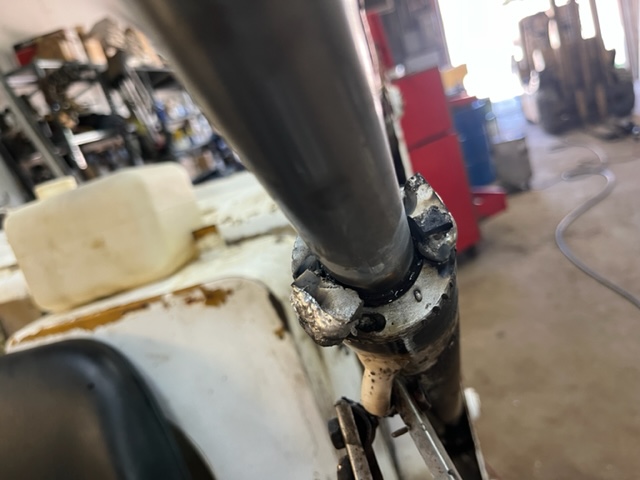
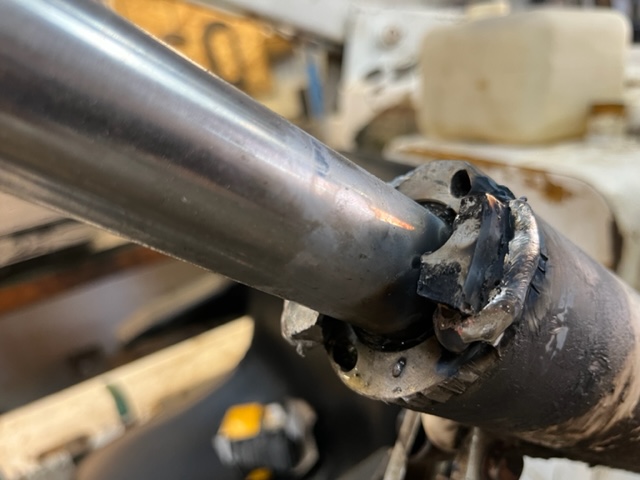
Glad you got it off finally.I finally had some success. No pin spanner would budge it, especially after the first time I tried and stripped the pin holes. That rendered the holes about useless. So, I tried for several days to heat-n-beat with penetrant and no luck, so I tried the pipe wrench approach, and that's the first pic. Pretty boogered, but still mostly intact. No luck though. I decided to try to weld some blocks to it, and use a wrench on the blocks, but because it was either just too dirty, or my aluminum welding skills are aweful, or most likely a combination of the 2, the blocks just fell off. I then realized I had a fairly decent bead on the edge of the gland nut. I put a better bead on the other side, and went after it with a pipe wrench again, and off she went! I'm not worried about the nut, because I can just fill it back in and clean it up on the lathe. It'll be fine. Also a GIANT F-YOU to Bobcat / Clark for doing this. It's almost like this was intended to happen and cause customers to buy new cylinders. UGH that pisses me off when I see that. Now all I have to do is take that cylinder apart, fix the nut, re-seal it, and it'll be good. The whole seal kit per cylinder is around $20. I'm happy.
I do wonder if it was bound a little bit because it is still in the machine? The arms can warp, binding the cylinders some. Keep this in mind If you have problems screwing the cap back on.
Keep us posted.
The cylinders seem to be a mixed bag. I just did the 4 steering cylinders on my A300 and had no problems at all, almost too loose. But I’ve also had a few lift and tilt cylinders off of older 700 series machines that were beasts. Never had one as bad as yours though…..YET.
I finally had some success. No pin spanner would budge it, especially after the first time I tried and stripped the pin holes. That rendered the holes about useless. So, I tried for several days to heat-n-beat with penetrant and no luck, so I tried the pipe wrench approach, and that's the first pic. Pretty boogered, but still mostly intact. No luck though. I decided to try to weld some blocks to it, and use a wrench on the blocks, but because it was either just too dirty, or my aluminum welding skills are aweful, or most likely a combination of the 2, the blocks just fell off. I then realized I had a fairly decent bead on the edge of the gland nut. I put a better bead on the other side, and went after it with a pipe wrench again, and off she went! I'm not worried about the nut, because I can just fill it back in and clean it up on the lathe. It'll be fine. Also a GIANT F-YOU to Bobcat / Clark for doing this. It's almost like this was intended to happen and cause customers to buy new cylinders. UGH that pisses me off when I see that. Now all I have to do is take that cylinder apart, fix the nut, re-seal it, and it'll be good. The whole seal kit per cylinder is around $20. I'm happy.
I had not posted for a few days. As of last night, I am about ready to put my cyl back together. I used a better spanner than I had, a 4ft cheater pipe, and then an air chisel on the outside edge of the cap before it turned. It required the 4 ft cheater pipe on the spanner all the way out. The threads in the cyl were corroded so it rolled the threads on the cap all the way out. It was a tough go all the way. The treads measure 12 TPI so I set up a lathe to straighten out the cap threads and cleaned the cyl threads by hand. I also milled new spanner pin holes to use for reassembly. I am slowly getting there. I had none of these problems doing the right side cyl a year or two ago.
That was my fear about corrosion and threads. Sorry you had that! Once torque was broken, mine almost came out by hand. Needed a little help from channel locks. I'm thinking of reassembly. Thinking about, instead of drilling new pin spanner holes, maybe cutting 1/4-28 threads in there. Or even 8mm, if I have room. That way, with a rather simply made tool, you could just use socket head cap screws to attach the tool to the cap, and torque it that way. Kind of single - use tool there, to be sure, but that would go a long way toward never stripping that aluminum cap again.


![Pampers Sensitive Baby Wipes, Clinically Proven, Fragrance Free, Unscented, Water Based, Hypoallergenic, Multi-Use, Hand Wipes 336 Wipes Total (6X Flip-Top Packs) [Packaging May Vary]](https://m.media-amazon.com/images/I/41KLBHu9CAL._SL500_.jpg)


As an Amazon Associate we earn from qualifying purchases. Product prices and availability are accurate as of the date/time indicated and are subject to change.
I have had good luck on stuck cylinders by taking the cylinder off the machine and putting the "nut" in a vise and then turning the cylinder with a pipe wrench. Pipe wrenches need to be used with caution and restraint. First off wrap some copper sheet around the cylinder. Then to use a pipe wrench properly there needs to be 3 points of contact, the 2 jaws and the back of the wrench opening. That would be the part that slides up and down when you adjust the wrench.
Also I have had to cut flats in the "nut" at times to have it hold in the vise. There are a few more tricks but this should cover 99% of what you will encounter.
Also I have had to cut flats in the "nut" at times to have it hold in the vise. There are a few more tricks but this should cover 99% of what you will encounter.
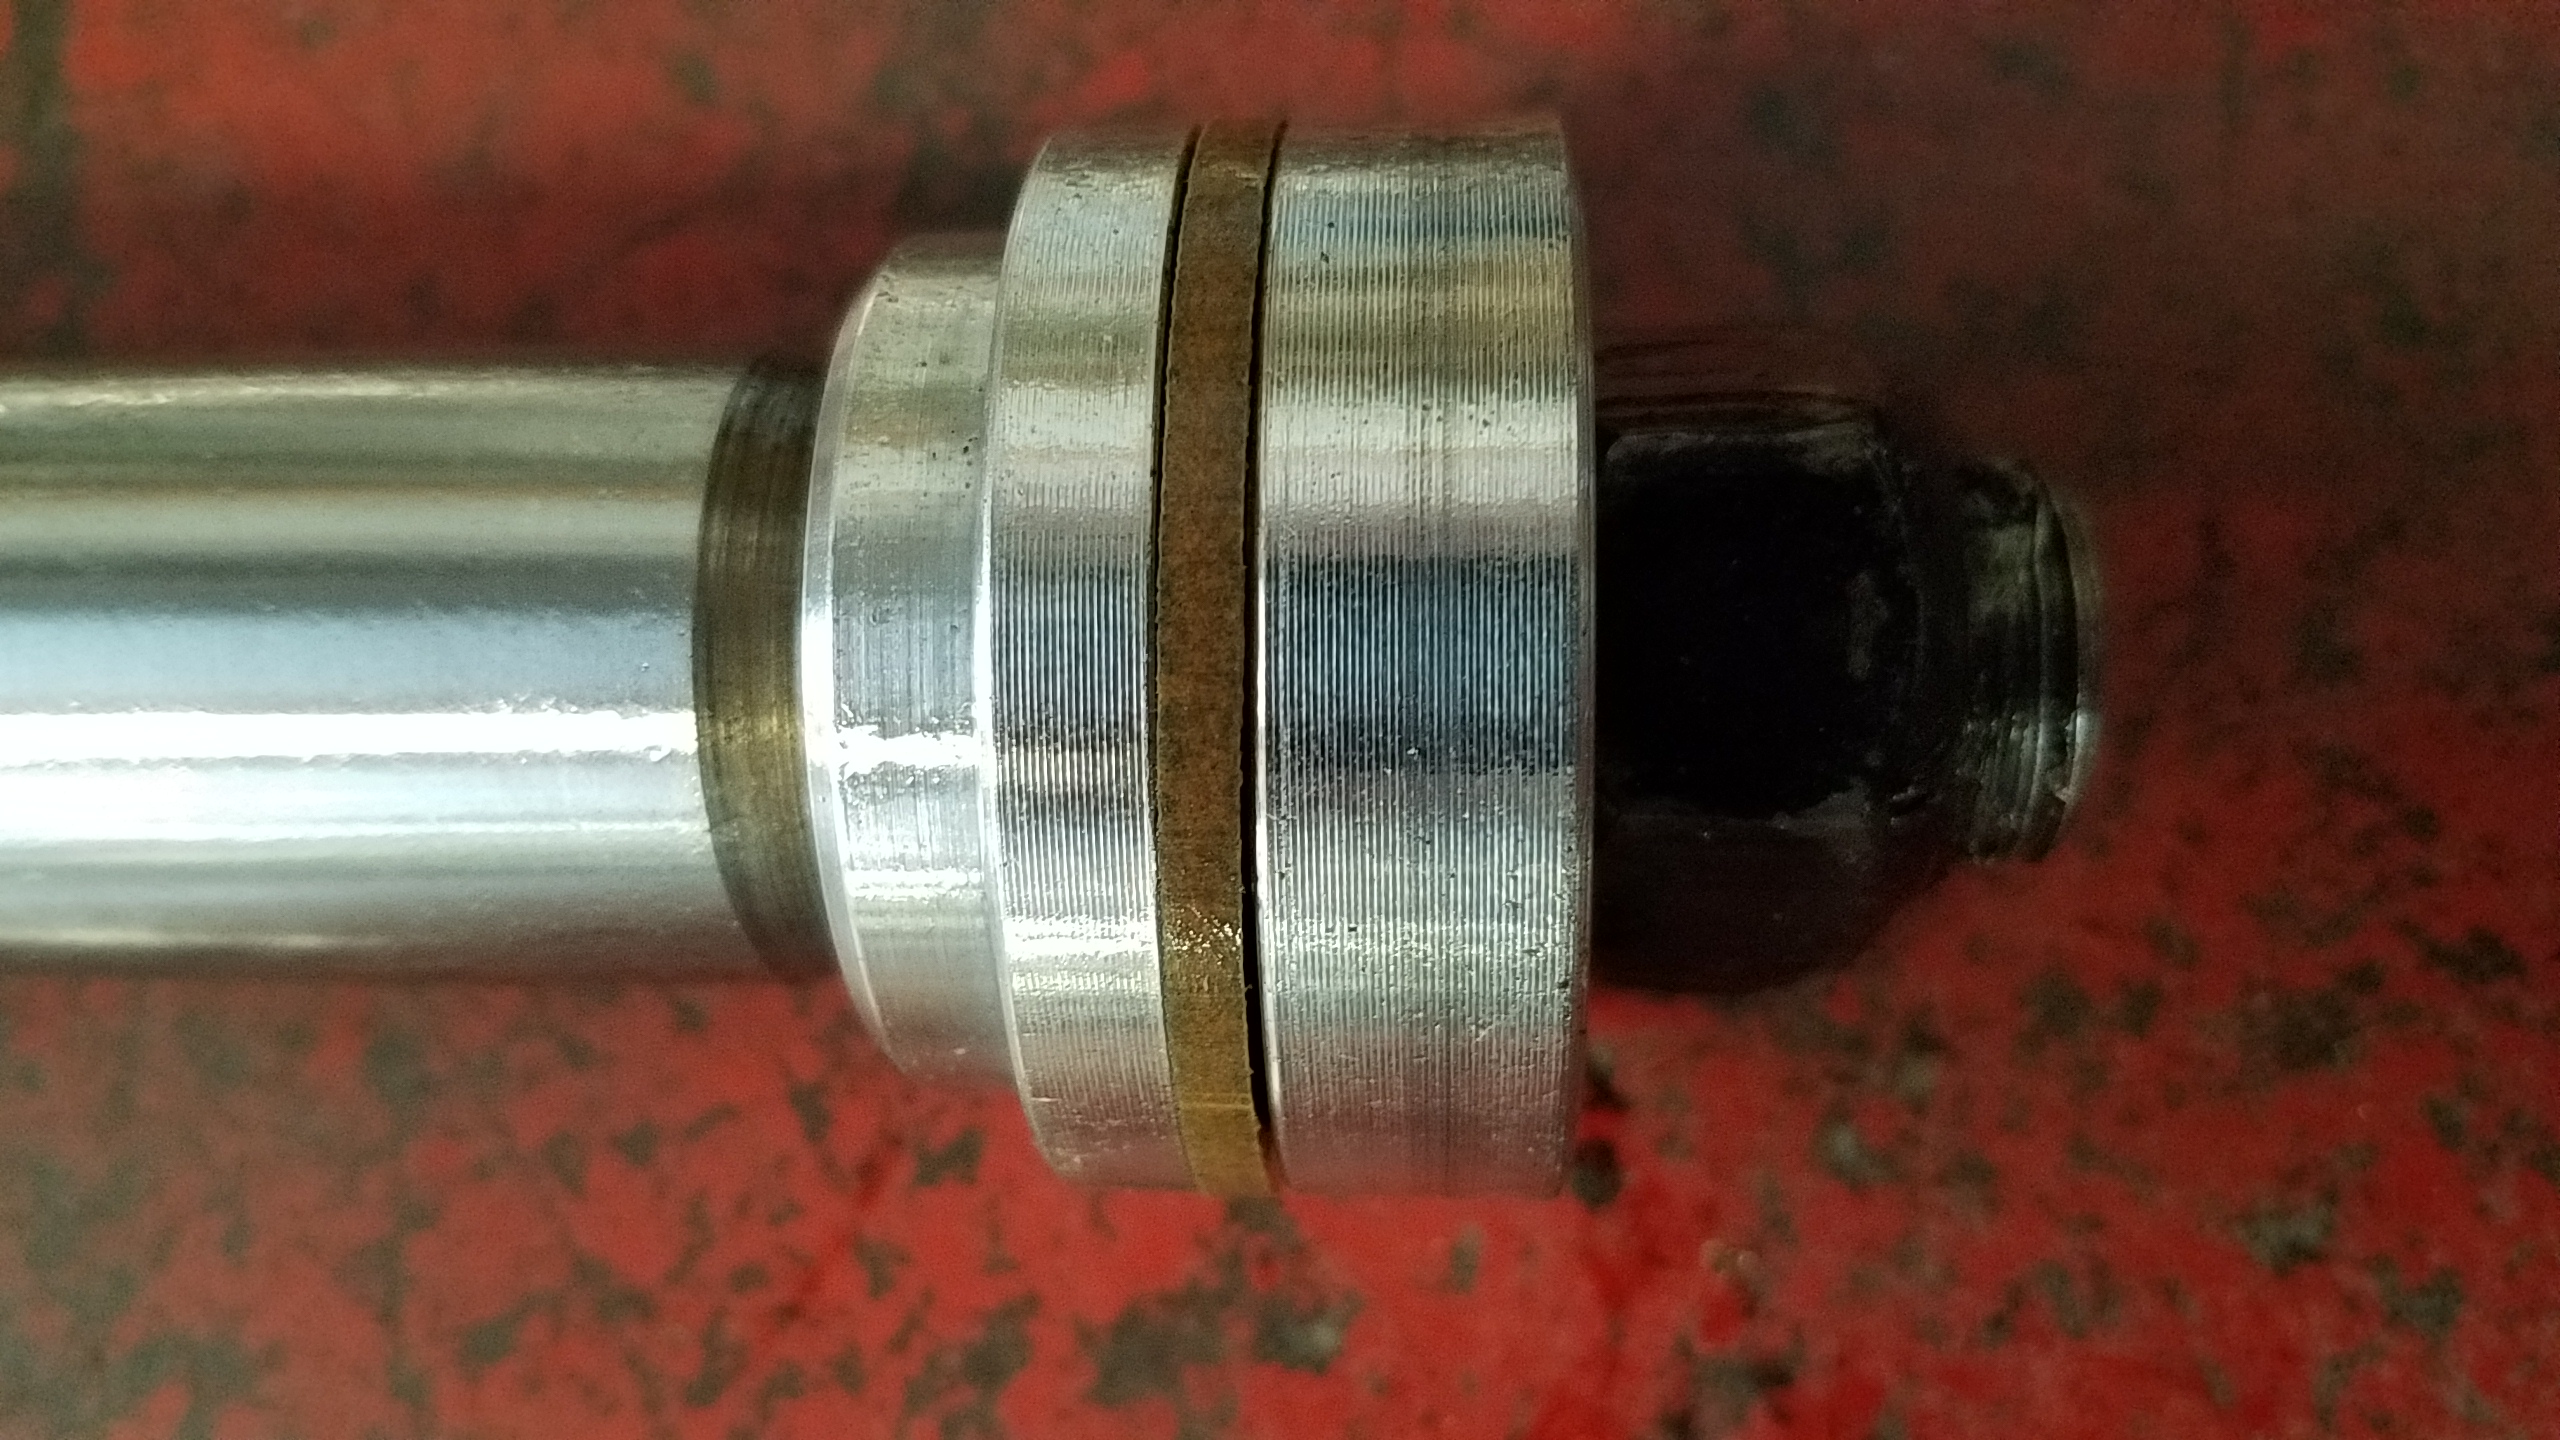
My seal project is finished and works fine, as it should. In one photo you can see the nut about halfway out, rolling the threads as it goes. Next photo shows the special service tool needed to turn the spanner until the very end, a long, slow process. Lastly, the locknut that holds the piston to the shaft had the threads pulled on it as well. A bunch of hand filing before removing that nut so as to save the shaft. What should have been a several hour job took several days. Patience and persistence won the battle.
Attachments

Most of the problems I’ve had with my machines has been the people that have worked on them in the past. Mainly a lot of stripped and cross threaded connectors. A lot of people not knowing or caring about what they are doing.
Impact guns in the wrong hands can do a lot of damage.
I would imagine that someone in the past had that cylinder apart and cross threaded it when they put it back in.
Impact guns in the wrong hands can do a lot of damage.
I would imagine that someone in the past had that cylinder apart and cross threaded it when they put it back in.
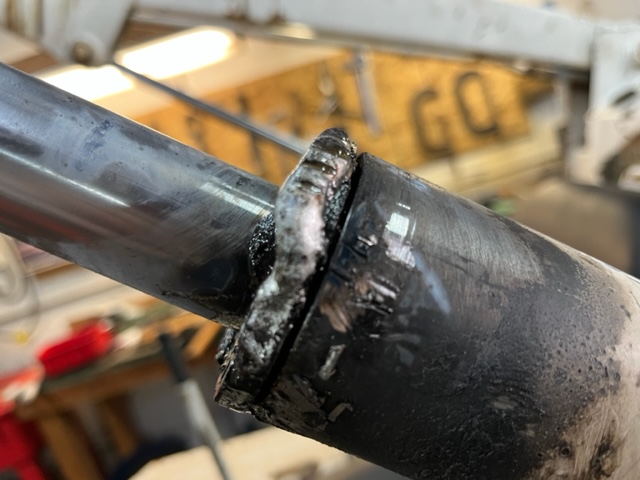
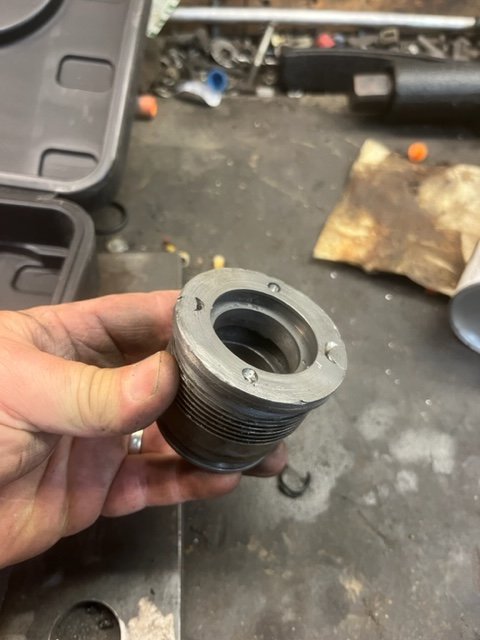
Here's my before and after repairing the gland nut. It's not perfect, but it seals just fine, and once it's painted, those imperfections will be harder to see. I also cleaned up a few dings in the cylinder rod, where it most likely made it leak in the first place.
Attachments
Nice job.
- Joined
- Dec 17, 2009
- Messages
- 239
Looks good! Nice work!
Thanks guys!
As far as mine goes, I don’t think anyone had been in there before. Those spanner holes were perfect (until I got to it). These gland nuts would have been a nightmare to tighten if they were cross - threaded. Someone would have had to work real hard to get it crossed too. I honestly don’t see how that could even happen. Who knows.
Next week I’m moving on to the fuel tank that has an inch of hard black sludge in the bottom of it. Also my radiator vents all positive pressure, so I haven’t even got the engine fully hot yet. Probably the cap causing that. Onward and upward.
Skip wisconsin old tech not reliable way under powered, crap carb problemsI'm right there with you (almost) I just bought a 610 ($1500) no bucket and not running... Mine isn't seized up though... I started with spark and got spark at the plugs then started with fire and a head gasket was blown so that's where I am now... I'll deal with each problem til I'm digging or selling
FYI there is a guy close to me (Southern Virginia) with a Wisconsin 30 HP engine for sale for $250 ????
Better off with small diesel or fird industrial
Ugh. Issues abound. That turkey runs fine, has plenty of power, seems to run smoothly. Once it's started, that is. Getting it started is a little like firing up a diesel that's been sitting for 10 years. Sometimes it just doesn't want to start, and when it does, it runs rough until it warms up a little. I thought the cylinder bores would be ok. I knew they were worn, but I had hoped they would be good enough. It turns out, maybe not. My cold compressions range from 70-110, with numbers a little higher with oil added. Warmed up, those numbers go from 90-115, similar gain when oil is dripped in there. So, right off the bat, the numbers don't look good; too much range among the cylinders. It shouldn't be more than a 20% difference across all 4, and my numbers are out. I did a leak down also, and that's supposed to show no more than about 10% loss. I'm showing 60/80 on all 4, or 25% loss. Most going past the rings. Some is going past the valves though, on every cylinder. It is an old engine, and maybe that 25% wouldn't be such a big deal if my compression numbers were closer. I did nothing to the head, so I'm wondering if I just gave it a good valve job, that might bring those numbers up enough to make it run ok.
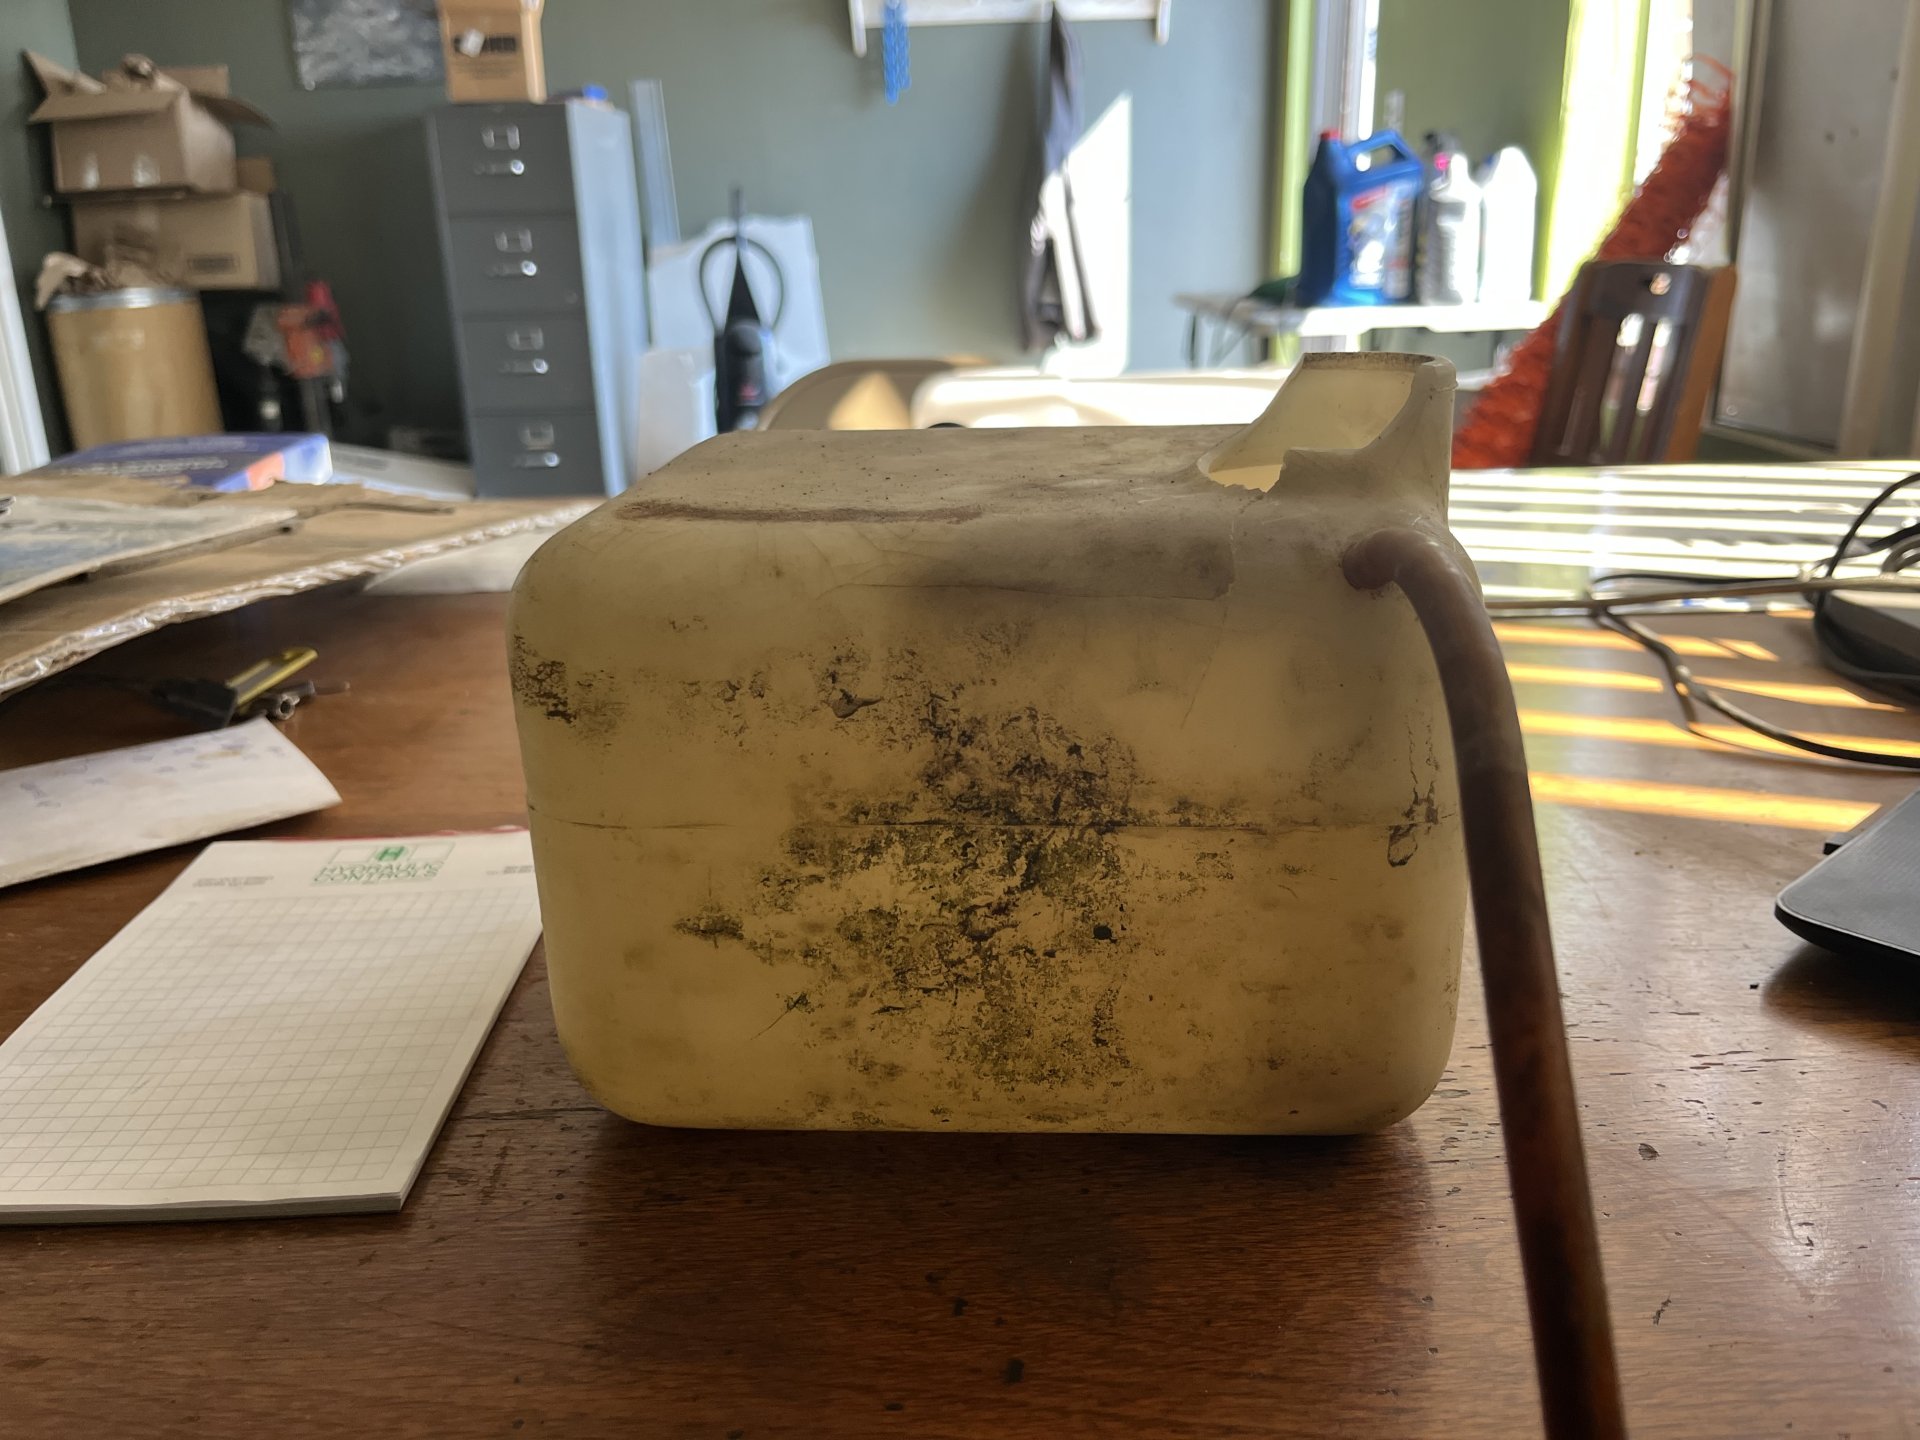
In other news, my lift cylinder is still sealed up fine, and I replaced the blown hard lines in the engine compartment with flex lines (I can make hydraulic hoses). That seems to be working fine. Of course, I just today found another leaky hose on the right side of the machine too") Also, I broke my coolant overflow tank when I tried to put the cap back in. It was so brittle, it just broke apart right at the filler neck. I still have the ROP off to clean it better, and replace that nasty seat, so the tank is real easy to replace at the moment. Oh, and my water pump just crapped out (water seeping out that little hole). So, I have a few other niggling issues to work out.
Also, I broke my coolant overflow tank when I tried to put the cap back in. It was so brittle, it just broke apart right at the filler neck. I still have the ROP off to clean it better, and replace that nasty seat, so the tank is real easy to replace at the moment. Oh, and my water pump just crapped out (water seeping out that little hole). So, I have a few other niggling issues to work out.
Anyhow, just some news to keep you entertained. Cheers.
In other news, my lift cylinder is still sealed up fine, and I replaced the blown hard lines in the engine compartment with flex lines (I can make hydraulic hoses). That seems to be working fine. Of course, I just today found another leaky hose on the right side of the machine too
Also, I broke my coolant overflow tank when I tried to put the cap back in. It was so brittle, it just broke apart right at the filler neck. I still have the ROP off to clean it better, and replace that nasty seat, so the tank is real easy to replace at the moment. Oh, and my water pump just crapped out (water seeping out that little hole). So, I have a few other niggling issues to work out.Anyhow, just some news to keep you entertained. Cheers.
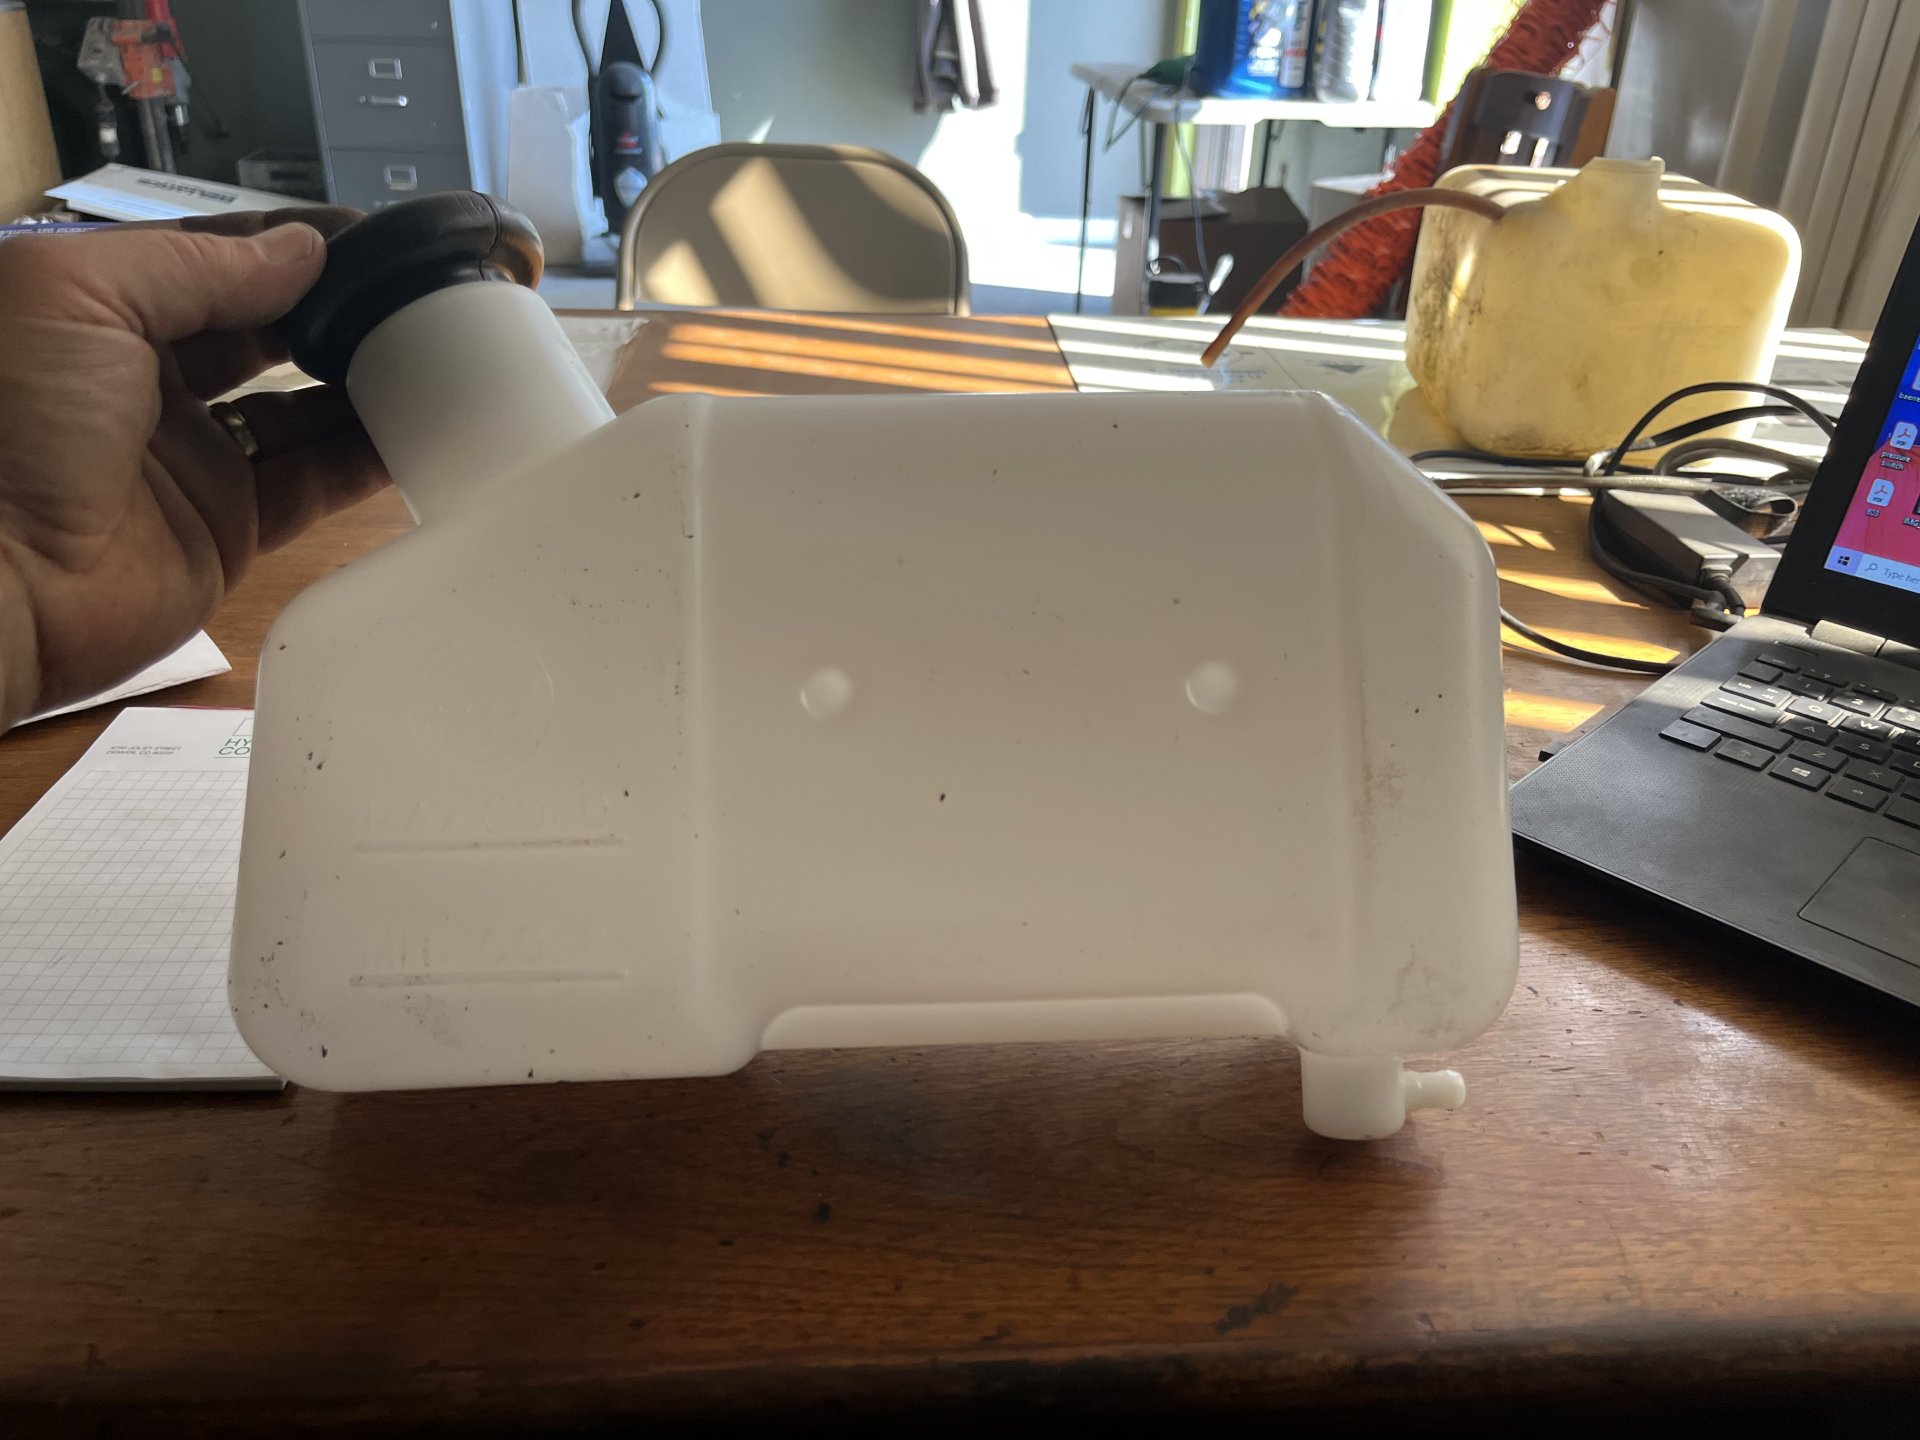
Hey folks, I’m looking for a little help. I need to replace my coolant overflow tank, but I can’t find the right one. I’ve attached a few pics. The first one is the existing tank. The second one is the new one. Obviously not even close. Can anyone shed some light? No amount of googling seems to help here. Thanks much!
Attachments
- Joined
- Dec 17, 2009
- Messages
- 239
That looks like a 40 series tank, they were mounted on the right-hand side of the engine compartment wall whereas the 30 series are mounted up above the fuel tank. On the 40 series the expansion tank was moved into the engine compartment so they could enlarge the fuel tank to the 14 gallon "Full Day" tank as they called it. I'm also looking for a tank for a 30 series machine and they are like hen's teeth to find...
Latest posts
-
-
T 243 HD upper pins and bushings at top rear of machine
- Latest: PALLETTOBYPALLET
-
-
-

-
-
-
-

-
-
