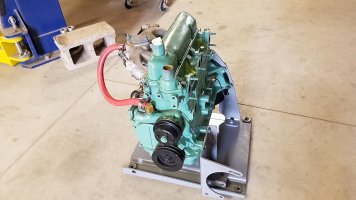
Bobcat 632 - Blown Head Gasket?

Help Support SkidSteer Forum:

dfb

Well-known member
Joined
Sep 11, 2017
Messages
95
For surface prep of both the head and block deck surfaces, clean them by hand only. Take your time and scrape them with a razor blade in a scraper. A large, fine, flat file would be ok for locating any high spots or imperfections by lightly dragging it across the surface.
The roloc abrasive discs will clean the surfaces up quickly but I would shy away from using them here, they can remove material very quickly. if your local mechanic/machinist checked it and ok'd the flatness, clean up by hand is all you need to do and eliminates the chance of creating low spots.
 

Ster1

Well-known member
Joined
Feb 8, 2022
Messages
90
Those 3m disks are great. I use. em with air die grinders, but a drill works too (just slower). The idea is to remove old gasket material and not any metal. Don't linger in one spot, keep that tool moving. This is one of those situations where close is probably close enough. It doesn't have to be perfect. It's a good thing the head and block is iron. More forgiving of enthusiasm. Just do it like you've done everything else; go slow, watch your progress carefully, and stop and ask when you hit a tough spot. I would suggest extreme caution in using the file method. The guys are not wrong, it's a viable method to detect surface imperfections. It's also real easy to go too far, and do damage. Remember this is not Formula 1, this is a low rpm, low compression industrial engine. It's easier for the head gasket to compensate for a little extra old gasket material than a gouge in the iron. I like your progress!

Given that this engine did overheat, there is a fair expectation that the head is warped. Iron heads don't warp nearly as much as aluminum heads, but they do warp. So when it comes time to check for warpage, don't scrap the whole head because one end of the straight edge is on a little blob of old gasket material :) CRC makes a parts cleaner that I've found is pretty good for helping get old baked on material off. It comes in a green can. I think it's supposed to be eco-friendly. I don't know about that, but I do know it doesn't evaporate as quickly and can soak in and start to break down that old material. It does well for me anyway.
 
OP
OP
bobcatzack

bobcatzack

Well-known member
Joined
Oct 16, 2022
Messages
122
For surface prep of both the head and block deck surfaces, clean them by hand only. Take your time and scrape them with a razor blade in a scraper. A large, fine, flat file would be ok for locating any high spots or imperfections by lightly dragging it across the surface.
The roloc abrasive discs will clean the surfaces up quickly but I would shy away from using them here, they can remove material very quickly. if your local mechanic/machinist checked it and ok'd the flatness, clean up by hand is all you need to do and eliminates the chance of creating low spots.
Got it! Thanks for the advise .. I can see if unintentionally I create a low spot using a roloc abrasive disc (no matter how careful I am) then there's no going back! A resurface of the entire head would be the only option I would think!
 
OP
OP
bobcatzack

bobcatzack

Well-known member
Joined
Oct 16, 2022
Messages
122
Those 3m disks are great. I use. em with air die grinders, but a drill works too (just slower). The idea is to remove old gasket material and not any metal. Don't linger in one spot, keep that tool moving. This is one of those situations where close is probably close enough. It doesn't have to be perfect. It's a good thing the head and block is iron. More forgiving of enthusiasm. Just do it like you've done everything else; go slow, watch your progress carefully, and stop and ask when you hit a tough spot. I would suggest extreme caution in using the file method. The guys are not wrong, it's a viable method to detect surface imperfections. It's also real easy to go too far, and do damage. Remember this is not Formula 1, this is a low rpm, low compression industrial engine. It's easier for the head gasket to compensate for a little extra old gasket material than a gouge in the iron. I like your progress!

Given that this engine did overheat, there is a fair expectation that the head is warped. Iron heads don't warp nearly as much as aluminum heads, but they do warp. So when it comes time to check for warpage, don't scrap the whole head because one end of the straight edge is on a little blob of old gasket material :) CRC makes a parts cleaner that I've found is pretty good for helping get old baked on material off. It comes in a green can. I think it's supposed to be eco-friendly. I don't know about that, but I do know it doesn't evaporate as quickly and can soak in and start to break down that old material. It does well for me anyway.
Well understood! Thanks for wise/practical advise Pete! I will look into the CRC parts cleaner too 🙂
 

Jyuma1

Well-known member
Joined
Oct 23, 2022
Messages
74
It is not my intention to be critical, but we can, at times, take things a bit too far on the side of perfect when good enough will do.

Case in point... several years ago (10) I parked my T133 in the backyard and covered it with a tarp. Unbeknown to me the tarp had ripped on the exhaust pipe (which sits vertically in the T133) and water had invaded the engine through the open exhaust valves.

Long story short, the pistons sat in water for years before I needed to use the loader again and when I went to start it the engine was seized tight.

Pulled the head and found 2 badly rusted cylinders which were rust welded to their pistons. The pistons were so seized tight to the cylinders that crank would not rotate at all. The most rusted cylinder was the one in the back and as luck would have it there is a cross member that lives a foot or so above the engine.

Call me crazy. but I wedged a 2x4 on top of the piston and mounted a bottle jack on top of the 2x4 with the piston end of the bottle jack against the cross member. Then I pumped and pumped and pumped and finally with a loud bang, the piston moved down. I jacked it all the way to the bottom of the stroke and got out my trusty cylinder hone and honed the crap out of that cylinder till all the rust was gone. Then I did the same to the other 3 cylinders (minus the need for the bottle jack) and slapped the head back on (yes with a new gasket). Bled the fuel lines, turned the key and after some coaxing the engine sprang to life... and this is a diesel, where compression is everything.

That was 10 years ago, and the old Kubota is still running like a charm today with no blow-by and it does not burn oil. Not perfect by the numbers, but good enough. :)
 
OP
OP
bobcatzack

bobcatzack

Well-known member
Joined
Oct 16, 2022
Messages
122
It is not my intention to be critical, but we can, at times, take things a bit too far on the side of perfect when good enough will do.

Case in point... several years ago (10) I parked my T133 in the backyard and covered it with a tarp. Unbeknown to me the tarp had ripped on the exhaust pipe (which sits vertically in the T133) and water had invaded the engine through the open exhaust valves.

Long story short, the pistons sat in water for years before I needed to use the loader again and when I went to start it the engine was seized tight.

Pulled the head and found 2 badly rusted cylinders which were rust welded to their pistons. The pistons were so seized tight to the cylinders that crank would not rotate at all. The most rusted cylinder was the one in the back and as luck would have it there is a cross member that lives a foot or so above the engine.

Call me crazy. but I wedged a 2x4 on top of the piston and mounted a bottle jack on top of the 2x4 with the piston end of the bottle jack against the cross member. Then I pumped and pumped and pumped and finally with a loud bang, the piston moved down. I jacked it all the way to the bottom of the stroke and got out my trusty cylinder hone and honed the crap out of that cylinder till all the rust was gone. Then I did the same to the other 3 cylinders (minus the need for the bottle jack) and slapped the head back on (yes with a new gasket). Bled the fuel lines, turned the key and after some coaxing the engine sprang to life... and this is a diesel, where compression is everything.

That was 10 years ago, and the old Kubota is still running like a charm today with no blow-by and it does not burn oil. Not perfect by the numbers, but good enough. :)
Thanks for sharing the story of your T133 .. all I can say is WOW!!
Well it also gives me confidence that after all is said and done with my Bobcat 632, it might spring back to life and become a reliable machine for some years to come 🙂
 
OP
OP
bobcatzack

bobcatzack

Well-known member
Joined
Oct 16, 2022
Messages
122
Those 3m disks are great. I use. em with air die grinders, but a drill works too (just slower). The idea is to remove old gasket material and not any metal. Don't linger in one spot, keep that tool moving. This is one of those situations where close is probably close enough. It doesn't have to be perfect. It's a good thing the head and block is iron. More forgiving of enthusiasm. Just do it like you've done everything else; go slow, watch your progress carefully, and stop and ask when you hit a tough spot. I would suggest extreme caution in using the file method. The guys are not wrong, it's a viable method to detect surface imperfections. It's also real easy to go too far, and do damage. Remember this is not Formula 1, this is a low rpm, low compression industrial engine. It's easier for the head gasket to compensate for a little extra old gasket material than a gouge in the iron. I like your progress!

Given that this engine did overheat, there is a fair expectation that the head is warped. Iron heads don't warp nearly as much as aluminum heads, but they do warp. So when it comes time to check for warpage, don't scrap the whole head because one end of the straight edge is on a little blob of old gasket material :) CRC makes a parts cleaner that I've found is pretty good for helping get old baked on material off. It comes in a green can. I think it's supposed to be eco-friendly. I don't know about that, but I do know it doesn't evaporate as quickly and can soak in and start to break down that old material. It does well for me anyway.
FYI - the engine head is definitely warped. I am trying to work with Randy to see if he can fit into his schedule to cut/straighten it out. Things are pretty much at standstill now.
 

cdmccul

Well-known member
Joined
Jun 18, 2013
Messages
504
FYI - the engine head is definitely warped. I am trying to work with Randy to see if he can fit into his schedule to cut/straighten it out. Things are pretty much at standstill now.
It's a double edge sword... At least you found out and it will get cleaned up right. Costs and time added, but done right in the end.
 
OP
OP
bobcatzack

bobcatzack

Well-known member
Joined
Oct 16, 2022
Messages
122
That's a bummer. Hopefully he'll get ya all straightened out!
Yes, look the engine head to Randy and left it at his shop. He said he will see what he can do .. to fit into his schedule.
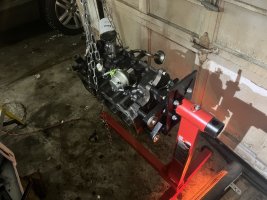
A definite positive news meanwhile today was that I was able to get the engine block finally attached to the engine stand 🙂
 

Attachments

  • 9CEF171B-04BC-4C4A-A99D-255BCA471160.jpeg
    9CEF171B-04BC-4C4A-A99D-255BCA471160.jpeg
    459.5 KB · Views: 51

cdmccul

Well-known member
Joined
Jun 18, 2013
Messages
504
Glad to hear! Say, by chance... Could you tell me what size hose that is next to the upper radiator hose on the water pump? I think it's a 1/2 inch, could you confirm? No rush.
 

dfb

Well-known member
Joined
Sep 11, 2017
Messages
95
Motor on the stand will make it much more "civilized" to work on, nice job.
The head being warped is what I would expect after seeing how badly that gasket was blown, resurfacing it to achieve a flat surface is critical to give the new gasket a fighting chance. I would strongly recommend you inquire with the machinist if he can vacuum test the valves also, with an overheated engine{yours was}, bent valves can be a common result.
BTW, once you get those cylinders cleaned up be sure to keep them coated in oil so they do not flash rust.
 

cdmccul

Well-known member
Joined
Jun 18, 2013
Messages
504
Also, I am sort of thinking ahead to when I might get around to put the engine back together. Never had worked with the concept of Torque .. I am attaching a pic from the bobcat 632 manual .. Cylinder Head Bolts are specified as Step 1-20-30 for Ft.-Lbs. and 27-41 as Nm. I am totally confused on what this is saying??
Ft-lbs is imperial measurements, and Nm is in metric. Feet of torque at one foot distance, or Newtons of torque at one meter distance.

Your torque wrench will have both numbers probably. What wrench do you have? Can you post a pic of the adjusting end of it?
 

RandyL

Active member
Joined
May 29, 2021
Messages
34
Yes, look the engine head to Randy and left it at his shop. He said he will see what he can do .. to fit into his schedule.
A definite positive news meanwhile today was that I was able to get the engine block finally attached to the engine stand 🙂

Good job on the stand. That will help keep things clean inside and much easier to work on. I think I mentioned it earlier, but, my head was warped .005 between cyl 2 and 3. .005 is max without resurfacing. That area is common as it is the hottest area. Doing great.
 

Jyuma1

Well-known member
Joined
Oct 23, 2022
Messages
74
There is a lot more involved in achieving proper torque then what first meets the eye. Sure, the average torque wrench will have scales in imperial and metric but that is only half the story. In order to achieve proper clamping force for head bolts, there is another consideration even more critical than setting the wrench to the desired value. Friction!

Follow the manufacturers recommendations relative to lubricating (or not) the threads and the bottom of the head of the bolt. Too much friction will lead to under torque and too little friction will lead to over torque.

The higher the torque value the more friction will exist that must be overcome before the bolt can tighten to the desired clamp force (or more accurately bolt stretch). For this reason, some manufacturers recommend an initial torque value that is much lower, followed by an additional angular value for the bolt to turn. For example: a manufacturer may specify an initial torque of 40-foot pounds followed by an additional 90 or 180 or 270 degrees of rotation. They sell tools with a built-in scale showing the additional degrees of rotation but most of the time it's easy enough to eyeball an additional 90 degrees or 180 degrees etc.

The bottom line... follow the manufacturers torque procedure, don't just set the value on the torque wrench and flail away. And one more thing... many guys have developed the bad habit of sneaking up on the "click" that many torque wrenches provide when the set value has been achieved, and then they release the pressure that provided the "click" and then repeatedly apply more pressure to produce the "click" again and again and again. This procedure does nothing but wear out the torque wrench, it does not produce a more accurate torque setting.

Proper torque procedure requires a steady uninterrupted motion right up to the "click" and that's it, further rocking around the "click" is a waste of time and ultimately detrimental to the torque wrench accuracy.
 
OP
OP
bobcatzack

bobcatzack

Well-known member
Joined
Oct 16, 2022
Messages
122
There is a lot more involved in achieving proper torque then what first meets the eye. Sure, the average torque wrench will have scales in imperial and metric but that is only half the story. In order to achieve proper clamping force for head bolts, there is another consideration even more critical than setting the wrench to the desired value. Friction!

Follow the manufacturers recommendations relative to lubricating (or not) the threads and the bottom of the head of the bolt. Too much friction will lead to under torque and too little friction will lead to over torque.

The higher the torque value the more friction will exist that must be overcome before the bolt can tighten to the desired clamp force (or more accurately bolt stretch). For this reason, some manufacturers recommend an initial torque value that is much lower, followed by an additional angular value for the bolt to turn. For example: a manufacturer may specify an initial torque of 40-foot pounds followed by an additional 90 or 180 or 270 degrees of rotation. They sell tools with a built-in scale showing the additional degrees of rotation but most of the time it's easy enough to eyeball an additional 90 degrees or 180 degrees etc.

The bottom line... follow the manufacturers torque procedure, don't just set the value on the torque wrench and flail away. And one more thing... many guys have developed the bad habit of sneaking up on the "click" that many torque wrenches provide when the set value has been achieved, and then they release the pressure that provided the "click" and then repeatedly apply more pressure to produce the "click" again and again and again. This procedure does nothing but wear out the torque wrench, it does not produce a more accurate torque setting.

Proper torque procedure requires a steady uninterrupted motion right up to the "click" and that's it, further rocking around the "click" is a waste of time and ultimately detrimental to the torque wrench accuracy.
Wow I am a bit lost on this unfortunately! But try my best to understand as well as watch as many videos before I attempt to put the engine head back (sometime next week hopefully). Thanks!
 
OP
OP
bobcatzack

bobcatzack

Well-known member
Joined
Oct 16, 2022
Messages
122
Motor on the stand will make it much more "civilized" to work on, nice job.
The head being warped is what I would expect after seeing how badly that gasket was blown, resurfacing it to achieve a flat surface is critical to give the new gasket a fighting chance. I would strongly recommend you inquire with the machinist if he can vacuum test the valves also, with an overheated engine{yours was}, bent valves can be a common result.
BTW, once you get those cylinders cleaned up be sure to keep them coated in oil so they do not flash rust.
Thank you for the wise advise!
Sounds good - will keep the cylinders coated in oil!
 

cdmccul

Well-known member
Joined
Jun 18, 2013
Messages
504
Wow I am a bit lost on this unfortunately! But try my best to understand as well as watch as many videos before I attempt to put the engine head back (sometime next week hopefully). Thanks!
I think what Jyuma1 is saying boils down to:

"Clean the threads in the block, clean the bolts, clean the head. Then follow the instructions in the manual, or in the head gasket packaging, on how to torque each bolt. Use oil only if the instructions call for it."

Chase the threads in the block with a good quality sharp tap. Ideally a "bottoming" tap. Blow air into and across the holes to blow them clear (watch your eyes, and ears).

Check the gasket packaging for torque spec and instructions... Yes, the engine was designed to be built a specific way, but the gasket was made much more recently. I would follow current gasket instructions over old printed manual ones.

Generally, you'll want to bring the bolts down to spec in stages. Following the torque pattern and order, (or following a cris-cross pattern starting in the center of the gasket and working outward if not defined), torque each bolt first to 1/3rd the torque, then 2/3rd, then the final 3/3rd (20, 40, 60 pounds, for example). If the spec then shows to turn the final 90 degrees, do that as a 4th step. I don't know for sure, but that engine is such an old design I would doubt it uses that 4th step.

Be careful when turning the wrench... The difference between 90 pounds and 100 pounds is NOT even a half turn, likely not even a quarter turn of the bolt. Torque will build quickly.
 
Top