Bobcat 632 - Blown Head Gasket?

Help Support SkidSteer Forum:

cdmccul

Well-known member
Joined
Jun 18, 2013
Messages
504
Here's your torque wrench video!

Sorry it is 10 min. I did NOT do this for ad revenue. I do not think it will get ads, I'm sorry if it does. I have YouTube Premium, so when I watch any video I don't see ads... Your millage may vary.

There is some odd background noise and the lights in the shop flicker. The camera work was all fine single handed, so there's some odd spots in the recording.

Feel free to share the video. Ask my questions here or there, I'll do what I can for you (anyone).
Oops!

Gotta add the link!

 
Last edited:
OP
OP
bobcatzack

bobcatzack

Well-known member
Joined
Oct 16, 2022
Messages
122
Here's your torque wrench video!
(Link in next post, oops!)

Sorry it is 10 min. I did NOT do this for ad revenue. I do not think it will get ads, I'm sorry if it does. I have YouTube Premium, so when I watch any video I don't see ads... Your millage may vary.

There is some odd background noise and the lights in the shop flicker. The camera work was all done single handed, so there's some odd spots in the recording.

The audio will also vary in volume a bit.

As Doc Brown might say: "Please excuse the crudity of this model. I didn't have time to build it to scale or to paint it."

Feel free to share the video. Ask me questions here or there, I'll do what I can for you (anyone).
Not sure if I am able to find the link to the video you posted?
 
OP
OP
bobcatzack

bobcatzack

Well-known member
Joined
Oct 16, 2022
Messages
122
It is in the post right above? To of page 9? You "liked" it with a thumbs up?
Yes! Watched it couple times already! Done very professionally and you clearly explain how the three different types of torque wrenches work! I will use the video as a reference when I am to the point of installing the engine head back. Thanks!!
 

Bigg_Billy

Active member
Joined
Jan 31, 2023
Messages
32
It was fantastic meeting you in person, thank you for dropping by to take a look at where things stand with the Bobcat. Thank you too for all the suggestions and assurances that I am on the right track.
Cheers!
Just chiming in at the end here but it doesn't take long for a leaking head gasket to move from sucking and pushing antifreeze to pumping moisture and exhaust into the oil passages to the crankcase. White spark plugs usually indicate where the blown area is, and also reduced compression. Milky oil would indicate water getting in the oil, in which case you'll want to check crank bearing clearances with plastigauge.
 
OP
OP
bobcatzack

bobcatzack

Well-known member
Joined
Oct 16, 2022
Messages
122
Just chiming in at the end here but it doesn't take long for a leaking head gasket to move from sucking and pushing antifreeze to pumping moisture and exhaust into the oil passages to the crankcase. White spark plugs usually indicate where the blown area is, and also reduced compression. Milky oil would indicate water getting in the oil, in which case you'll want to check crank bearing clearances with plastigauge.
Will do! I will google on how to check crank bearing clearance with a plastic gauge 🙂
 
OP
OP
bobcatzack

bobcatzack

Well-known member
Joined
Oct 16, 2022
Messages
122
Oops!

Gotta add the link!


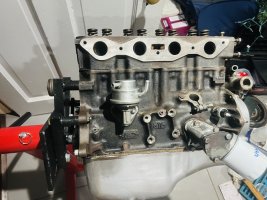
Thank you for your help and Ster1 member help on the phone!! I did manage to get the engine head installed with the new head gasket. Tomorrow will start on getting the rest of the parts installed one by one 🤞🏼
 

Attachments

  • 472CEB38-444A-4565-A88D-1FA6A7BD06FA.jpeg
    472CEB38-444A-4565-A88D-1FA6A7BD06FA.jpeg
    535.5 KB · Views: 60
OP
OP
bobcatzack

bobcatzack

Well-known member
Joined
Oct 16, 2022
Messages
122
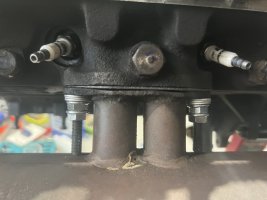
So great to hear from you, and awesome truggled quite a lot to get the longer than normal studs installed and then the exhaust manifolds installed (pic attached) .. but now I can clearly see a thin line of a crack in the middle section of the exhaust manifold
So great to hear from you, and awesome progress!
Struggled quite a lot to get the longer than normal studs installed and then the exhaust manifold installed with new gaskets. However, now I can clearly see a thin line of a crack in the middle section of the exhaust manifold where it meets the engine head (pic attached). Surely seem like the exhaust manifold part that attaches to the head is slightly warped! A bit confused now - I would think I will need to remove the exhaust manifold and get the attaching parts resurfaced?? Or would there be an option to use some high-temp gasket sealer? The gap with the two bolts completely tight appear to be about 2mm.
Thanks!
 

Attachments

  • AE6D519B-3225-4AB5-A50F-E875801392AB.jpeg
    AE6D519B-3225-4AB5-A50F-E875801392AB.jpeg
    324.8 KB · Views: 66

foton

Well-known member
Joined
Mar 1, 2018
Messages
1,304
I think I would be tempted to stack two exaust gaskets together and see what it looks like, you can try a gasket sealer like copper kote, I think it will tolerate the heat there. If you do this you will need to remember to check this area once in a while for leaks until all is kinda seasoned in. I also would never sieze the studs so a retorqueing is easier later if necessary.
 

cdmccul

Well-known member
Joined
Jun 18, 2013
Messages
504
I'm with foton. I'd stack a couple gaskets.

Traditionally you'd have your exhaust manifolds milled flat at the machine shop. Nice smooth head, nice smooth manifold, and NO gasket.

But this is really warped!

If stacking gaskets doesn't clean it up enough, I think you could use a belt sander to reduce the overall warp. No, you're not going to get perfect surfaces, but you would take down some of the warp did try a single gasket will do the job.

With these exhaust gaskets, I wouldn't be worried about reusing EXHAUST gaskets, even if you have a few hours of run time on them. Unless they start flaking apart, reuse them.
 

Dadosix

Member
Joined
Jul 16, 2022
Messages
17
Those studs are painfully long! I can't tell for sure if the studs are keeping the manifold proud of going fully against the head.

I'd be tempted to cut (saw) them shorter to gain some room.

with nuts in place, sawzall / hacksaw blade whatever, then back the nut off to clean up the threads.
 

Ster1

Well-known member
Joined
Feb 8, 2022
Messages
90
It looks to me like the flanges are bent under the studs. You could just take them off again and straighten them with a hammer and a vice. Also, to make getting that exhaust on/off easier, drill those flanges out one size bigger. For some reason, the holes in the flanges don't line up well, and when you make em a tad bigger, that job becomes MUCH easier.
 

foton

Well-known member
Joined
Mar 1, 2018
Messages
1,304
If you go down the double the gasket route when you have the manfoid off cut them studs off then , and they might be hardened steel so something like a speedy cut will be needed a sawzall might just dance around on them and never get anywhere. It might be kinda a pain but maybe you should look for a different exaust manifold down the road after you make sure the engine is going to be all good, I think your warpage is mostly that and not the head. good luck it will get there.
 
OP
OP
bobcatzack

bobcatzack

Well-known member
Joined
Oct 16, 2022
Messages
122
I'm with foton. I'd stack a couple gaskets.

Traditionally you'd have your exhaust manifolds milled flat at the machine shop. Nice smooth head, nice smooth manifold, and NO gasket.

But this is really warped!

If stacking gaskets doesn't clean it up enough, I think you could use a belt sander to reduce the overall warp. No, you're not going to get perfect surfaces, but you would take down some of the warp did try a single gasket will do the job.

With these exhaust gaskets, I wouldn't be worried about reusing EXHAUST gaskets, even if you have a few hours of run time on them. Unless they start flaking apart, reuse them.
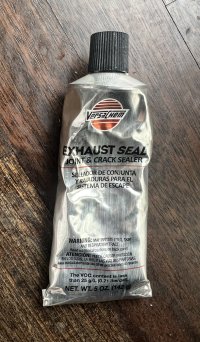
I hadn't seen too many responses on this exhaust manifold issue yesterday .. so I had taken a drastic (and hopefully not a disastrous) step! I used an exhaust joint and crack sealer filled the gaps and retightened the bolds. This morning it's dried like a rock! Which tells me I may have a very hard time if I wanted to remove the exhaust manifold for any repair next time! The damage is done 🙁
 

Attachments

  • 9EBADC59-DDF7-4D6E-B692-5A4CDFEAAC68.jpeg
    9EBADC59-DDF7-4D6E-B692-5A4CDFEAAC68.jpeg
    562.6 KB · Views: 49
  • C2B7E752-3A15-4D76-82DA-B93893A607C0.jpeg
    C2B7E752-3A15-4D76-82DA-B93893A607C0.jpeg
    417.2 KB · Views: 46

foton

Well-known member
Joined
Mar 1, 2018
Messages
1,304
yeah it does dry hard but it is to the point that it is also brittle, so it will not be that bad to remove, you will be ok.
 
Top