TriHonu
Well-known member
- Joined
- Apr 15, 2007
- Messages
- 486
This came up in another thread and I was asked to provide some pictures of one of the machines I converted. My conversion started after my next door neighbor took his Gehl skidsteer in to have the factory power attach installed. I saw it a couple days later and was surprised to see that Gehl uses an electric linear actuator.
I just happened to have a linear actuator on the shelf from a wheelchair lift that was scrapped. So I did a little measuring and this is what I put together.
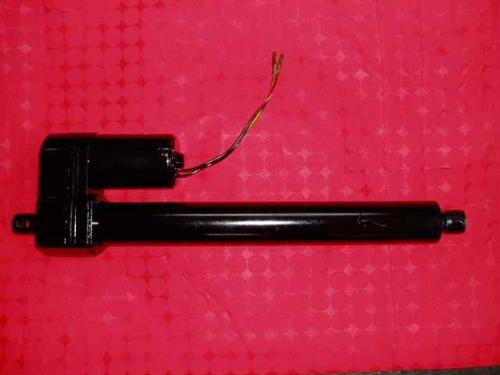
12 volt, 12 inch stroke linear actuator, (my spare).
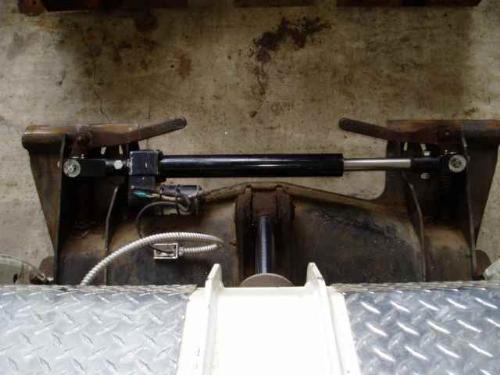
Here it is installed in the latched position.
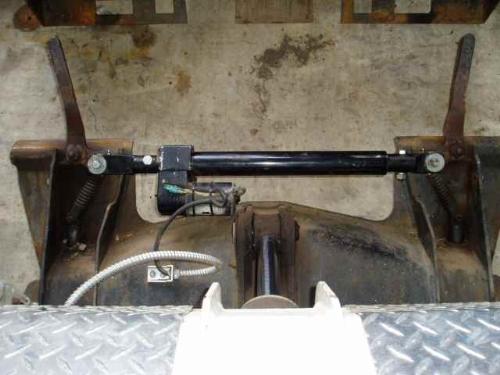
Here it is in the unlatched position.
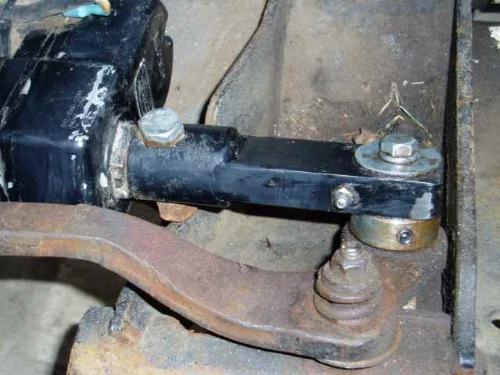
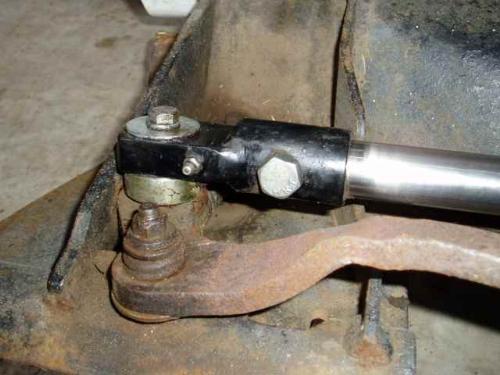
This is the weldament to attach the motor end of the actuator to the Bobtach pin. More detail is shown below. It is spaced away from the handle by a bushing I picked up at the farm supply. I needed clearance to keep the actuator mounting bolt and body of the actuator from hitting the Bobtach.
Here is the second weldament to connect the piston end to the other Bobtach pin.
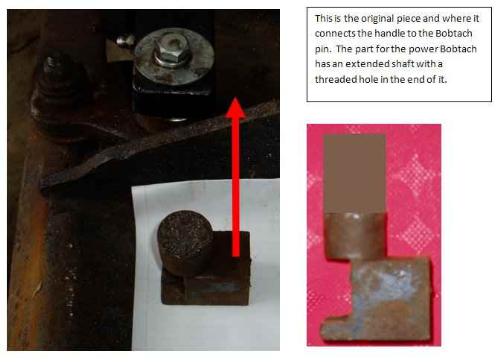
I purchased two parts from Bobcat. They are the pivots for factory power Bobtach where the hydraulic cylinder normally mounts. They were about $40 USD for the two parts. I could have made them but not for $40 dollars worth of time...
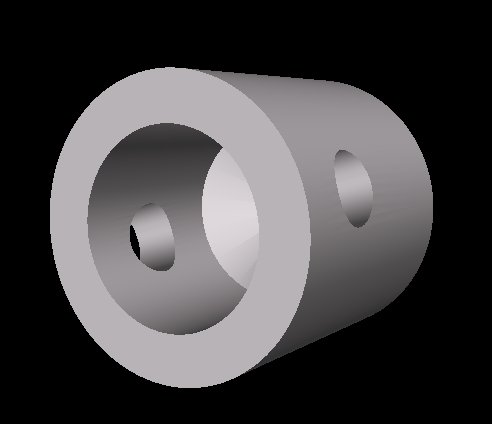
I had to make up two mounts to connect each end of the linear actuator to the new pivots. Each adapter is made from two parts and welded together. Both parts were made from cold rolled steel. A piece of 1.5 inch round bar and a piece of 3/4 inch thick plate. This is an example sleeve that fits to the actuator.
This is the piece to connect to the Bobtach pivot. I drilled for a grease zerk out the top and cross drilled in from the end to connect the port. I then welded the hole shut on the end of the part. The port was put in this position to insure that grease was applied to the area where most pressure is applied by the actuator.
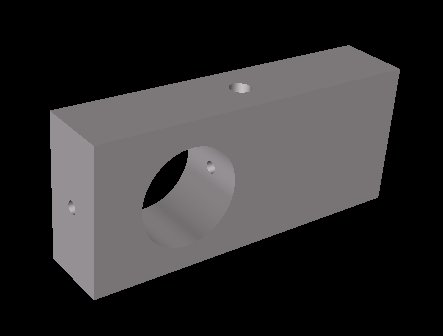
Wire frame view of the part.
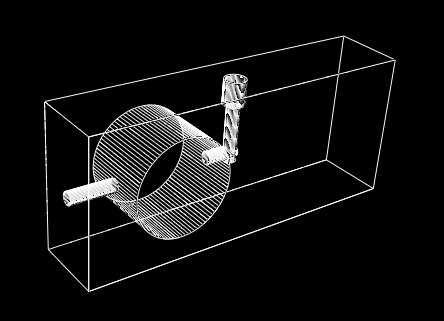
The two parts were tack welded and adjusted for final fit of the actuator to its installed position. I need to insure it would not contact any part of the Bobtach as it opens and closes the pins. They were then removed and welded/painted.
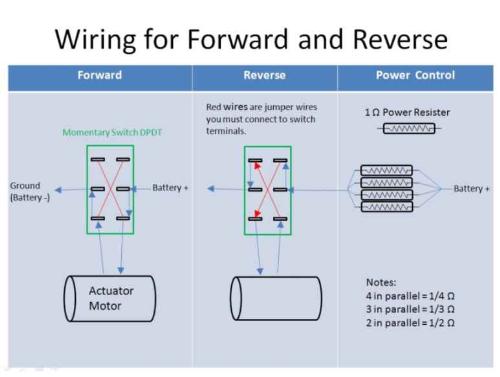
Controlling an actuator is nothing more than applying 12 volts to the two wires on the actuator motor. If you reverse the polarity it will move the piston in the opposite direction. This is accomplished with a Momentary Double Pull Double Throw switch.
I purchased a switch from a local electrical supply. I selected one that would fit in an unused switch position in the dash of my 763. The switch was about $7.
The actuator we used to convert my buddies 753 was much stronger and it had a ball-screw instead of the acme screw on mine. We had some problems on his with the actuator pushing so hard that it was binding itself if you did not release the switch quick enough when latching the pins. We fixed this by installing (4) 1 ohm ceramic power resistors from the local electrical supply, cost was about $2. Wired in parallel they add 1/4 ohm of resistance and will drop the speed and power just enough to keep the actuator from binding.
The arrows on the diagram below show the flow of electricity through the switch.
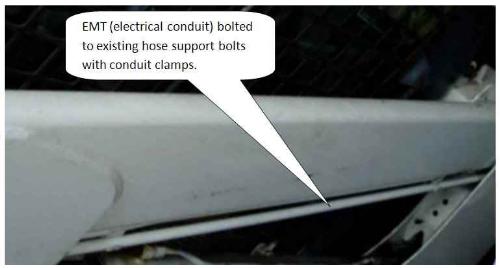
I used SOJ 14 gauge 2 wire cord from the dash, across cab, down into the engine compartment to the base of the boom. I bent a piece of electrical conduit to fit the underside of the boom and down into the chassis to protect and guide the wire out to the boom cross tube. I wanted to go through the boom but mine is sealed on the pivot end. When I built the second one for my buddies 753 G Series we ran the wire through the boom and out a hole next to the hydraulic couplers.
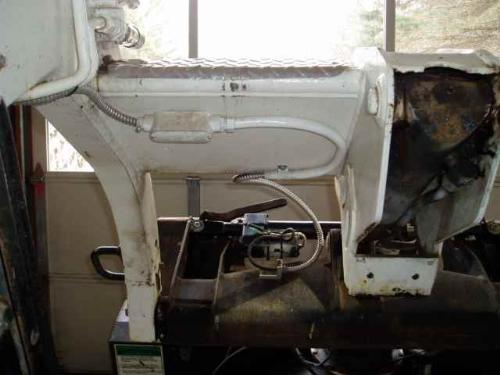
I drilled and tapped two holes to install a conduit junction box on the back of the cross tube. The cord is cut and wire nutted to the drop cord in the junction box. I wanted to insure if the wire running to the actuator got caught on something it can tear away at the actuator or in the junction box without doing any further damage to the cord or conduit running up the boom.
Since I already had an actuator, total cost for me was about $80. For the my buddies conversion it was less than $200 in parts since he picked up a used actuator for $90.
I thought about just buying a used Bobtach hydraulic cylinder and just plumbing it into my auxiliary couplers on the boom. I decided against it because of the number of hydraulic attachments I have and the cost of the hydraulic cylinder. I don't recall exactly what Bobcat quoted for the cylinder but they are high! Even the used ones I found were more way more than what it cost to convert one using a linear actuator.
I just happened to have a linear actuator on the shelf from a wheelchair lift that was scrapped. So I did a little measuring and this is what I put together.
12 volt, 12 inch stroke linear actuator, (my spare).

Here it is installed in the latched position.

Here it is in the unlatched position.

This is the weldament to attach the motor end of the actuator to the Bobtach pin. More detail is shown below. It is spaced away from the handle by a bushing I picked up at the farm supply. I needed clearance to keep the actuator mounting bolt and body of the actuator from hitting the Bobtach.

Here is the second weldament to connect the piston end to the other Bobtach pin.

I purchased two parts from Bobcat. They are the pivots for factory power Bobtach where the hydraulic cylinder normally mounts. They were about $40 USD for the two parts. I could have made them but not for $40 dollars worth of time...

I had to make up two mounts to connect each end of the linear actuator to the new pivots. Each adapter is made from two parts and welded together. Both parts were made from cold rolled steel. A piece of 1.5 inch round bar and a piece of 3/4 inch thick plate. This is an example sleeve that fits to the actuator.

This is the piece to connect to the Bobtach pivot. I drilled for a grease zerk out the top and cross drilled in from the end to connect the port. I then welded the hole shut on the end of the part. The port was put in this position to insure that grease was applied to the area where most pressure is applied by the actuator.

Wire frame view of the part.

The two parts were tack welded and adjusted for final fit of the actuator to its installed position. I need to insure it would not contact any part of the Bobtach as it opens and closes the pins. They were then removed and welded/painted.
Controlling an actuator is nothing more than applying 12 volts to the two wires on the actuator motor. If you reverse the polarity it will move the piston in the opposite direction. This is accomplished with a Momentary Double Pull Double Throw switch.
I purchased a switch from a local electrical supply. I selected one that would fit in an unused switch position in the dash of my 763. The switch was about $7.
The actuator we used to convert my buddies 753 was much stronger and it had a ball-screw instead of the acme screw on mine. We had some problems on his with the actuator pushing so hard that it was binding itself if you did not release the switch quick enough when latching the pins. We fixed this by installing (4) 1 ohm ceramic power resistors from the local electrical supply, cost was about $2. Wired in parallel they add 1/4 ohm of resistance and will drop the speed and power just enough to keep the actuator from binding.
The arrows on the diagram below show the flow of electricity through the switch.

I used SOJ 14 gauge 2 wire cord from the dash, across cab, down into the engine compartment to the base of the boom. I bent a piece of electrical conduit to fit the underside of the boom and down into the chassis to protect and guide the wire out to the boom cross tube. I wanted to go through the boom but mine is sealed on the pivot end. When I built the second one for my buddies 753 G Series we ran the wire through the boom and out a hole next to the hydraulic couplers.

I drilled and tapped two holes to install a conduit junction box on the back of the cross tube. The cord is cut and wire nutted to the drop cord in the junction box. I wanted to insure if the wire running to the actuator got caught on something it can tear away at the actuator or in the junction box without doing any further damage to the cord or conduit running up the boom.

Since I already had an actuator, total cost for me was about $80. For the my buddies conversion it was less than $200 in parts since he picked up a used actuator for $90.
I thought about just buying a used Bobtach hydraulic cylinder and just plumbing it into my auxiliary couplers on the boom. I decided against it because of the number of hydraulic attachments I have and the cost of the hydraulic cylinder. I don't recall exactly what Bobcat quoted for the cylinder but they are high! Even the used ones I found were more way more than what it cost to convert one using a linear actuator.

