Electric Power Bob-Tach

Help Support SkidSteer Forum:

TriHonu

Well-known member
Joined
Apr 15, 2007
Messages
486
This came up in another thread and I was asked to provide some pictures of one of the machines I converted. My conversion started after my next door neighbor took his Gehl skidsteer in to have the factory power attach installed. I saw it a couple days later and was surprised to see that Gehl uses an electric linear actuator.
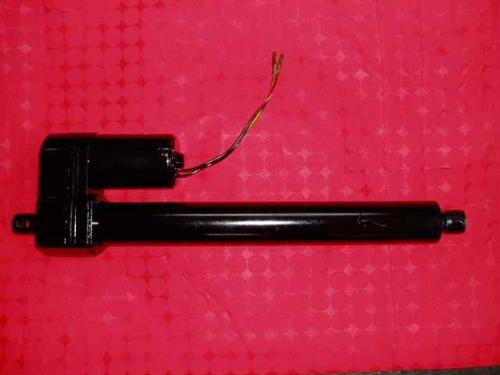
I just happened to have a linear actuator on the shelf from a wheelchair lift that was scrapped. So I did a little measuring and this is what I put together.
12 volt, 12 inch stroke linear actuator, (my spare).
1_LinearActuator.jpg

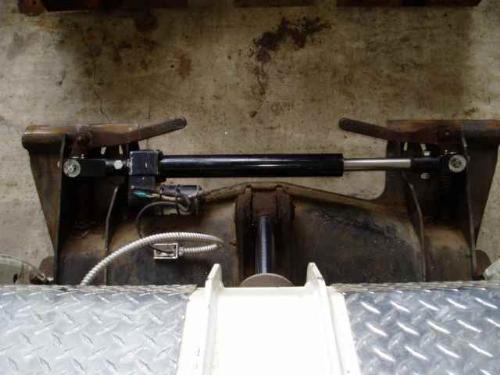
Here it is installed in the latched position.
2_Closed.jpg

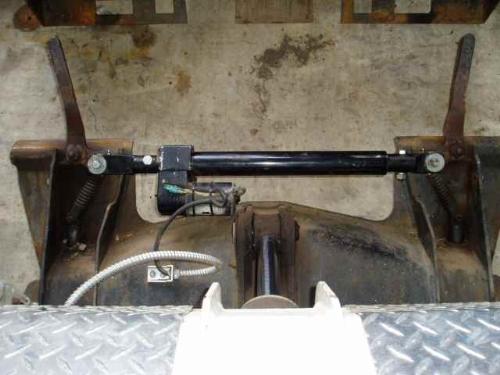
Here it is in the unlatched position.
3_Open2.jpg

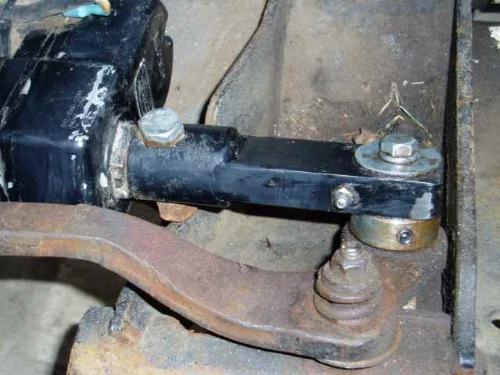
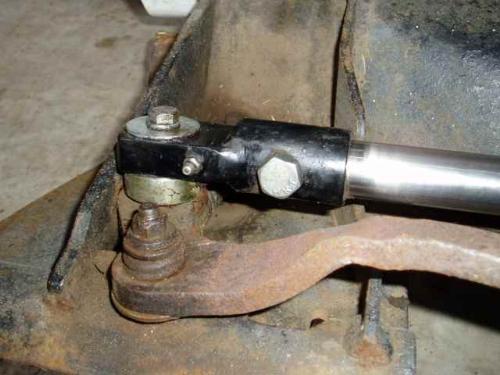
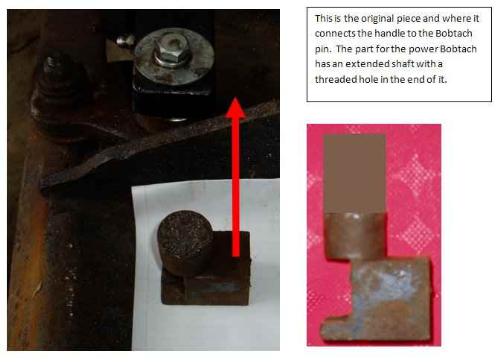
This is the weldament to attach the motor end of the actuator to the Bobtach pin. More detail is shown below. It is spaced away from the handle by a bushing I picked up at the farm supply. I needed clearance to keep the actuator mounting bolt and body of the actuator from hitting the Bobtach.
4_Weldament.jpg

Here is the second weldament to connect the piston end to the other Bobtach pin.
5_Welament2.jpg

I purchased two parts from Bobcat. They are the pivots for factory power Bobtach where the hydraulic cylinder normally mounts. They were about $40 USD for the two parts. I could have made them but not for $40 dollars worth of time...
6_PivotDetail.jpg

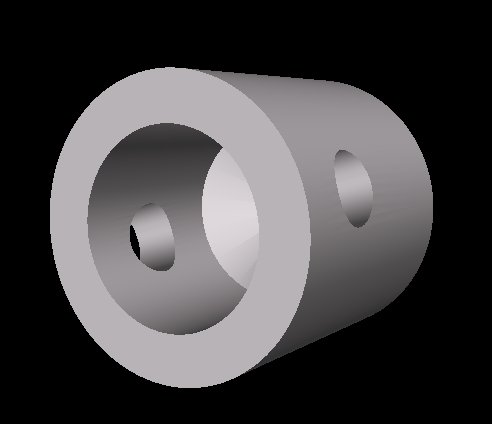
I had to make up two mounts to connect each end of the linear actuator to the new pivots. Each adapter is made from two parts and welded together. Both parts were made from cold rolled steel. A piece of 1.5 inch round bar and a piece of 3/4 inch thick plate. This is an example sleeve that fits to the actuator.
7_Adapter_Round.jpg

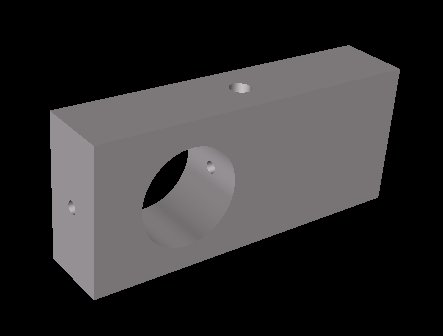
This is the piece to connect to the Bobtach pivot. I drilled for a grease zerk out the top and cross drilled in from the end to connect the port. I then welded the hole shut on the end of the part. The port was put in this position to insure that grease was applied to the area where most pressure is applied by the actuator.
8_Adapter_Square.jpg

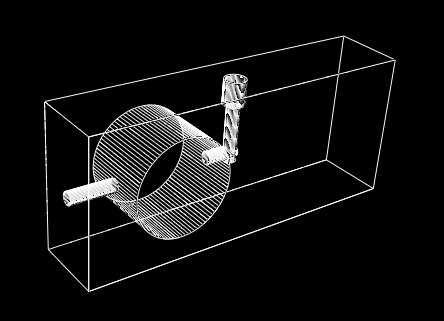
Wire frame view of the part.
9_Adapter_Square_Wireframe.jpg

The two parts were tack welded and adjusted for final fit of the actuator to its installed position. I need to insure it would not contact any part of the Bobtach as it opens and closes the pins. They were then removed and welded/painted.
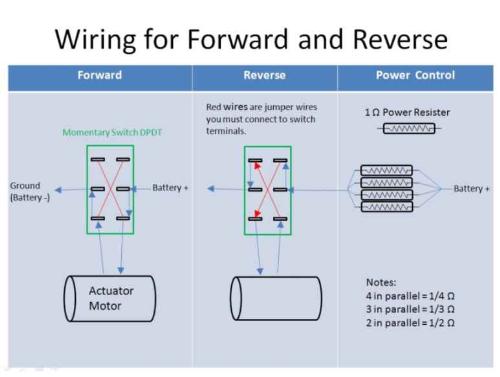
Controlling an actuator is nothing more than applying 12 volts to the two wires on the actuator motor. If you reverse the polarity it will move the piston in the opposite direction. This is accomplished with a Momentary Double Pull Double Throw switch.
I purchased a switch from a local electrical supply. I selected one that would fit in an unused switch position in the dash of my 763. The switch was about $7.
The actuator we used to convert my buddies 753 was much stronger and it had a ball-screw instead of the acme screw on mine. We had some problems on his with the actuator pushing so hard that it was binding itself if you did not release the switch quick enough when latching the pins. We fixed this by installing (4) 1 ohm ceramic power resistors from the local electrical supply, cost was about $2. Wired in parallel they add 1/4 ohm of resistance and will drop the speed and power just enough to keep the actuator from binding.
The arrows on the diagram below show the flow of electricity through the switch.
10_WiringDiagram.jpg

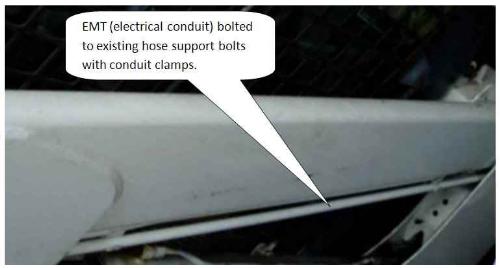
I used SOJ 14 gauge 2 wire cord from the dash, across cab, down into the engine compartment to the base of the boom. I bent a piece of electrical conduit to fit the underside of the boom and down into the chassis to protect and guide the wire out to the boom cross tube. I wanted to go through the boom but mine is sealed on the pivot end. When I built the second one for my buddies 753 G Series we ran the wire through the boom and out a hole next to the hydraulic couplers.
11_Conduit.jpg

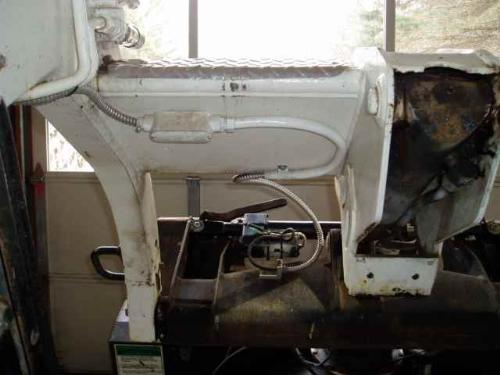
I drilled and tapped two holes to install a conduit junction box on the back of the cross tube. The cord is cut and wire nutted to the drop cord in the junction box. I wanted to insure if the wire running to the actuator got caught on something it can tear away at the actuator or in the junction box without doing any further damage to the cord or conduit running up the boom.
12_Boom.jpg

Since I already had an actuator, total cost for me was about $80. For the my buddies conversion it was less than $200 in parts since he picked up a used actuator for $90.
I thought about just buying a used Bobtach hydraulic cylinder and just plumbing it into my auxiliary couplers on the boom. I decided against it because of the number of hydraulic attachments I have and the cost of the hydraulic cylinder. I don't recall exactly what Bobcat quoted for the cylinder but they are high! Even the used ones I found were more way more than what it cost to convert one using a linear actuator.
 

Tazza

Moderator
Staff member
Joined
Dec 7, 2004
Messages
16,829
Very well done!!!
So simple, saves a lot of mucking around with hydraulic plumbing too.
 

thetool

Well-known member
Joined
Mar 22, 2008
Messages
516
Very well done!!!
So simple, saves a lot of mucking around with hydraulic plumbing too.
Man o man.....Thanks TriHonu........
That is excellent work, and an excellent post!
That's a lot to share, very generous of you to do so in this forum. Any body who uses this idea definitley owes you a beer!
Stuff like this needs a special home on the site. Like bremery's post on the rear door glass, it exceeds a standard that is a cut above your average how-to's. IMO......=).
 

Land-Tech

Well-known member
Joined
May 13, 2008
Messages
160
Man o man.....Thanks TriHonu........
That is excellent work, and an excellent post!
That's a lot to share, very generous of you to do so in this forum. Any body who uses this idea definitley owes you a beer!
Stuff like this needs a special home on the site. Like bremery's post on the rear door glass, it exceeds a standard that is a cut above your average how-to's. IMO......=).
Yea that was a great post. I've always stuck with manual levers because of the freezing and binding that comes from frozen dirt and ice.That's a great modification for most guys.
Are you using Google Sketchup for your drawings? A cool way to illustrate an idea. Scott
 

jerry

Well-known member
Joined
May 3, 2007
Messages
2,043
Thank you, this is great now I can print the whole thing out and start scrounging for parts.
 
OP
OP
TriHonu

TriHonu

Well-known member
Joined
Apr 15, 2007
Messages
486
Thank you, this is great now I can print the whole thing out and start scrounging for parts.
You're welcome.
emotion-2.gif
I am happy to contribute. As I have stated in a previous post this is a great site for people to share ideas and information. I have learned from reading the discussions on this site and have even helped some of my friends with information from this site. The least I can do is to try to share some of what I know.


Quote:
Land-Tech - 'I've always stuck with manual levers because of the freezing and binding that comes from frozen dirt and ice.That's a great modification for most guys.
Are you using Google Sketchup for your drawings?'
Frozen dirt and ice have not been a problem yet. The actuator on my buddies machine is rated for 500 lbs of force and is way more than what is required. The one on mine is rated for 250 lbs of force and has no problems. I wouldn't recommend less than 250 lb capacity.
The 3D drawings were done in a freeware CAD program from www.emachineshop.com. It is designed to allow you to design a part and define the machining operations, tolerances and material type and submit it to the company. Based on the number of units the software will give you a quote for the job in less than a minute. Of course the more you order the cheaper cost per part. I have compared costs with some guys in the business and they are quite competitive on their costs.
If you want the parts give them a credit card number and the parts will be made and shipped to you. Your drawing and specifications are converted to a CAM program and they send it out to the CNC machines.
 

Land-Tech

Well-known member
Joined
May 13, 2008
Messages
160
You're welcome. I am happy to contribute. As I have stated in a previous post this is a great site for people to share ideas and information. I have learned from reading the discussions on this site and have even helped some of my friends with information from this site. The least I can do is to try to share some of what I know.


Quote:
Land-Tech - 'I've always stuck with manual levers because of the freezing and binding that comes from frozen dirt and ice.That's a great modification for most guys.
Are you using Google Sketchup for your drawings?'


Frozen dirt and ice have not been a problem yet. The actuator on my buddies machine is rated for 500 lbs of force and is way more than what is required. The one on mine is rated for 250 lbs of force and has no problems. I wouldn't recommend less than 250 lb capacity.
The 3D drawings were done in a freeware CAD program from www.emachineshop.com. It is designed to allow you to design a part and define the machining operations, tolerances and material type and submit it to the company. Based on the number of units the software will give you a quote for the job in less than a minute. Of course the more you order the cheaper cost per part. I have compared costs with some guys in the business and they are quite competitive on their costs.
If you want the parts give them a credit card number and the parts will be made and shipped to you. Your drawing and specifications are converted to a CAM program and they send it out to the CNC machines.
Most of the summer its not a problem but during breakup in the spring and in the fall I'll have problems. A tap on the pin from underneath is all that is needed. I haven't checked out the new gehl system other than seeing the pics on there site. Google is freeware too and easy to use but yours is more practical for design work.
Also an option for hydralic cylinders can be something found at a snowplow dealer. Western has double action for around $100 that are narrow with a long stroke. Not everyones cup of tea but can be used for a lot of applications on attachments.
Anyway, look forward to more of your projects.Scott
 

Luthor

Well-known member
Joined
Nov 15, 2005
Messages
179
Most of the summer its not a problem but during breakup in the spring and in the fall I'll have problems. A tap on the pin from underneath is all that is needed. I haven't checked out the new gehl system other than seeing the pics on there site. Google is freeware too and easy to use but yours is more practical for design work.
Also an option for hydralic cylinders can be something found at a snowplow dealer. Western has double action for around $100 that are narrow with a long stroke. Not everyones cup of tea but can be used for a lot of applications on attachments.
Anyway, look forward to more of your projects.Scott
Great work and an excellent write up TriHonu.
 

skidsteer.ca

Well-known member
Joined
Jan 20, 2006
Messages
3,853
Great work and an excellent write up TriHonu.
"We're not worthy, We're not worthy..."
Great job!
FAQ that one? imo.
The only small concern I have for you is to be sure your wires bend all along the loops you made from the boom to the QA, so they don't break from being bent too much in the same place.
How many amps doe it draw?
Ken
 
OP
OP
TriHonu

TriHonu

Well-known member
Joined
Apr 15, 2007
Messages
486
"We're not worthy, We're not worthy..."
Great job!
FAQ that one? imo.
The only small concern I have for you is to be sure your wires bend all along the loops you made from the boom to the QA, so they don't break from being bent too much in the same place.
How many amps doe it draw?
Ken
Quote:
Ken - The only small concern I have for you is to be sure your wires bend all along the loops you made from the boom to the QA, so they don't break from being bent too much in the same place.

How many amps doe it draw?'
The conduit that runs along the boom has a 45 degree sweep below the boom pivot. The cord has a piece of hose around it that also is fed up into the conduit and attached. Even with the boom at full lift there is minimal strain and very little flex. The cord is attached to the chassis with adhesive pads with zip ties to keep the wire stationary.
The only place where the wire has to flex is from the boom cross tube to the Bobtach. It is a little hard to see in the picture but the flex conduit is 'S' shaped as you look at it from the cab. As you dump the bucket the the wire is gradually twisted about 90 degrees rather than bent sharply. The flex conduit also prevents the wire from bending sharply.
I did not put a meter on them but the manufacturer's literature states the 250 lb actuator on my loader has an acme screw and draws 10 amps at max load. The 500 lb actuator on my buddies loader has a ball screw and draws 14 amps at max load.
 

perry

Well-known member
Joined
Aug 22, 2006
Messages
869
Quote:
Ken - The only small concern I have for you is to be sure your wires bend all along the loops you made from the boom to the QA, so they don't break from being bent too much in the same place.

How many amps doe it draw?'


The conduit that runs along the boom has a 45 degree sweep below the boom pivot. The cord has a piece of hose around it that also is fed up into the conduit and attached. Even with the boom at full lift there is minimal strain and very little flex. The cord is attached to the chassis with adhesive pads with zip ties to keep the wire stationary.
The only place where the wire has to flex is from the boom cross tube to the Bobtach. It is a little hard to see in the picture but the flex conduit is 'S' shaped as you look at it from the cab. As you dump the bucket the the wire is gradually twisted about 90 degrees rather than bent sharply. The flex conduit also prevents the wire from bending sharply.
I did not put a meter on them but the manufacturer's literature states the 250 lb actuator on my loader has an acme screw and draws 10 amps at max load. The 500 lb actuator on my buddies loader has a ball screw and draws 14 amps at max load.
Good job...........
 
OP
OP
TriHonu

TriHonu

Well-known member
Joined
Apr 15, 2007
Messages
486
TriHonu, I looked all over and the linear rod you have is a unique small piece. I guess I'll try it with a small hyd. cylinder and low pressure relief valve?.
Linear actuators are quite common. I frequently see them on Ebay. If you search for "Linear Actuator" or "Actuator" in Business and Industrial or on Ebay Motors you will find them.
The ones I have and have used are made by Warner Linear. The models have changed, but the ones I have are Electrac 2 and Electrac 10. The Electrac 2 line is a general purpose DC actuator and the Electrac 10 is a general purpose industrial duty DC actuator.
The new models are listed in their catalog available on their website under "Literature". It looks like the new models are A-Track 2 and A-Track 10. Warner is not the only manufacturer. You will find many others listed on Ebay.
 

perry

Well-known member
Joined
Aug 22, 2006
Messages
869
Linear actuators are quite common. I frequently see them on Ebay. If you search for "Linear Actuator" or "Actuator" in Business and Industrial or on Ebay Motors you will find them.
The ones I have and have used are made by Warner Linear. The models have changed, but the ones I have are Electrac 2 and Electrac 10. The Electrac 2 line is a general purpose DC actuator and the Electrac 10 is a general purpose industrial duty DC actuator.
The new models are listed in their catalog available on their website under "Literature". It looks like the new models are A-Track 2 and A-Track 10. Warner is not the only manufacturer. You will find many others listed on Ebay.
Excellent reply, thank you.
 
Joined
Dec 15, 2009
Messages
8
Excellent reply, thank you.
I wasn't here back in February to tell you how awesome I think that is. But I am here now...and that is freakin' sweet. Visions of actuators, trails of self braided wire, and the smell of lathed steel started to run rampant through my mind as I sat here grinning like an idiot. No longer would I get tangled in my seat belt jumping in and out of the cab to switch between buckets, sweepers, and whatnot. Then like all good dreams it came to an end... pivot points for the quick attach are located on the inside of my 170's mounting plate. It has been mentioned in this thread a few times, and I'll gladly say it again. Well done on the DIY. Have you had any problems with it? The elements, material getting in the way, power draws, etc? Sean
 
OP
OP
TriHonu

TriHonu

Well-known member
Joined
Apr 15, 2007
Messages
486
I wasn't here back in February to tell you how awesome I think that is. But I am here now...and that is freakin' sweet. Visions of actuators, trails of self braided wire, and the smell of lathed steel started to run rampant through my mind as I sat here grinning like an idiot. No longer would I get tangled in my seat belt jumping in and out of the cab to switch between buckets, sweepers, and whatnot. Then like all good dreams it came to an end... pivot points for the quick attach are located on the inside of my 170's mounting plate. It has been mentioned in this thread a few times, and I'll gladly say it again. Well done on the DIY. Have you had any problems with it? The elements, material getting in the way, power draws, etc? Sean
No problems as of now. The one I installed on my friends 753 has been solid also. However, this fall he managed to bend the shaft of the actuator while moving a bunch of small rip-rap (5-10 lb stones). He was going full tilt boogie for about 9 hours and didn't finish until after dark. He did not notice it until he got the machine home, and doesn't know how he bent it. The actuator still works but the shaft has a long bend in it.
He hasn't been worried enough about it to bring it over. I told him we could probably straighten it out in about a half hour. The shaft is just a piece of tube.
I'll tell you that replacing an actuator is a lot cheaper than replacing a Power Bobtach hydraulic cylinder. My dealer told me they sell a good number of these hydraulic cylinders each year.
I'll compliment the Gehl engineers. The attachment plate for their machines is a different part than the standard mount. They have protected the actuator by recessing it in the bucket mount and protected it with additional plates.
 

bobcat_ron

Well-known member
Joined
Aug 6, 2007
Messages
334
No problems as of now. The one I installed on my friends 753 has been solid also. However, this fall he managed to bend the shaft of the actuator while moving a bunch of small rip-rap (5-10 lb stones). He was going full tilt boogie for about 9 hours and didn't finish until after dark. He did not notice it until he got the machine home, and doesn't know how he bent it. The actuator still works but the shaft has a long bend in it.
He hasn't been worried enough about it to bring it over. I told him we could probably straighten it out in about a half hour. The shaft is just a piece of tube.
I'll tell you that replacing an actuator is a lot cheaper than replacing a Power Bobtach hydraulic cylinder. My dealer told me they sell a good number of these hydraulic cylinders each year.
I'll compliment the Gehl engineers. The attachment plate for their machines is a different part than the standard mount. They have protected the actuator by recessing it in the bucket mount and protected it with additional plates.
There is also a Hydraulic Quick Latch system for Mustang/Gehl/Takeuchi loaders now from Bradco, my TL130 is getting one installed:
http://www.bradcoattachments.com/product_detail.aspx?ID=441

It has a diverter valve set up on the aux. system with an over ride switch and alarm in the cab, you then use your aux. buttons to operate the cylinder.
 

papow22

Member
Joined
Apr 6, 2008
Messages
16
TriHonu, I looked all over and the linear rod you have is a unique small piece. I guess I'll try it with a small hyd. cylinder and low pressure relief valve?.
Thanks to TriHonu I believe I see a Light at the end of the tunnel,SURE HOPE IT'S NOT A LOCOMOTIVE.LMAO.THAT linear rod looks alot like those you would find on old 10 foot sat dishes,the ones that use to adjust for the stations.well that was my 1.89 cents.
 

papow22

Member
Joined
Apr 6, 2008
Messages
16
Thanks to TriHonu I believe I see a Light at the end of the tunnel,SURE HOPE IT'S NOT A LOCOMOTIVE.LMAO.THAT linear rod looks alot like those you would find on old 10 foot sat dishes,the ones that use to adjust for the stations.well that was my 1.89 cents.
For those that live in CANADA,I found one in Princess Auto Machinery.It's also 12v.,max force 500 pounds.I found it under PNEUMATIC PRODUCTS. 269.99 can. I was amazed to see such a idea,Cause 2 weeks before xmas I was talking to a mill wright about the design of with hydraulic.But now that's out to the door,THANKS to Trihonu for a better idea. Cause the wheel loaders have one hook up to the hydraulics,For the to switch from log forks to lumber forks or bucket without leaving the the seat. Once again THANKS to "Trihonu".
 
Top