I am new to the forum and fabricator by trade. I had been looking on and off over the last few years for a kit like this but hydraulic..... However I was so amazed that this worked and so I gathered a few misc items and ....... It works like a champ! I have not been able to actually totally install it due to that I am freaking busy. However it tested out perfectly and I wanted to thank you for your input and fore site to even try something like this. I hope to post some pictures in the near future of my 36" tree spade I built about 6 years ago Thanks G
You are using an out of date browser. It may not display this or other websites correctly.
You should upgrade or use an alternative browser.
You should upgrade or use an alternative browser.
Electric Power Bob-Tach
- Thread starter TriHonu
- Start date
TriHonu should have charged for the plansI am new to the forum and fabricator by trade. I had been looking on and off over the last few years for a kit like this but hydraulic..... However I was so amazed that this worked and so I gathered a few misc items and ....... It works like a champ! I have not been able to actually totally install it due to that I am freaking busy. However it tested out perfectly and I wanted to thank you for your input and fore site to even try something like this. I hope to post some pictures in the near future of my 36" tree spade I built about 6 years ago Thanks G
")
Nice to hear that it all checks out with how you made yours, i never would have thought an actuator like that would have the power either. Mind you, the hydraulic version Bobcat sells does have a relief for the hydraulic cylinder they use to lower it's power quite a lot.
VistaPropertiesLLC
New member
- Joined
- Feb 10, 2016
- Messages
- 1
What is the width of the 3/4 flat stock used to make the actuator attachment brackets? I ordered the factory bobtach pins like you said and I found the linear actuator and all its components on amazon. Including all the wiring, switch with relays, flexible liquid tight conduit and connectors came to 240.00 plus 44.15 for the bobtach pins. Now I did get a 100 ft roll of the liquid tight flexible conduit because I'm going to do 2 machines but I'm starting with my T250.
OP
OP
TriHonu
Well-known member
- Joined
- Apr 15, 2007
- Messages
- 486
The width is approximately 1-1/2"What is the width of the 3/4 flat stock used to make the actuator attachment brackets? I ordered the factory bobtach pins like you said and I found the linear actuator and all its components on amazon. Including all the wiring, switch with relays, flexible liquid tight conduit and connectors came to 240.00 plus 44.15 for the bobtach pins. Now I did get a 100 ft roll of the liquid tight flexible conduit because I'm going to do 2 machines but I'm starting with my T250.
I chose the width to match the outside diameter of the sleeve that fits to the actuator. The sleeve was made from 1-1/2" round bar.
Our mustang uses a aftermarket system with a 12 volts hydraulic pump for the quick attach . Yes the bobcat cylinder is expensive almost 800 USD for a.New oneThe width is approximately 1-1/2"
I chose the width to match the outside diameter of the sleeve that fits to the actuator. The sleeve was made from 1-1/2" round bar.
[email protected]
Well-known member
- Joined
- Feb 23, 2011
- Messages
- 881
sry to dig up old thread but i'm very intrigued by this, i guess the only issue i see is that you can't use the levers manually, correct?Our mustang uses a aftermarket system with a 12 volts hydraulic pump for the quick attach . Yes the bobcat cylinder is expensive almost 800 USD for a.New one
That's right, once it's fitted, you have to use the button to operate the levers.sry to dig up old thread but i'm very intrigued by this, i guess the only issue i see is that you can't use the levers manually, correct?
Billwardak
New member
- Joined
- Aug 8, 2019
- Messages
- 1
I apologize for bringing such an old post back to life but i am in the process of doing this to my bobcat and for the life of me cannot find anywhere to get the weldements mentioned in the post. I have everything else but dont have the skill or machinery to create them. Is there anywhere i might be able to order the two ends for the actuater?
OP
OP
TriHonu
Well-known member
- Joined
- Apr 15, 2007
- Messages
- 486
 I apologize for bringing such an old post back to life but i am in the process of doing this to my bobcat and for the life of me cannot find anywhere to get the weldements mentioned in the post. I have everything else but dont have the skill or machinery to create them. Is there anywhere i might be able to order the two ends for the actuater?
Not that I am aware of.
I am not aware of any standard that specifies the external dimensions for linear actuators. The ends would need to be fit to the actuator you purchased.
Any decent weld/fabrication shop can make them if they had the actuator and access to the Bob-Tach.
"Brilliant!" What a great idea. Thank you so much for sharing. I have been toying with the idea of using an onboard 12v electric air compressor and an air cylinder. However, this appears to be much simpler and more cost effective than any other solution I have seen. I'm sure I have a number of linear actuators in the parts bin. Thank you for sharing. The write up is very professional.
Jeff Jewson
New member
Love the idea. Have a 753 and the 250# actuator. Could you let me know the bobcat parts you bought part numbers? That's all I'm missing here I think. Thanks very much!!
OP
OP
TriHonu
Well-known member
- Joined
- Apr 15, 2007
- Messages
- 486
On mine the part number is 6731119 - PIVOT, WEDGE, 50 mm (1.95") long pin.
The Pivot Wedge can be bought with the short .75" long pin or the long pin version for the Power Bob-Tach.
You can look up the Part Number for your loader at https://www.bobcatpartsonline.com
Enter your model number or serial number and open the BOB-TACH parts list.
The Pivot Wedge can be bought with the short .75" long pin or the long pin version for the Power Bob-Tach.
You can look up the Part Number for your loader at https://www.bobcatpartsonline.com
Enter your model number or serial number and open the BOB-TACH parts list.
Last edited:
TriHonu this is probably a stupid question but I looked up these 6731119 - PIVOT, WEDGE, 50 mm (1.95") long pin. and for the life of me can't figure out where they go and why they need them. Also do you have to set it up so the actuator piston fully closes when in that position or will it just stop when it is in the fully open position ?On mine the part number is 6731119 - PIVOT, WEDGE, 50 mm (1.95") long pin.
The Pivot Wedge can be bought with the short .75" long pin or the long pin version for the Power Bob-Tach.
You can look up the Part Number for your loader at https://www.bobcatpartsonline.com
Enter your model number or serial number and open the BOB-TACH parts list.
OP
OP
TriHonu
Well-known member
- Joined
- Apr 15, 2007
- Messages
- 486
The part is the pivot that the handle moves to slide the wedge pins.
The longer pin extends through the handle so you can connect the actuator on top of the handle. The longer pin goes through the handle, the gold colored bushing and then through the flat plate attached to the end of the actuator.
If you page back to the pictures, you will see that I have my actuator set up so it is almost fully retracted when the handles are in the open position. This was required because of the length of the actuator I used.
The actuator I used did not have built-in limit switches so you have to let go of the button as handle approaches fully open or closed.
Last edited:
Thank You !The part is the pivot that the handle moves to slide the wedge pins.
The longer pin extends through the handle so you can connect the actuator on top of the handle. The longer pin goes through the handle, the gold colored bushing and then through the flat plate attached to the end of the actuator.
If you page back to the pictures, you will see that I have my actuator set up so it is almost fully retracted when the handles are in the open position. This was required because of the length of the actuator I used.
The actuator I used did not have built-in limit switches so you have to let go of the button as handle approaches fully open or closed.
Any Chance you would have the Bobcat Part numbers for the spacers you used?This came up in another thread and I was asked to provide some pictures of one of the machines I converted. My conversion started after my next door neighbor took his Gehl skidsteer in to have the factory power attach installed. I saw it a couple days later and was surprised to see that Gehl uses an electric linear actuator.
I just happened to have a linear actuator on the shelf from a wheelchair lift that was scrapped. So I did a little measuring and this is what I put together.
12 volt, 12 inch stroke linear actuator, (my spare).
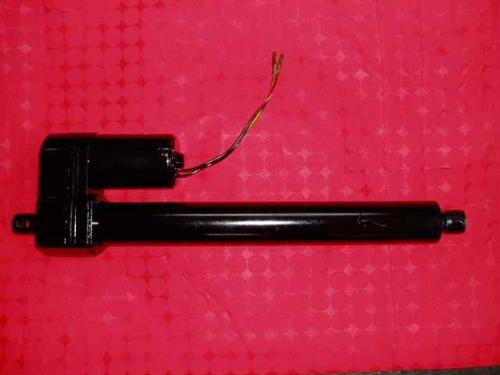
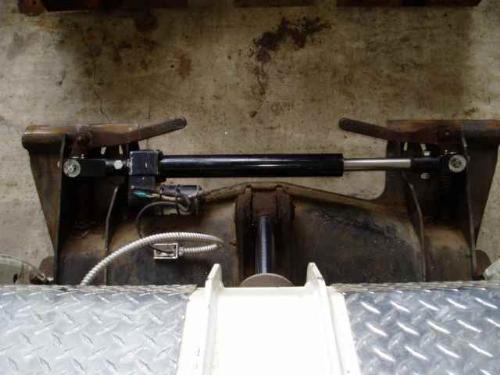
Here it is installed in the latched position.
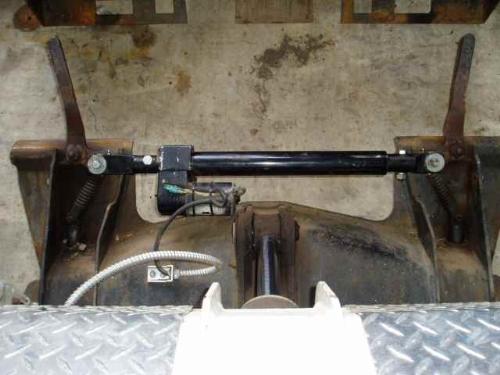
Here it is in the unlatched position.
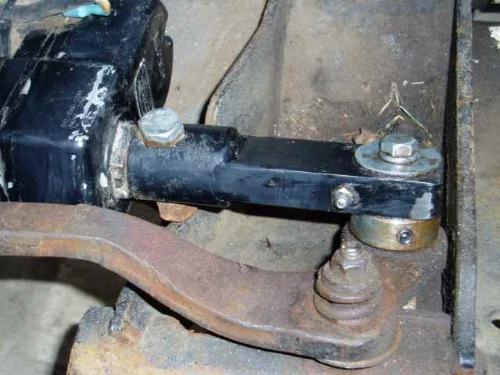
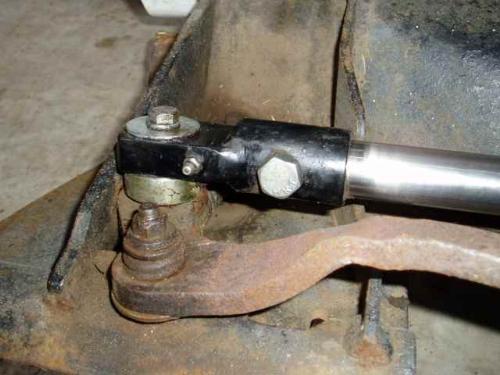
This is the weldament to attach the motor end of the actuator to the Bobtach pin. More detail is shown below. It is spaced away from the handle by a bushing I picked up at the farm supply. I needed clearance to keep the actuator mounting bolt and body of the actuator from hitting the Bobtach.
Here is the second weldament to connect the piston end to the other Bobtach pin.
I purchased two parts from Bobcat. They are the pivots for factory power Bobtach where the hydraulic cylinder normally mounts. They were about $40 USD for the two parts. I could have made them but not for $40 dollars worth of time...
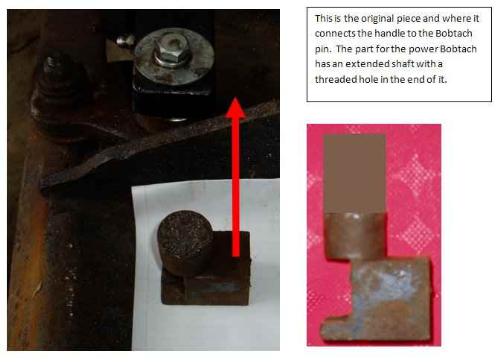
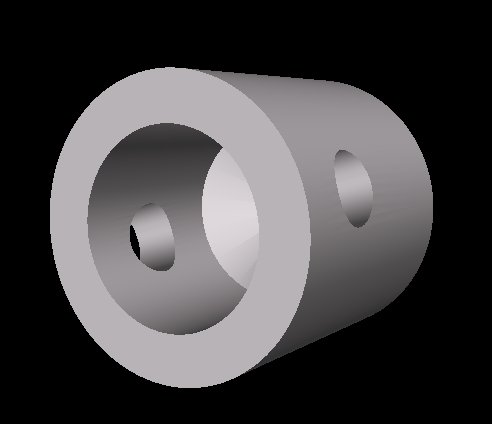
I had to make up two mounts to connect each end of the linear actuator to the new pivots. Each adapter is made from two parts and welded together. Both parts were made from cold rolled steel. A piece of 1.5 inch round bar and a piece of 3/4 inch thick plate. This is an example sleeve that fits to the actuator.
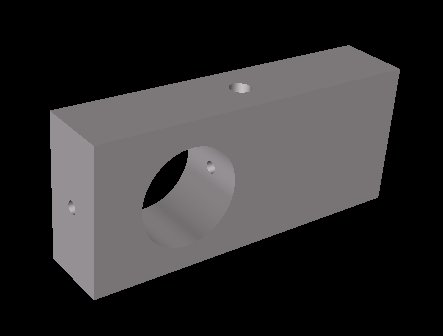
This is the piece to connect to the Bobtach pivot. I drilled for a grease zerk out the top and cross drilled in from the end to connect the port. I then welded the hole shut on the end of the part. The port was put in this position to insure that grease was applied to the area where most pressure is applied by the actuator.
Wire frame view of the part.
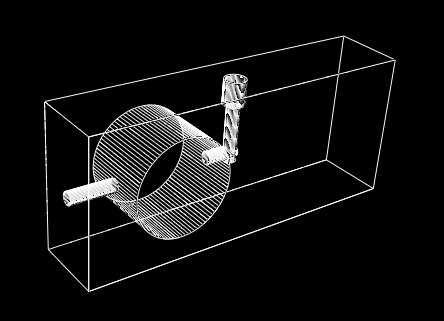
The two parts were tack welded and adjusted for final fit of the actuator to its installed position. I need to insure it would not contact any part of the Bobtach as it opens and closes the pins. They were then removed and welded/painted.
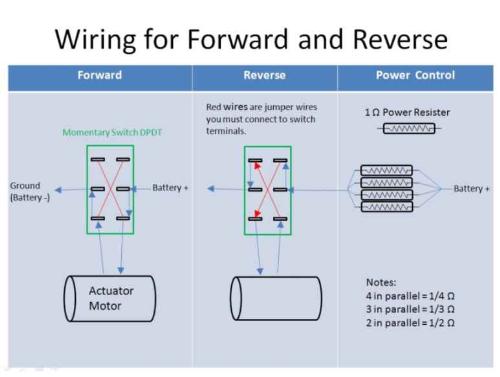
Controlling an actuator is nothing more than applying 12 volts to the two wires on the actuator motor. If you reverse the polarity it will move the piston in the opposite direction. This is accomplished with a Momentary Double Pull Double Throw switch.
I purchased a switch from a local electrical supply. I selected one that would fit in an unused switch position in the dash of my 763. The switch was about $7.
The actuator we used to convert my buddies 753 was much stronger and it had a ball-screw instead of the acme screw on mine. We had some problems on his with the actuator pushing so hard that it was binding itself if you did not release the switch quick enough when latching the pins. We fixed this by installing (4) 1 ohm ceramic power resistors from the local electrical supply, cost was about $2. Wired in parallel they add 1/4 ohm of resistance and will drop the speed and power just enough to keep the actuator from binding.
The arrows on the diagram below show the flow of electricity through the switch.
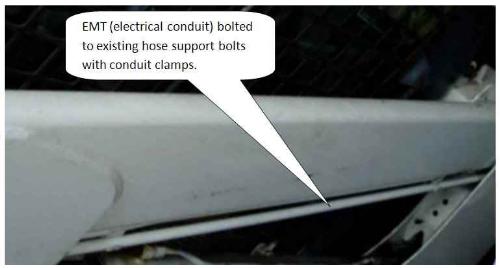
I used SOJ 14 gauge 2 wire cord from the dash, across cab, down into the engine compartment to the base of the boom. I bent a piece of electrical conduit to fit the underside of the boom and down into the chassis to protect and guide the wire out to the boom cross tube. I wanted to go through the boom but mine is sealed on the pivot end. When I built the second one for my buddies 753 G Series we ran the wire through the boom and out a hole next to the hydraulic couplers.
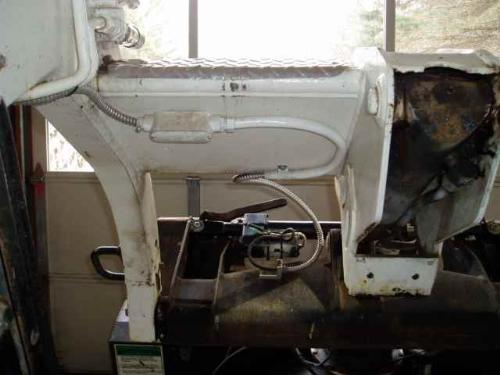
I drilled and tapped two holes to install a conduit junction box on the back of the cross tube. The cord is cut and wire nutted to the drop cord in the junction box. I wanted to insure if the wire running to the actuator got caught on something it can tear away at the actuator or in the junction box without doing any further damage to the cord or conduit running up the boom.
Since I already had an actuator, total cost for me was about $80. For the my buddies conversion it was less than $200 in parts since he picked up a used actuator for $90.
I thought about just buying a used Bobtach hydraulic cylinder and just plumbing it into my auxiliary couplers on the boom. I decided against it because of the number of hydraulic attachments I have and the cost of the hydraulic cylinder. I don't recall exactly what Bobcat quoted for the cylinder but they are high! Even the used ones I found were more way more than what it cost to convert one using a linear actuator.
OP
OP
TriHonu
Well-known member
- Joined
- Apr 15, 2007
- Messages
- 486
If the spacers you are referring to are the gold colored pieces with the set screws, they are not Bobcat parts.
They are 1 inch solid shaft collars that the local farm supply had in stock. If you search for a "1 inch shaft collar" you should find lots of options.
Home Depot has them for $2.07 each.
They are 1 inch solid shaft collars that the local farm supply had in stock. If you search for a "1 inch shaft collar" you should find lots of options.
Home Depot has them for $2.07 each.
This came up in another thread and I was asked to provide some pictures of one of the machines I converted. My conversion started after my next door neighbor took his Gehl skidsteer in to have the factory power attach installed. I saw it a couple days later and was surprised to see that Gehl uses an electric linear actuator.
I just happened to have a linear actuator on the shelf from a wheelchair lift that was scrapped. So I did a little measuring and this is what I put together.
12 volt, 12 inch stroke linear actuator, (my spare).
Here it is installed in the latched position.
Here it is in the unlatched position.
This is the weldament to attach the motor end of the actuator to the Bobtach pin. More detail is shown below. It is spaced away from the handle by a bushing I picked up at the farm supply. I needed clearance to keep the actuator mounting bolt and body of the actuator from hitting the Bobtach.
Here is the second weldament to connect the piston end to the other Bobtach pin.
I purchased two parts from Bobcat. They are the pivots for factory power Bobtach where the hydraulic cylinder normally mounts. They were about $40 USD for the two parts. I could have made them but not for $40 dollars worth of time...
I had to make up two mounts to connect each end of the linear actuator to the new pivots. Each adapter is made from two parts and welded together. Both parts were made from cold rolled steel. A piece of 1.5 inch round bar and a piece of 3/4 inch thick plate. This is an example sleeve that fits to the actuator.
This is the piece to connect to the Bobtach pivot. I drilled for a grease zerk out the top and cross drilled in from the end to connect the port. I then welded the hole shut on the end of the part. The port was put in this position to insure that grease was applied to the area where most pressure is applied by the actuator.
Wire frame view of the part.
The two parts were tack welded and adjusted for final fit of the actuator to its installed position. I need to insure it would not contact any part of the Bobtach as it opens and closes the pins. They were then removed and welded/painted.
Controlling an actuator is nothing more than applying 12 volts to the two wires on the actuator motor. If you reverse the polarity it will move the piston in the opposite direction. This is accomplished with a Momentary Double Pull Double Throw switch.
I purchased a switch from a local electrical supply. I selected one that would fit in an unused switch position in the dash of my 763. The switch was about $7.
The actuator we used to convert my buddies 753 was much stronger and it had a ball-screw instead of the acme screw on mine. We had some problems on his with the actuator pushing so hard that it was binding itself if you did not release the switch quick enough when latching the pins. We fixed this by installing (4) 1 ohm ceramic power resistors from the local electrical supply, cost was about $2. Wired in parallel they add 1/4 ohm of resistance and will drop the speed and power just enough to keep the actuator from binding.
The arrows on the diagram below show the flow of electricity through the switch.
I used SOJ 14 gauge 2 wire cord from the dash, across cab, down into the engine compartment to the base of the boom. I bent a piece of electrical conduit to fit the underside of the boom and down into the chassis to protect and guide the wire out to the boom cross tube. I wanted to go through the boom but mine is sealed on the pivot end. When I built the second one for my buddies 753 G Series we ran the wire through the boom and out a hole next to the hydraulic couplers.
I drilled and tapped two holes to install a conduit junction box on the back of the cross tube. The cord is cut and wire nutted to the drop cord in the junction box. I wanted to insure if the wire running to the actuator got caught on something it can tear away at the actuator or in the junction box without doing any further damage to the cord or conduit running up the boom.
Since I already had an actuator, total cost for me was about $80. For the my buddies conversion it was less than $200 in parts since he picked up a used actuator for $90.
I thought about just buying a used Bobtach hydraulic cylinder and just plumbing it into my auxiliary couplers on the boom. I decided against it because of the number of hydraulic attachments I have and the cost of the hydraulic cylinder. I don't recall exactly what Bobcat quoted for the cylinder but they are high! Even the used ones I found were more way more than what it cost to convert one using a linear actuator.
I am cutting and pasting from your thread. " I purchased two parts from Bobcat. They are the pivots for factory power Bobtach where the hydraulic cylinder normally mounts. They were about $40 USD for the two parts. I could have made them but not for $40 dollars worth of time..."
If you could provide me with the Bobat part number that would be a great help. I am very sure after I get mine done my friends will want theirs done also. Do you have a Make, model, and part number from your actuator, and your friends? I am looking forward to this project. Tired of getting on and off so much during the day. Thank you to all with the help.
Sean Magill
What Acturrator did you purchase from Amazon? The part number for the Bobcat $44.15. Thank you for all of your help.What is the width of the 3/4 flat stock used to make the actuator attachment brackets? I ordered the factory bobtach pins like you said and I found the linear actuator and all its components on amazon. Including all the wiring, switch with relays, flexible liquid tight conduit and connectors came to 240.00 plus 44.15 for the bobtach pins. Now I did get a 100 ft roll of the liquid tight flexible conduit because I'm going to do 2 machines but I'm starting with my T250.
4 for the pins.
Thank you,
Sean Magill
Similar threads
- Replies
- 1
- Views
- 393