Line Boring my Quicktach Bores

Help Support SkidSteer Forum:

TriHonu

Well-known member
Joined
Apr 15, 2007
Messages
486
Here is the short version of my home built line boring rig that I used to re-bore the pin bosses in my Quicktach. The holes were badly worn and egg shaped. In fact, they had gotten so bad that the cutting edge on my low profile bucket had 4+ inches of slop.
Parts List:
2 - 1 inch bore flange bearings. ($4.41 each)
2 - pieces of plate
2 - 3 inch long by 3 inch OD pieces of pipe.
Bolts and nuts.
1 - 3/8 inch round HSS lathe bit ($3.66 at Enco)
32 inches of 1 inch OD turn ground and polished (TGP) round bar. ($5.25)
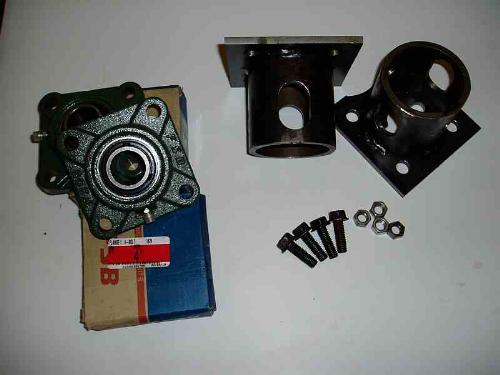
LB1_Parts.JPG

To make the cutting bit, I cut about 1.125 inch off with an abrasive wheel mounted in a die grinder. I sharpened it like a lathe bit and ground a flat along its length for the set screw seat. It is held in the boring bar with a 1/4 inch set screw.
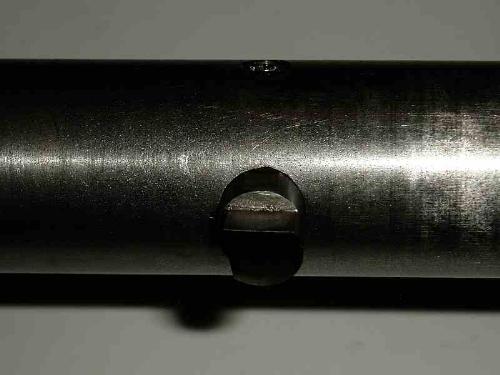
LB2_Bit.JPG

The holes for the flange bearings were drilled over size to allow for final alignment. I also made some tapered bushings to help align the boring bar.
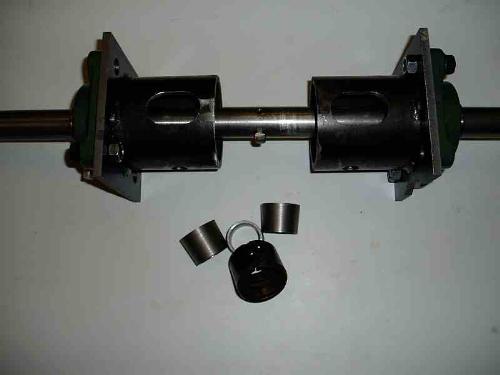
LB3_Rig_Bushings.JPG

My plan was to over bore the existing holes and install Connex Spring Bushings. I had 6 of them that I removed from a Bradco backhoe bucket that I bought. They are 1.250 ID. The spring bushings will compensate if you bore the holes a little oversize.
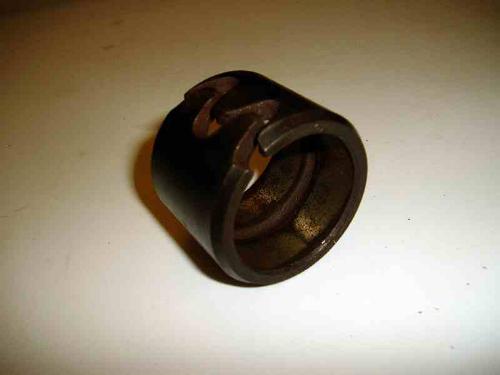
LB4_SpringBushing.JPG

I used the tapered bushings to help align the boring bar. Three tack welds hold the pipe supports to the Bobtach ears. Make sure you tack weld where you can grind them off.
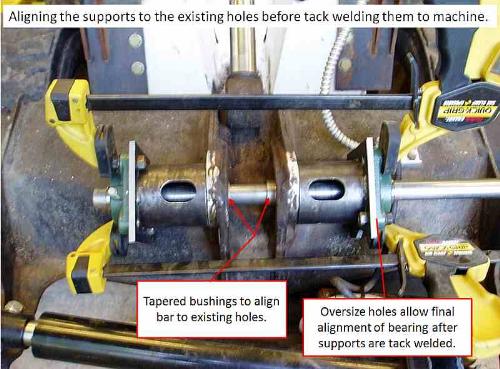
LB5_Alignment.jpg

I adjusted the tool bit by eye for the first cut. I made sure the bit was out far enough to cut the entire circumference. An interrupted cut can result in the new bore being egg shaped.
A friend of mine ran the drill at 300 rpm while I slowly tightened the gear puller to feed the bit through the hole. With only one cutting edge, you can not just pull it through by hand. The drill will pull in and out and you won't be able to bore a smooth hole.
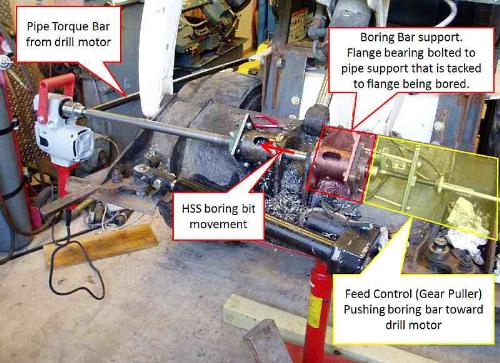
LB6_RigDesc.jpg

I was enlarging the 1.250 bore to 1.620. I took 4 roughing cuts and 1 finish cut per side. It took about an hour to do both sides. Not bad for my first time doing this.
The first bore came out at 1.619. The second side was 1.628 (.008 over). I'm not sure what caused the over cut. It was really making noise on the final pass. I don't recall re-checking the bit stick-out after I tightened the set screw. So it could be the bit moved or the bit got dull and was tearing some extra steel, or the fact that I removed the tapered guide bushing and had not made one to fit the finish bored hole. Either way, It didn't matter since I just grabbed a different bushing that was a little thicker (I had 6 of them).

I had sharpened the bit so the cutting edge was 90 degrees to the boring bar. The next time I will angle it back to provide a little lead and direct some force back toward the boring bar. The finish was very smooth. The mark at 2 o'clock is from installing and removing the spring bushing to install a slightly thicker one.
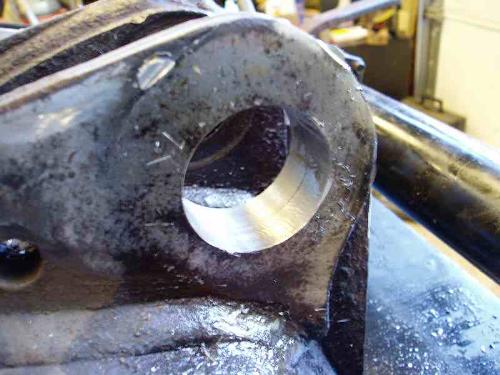
LB7_Bore.JPG

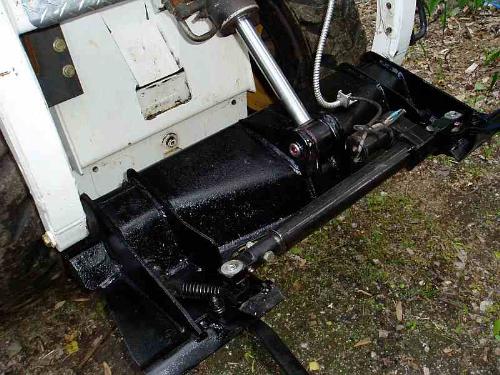
I replaced the rod eye bushing ($7.00). Bobcat wanted $70 for a new pin. I made a replacement from a piece of 1.250 inch 4140 TGP.
There is no perceivable slop in the new setup.
LB8_Bobtach.JPG

Bottom line: Yes I have a lathe and milling machine. However, you could do this repair with a slow speed drill, grinder and welder. The only thing that required the lathe was the tapered bushings. I chose to make those to speed up the initial alignment of the boring bar.
The best part is my tilt is tight and I now have a line boring rig for future repairs!
 

Tazza

Moderator
Staff member
Joined
Dec 7, 2004
Messages
16,837
Nice job, couldn't have done it better myself.
Even if you only use it once, its worth it. The slightest amount of wear sure makes the bucket flop around.
I have to do this repair on two machines, i have been wondering how i was going to do it. I think your way may be an option! I do have an old 'rail drill' the ones they use for drilling holes in rail road to bolt them together. Its slow spinning and has a slow in-feed speed. I bored out the lower bushings on my bobtach with it years ago, worked a treat. The problem is, its pretty heavy.
I like your bearings for support, i used old cast iron that i bored out for bearings that i ran with grease/oil, it worked pretty well but did pickup a little with the swarf. It got the job done though. I have pictures of it somewhere.
 

Tazza

Moderator
Staff member
Joined
Dec 7, 2004
Messages
16,837
Even if you only use it once, its worth it. The slightest amount of wear sure makes the bucket flop around.
I have to do this repair on two machines, i have been wondering how i was going to do it. I think your way may be an option! I do have an old 'rail drill' the ones they use for drilling holes in rail road to bolt them together. Its slow spinning and has a slow in-feed speed. I bored out the lower bushings on my bobtach with it years ago, worked a treat. The problem is, its pretty heavy.
I like your bearings for support, i used old cast iron that i bored out for bearings that i ran with grease/oil, it worked pretty well but did pickup a little with the swarf. It got the job done though. I have pictures of it somewhere.
Are the bearings self aligning? can i harass you for the bearing number?
 
OP
OP
TriHonu

TriHonu

Well-known member
Joined
Apr 15, 2007
Messages
486
Are the bearings self aligning? can i harass you for the bearing number?
Thanks OldMachinist.
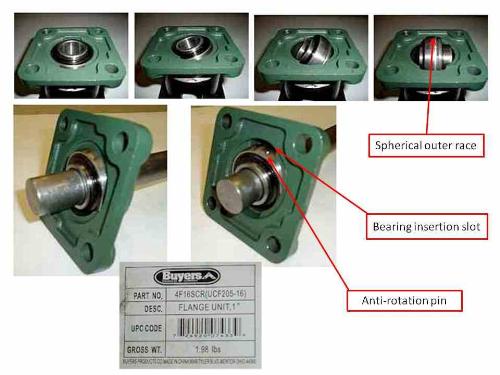
Tazza - the bearings themselves are not self aligning, however the bearings have a spherical outer race. There is no "keeper" in the flange. The bearing is set on edge in the bearing insertion slot and rotated into the spherical groove. This groove allows the bearing to be placed out of square with the flange. There is a limit to the amount. I would guess it is 5-10 degrees retaining full radial support.
There is an anti-rotation pin that should stay within the bearing insertion slot.
The actual bearing is a UC205 series. The -16 is 16 sixteenths of an inch or 1 inch.
The Big Bearing Store has quite a selection. These are a general duty bearing.
The pic below should fill in the gaps. I would think you would be able to get the metric equivalent locally.
BearingInfo.jpg

My friend who helped me has a magnetic drill. I thought about using it however the problem remained of how to insure the bit would accurately pass through both ears.
I had considered welding in my bores and re-boring to factory size. However this is not a large hole and clearance and rigidity of the boring bar become a concern, especially when machining through a weld with slag inclusions. My backup plan was if the bore was bored too oversize, I would just machine my own bushings out of some 4140.
 

Tazza

Moderator
Staff member
Joined
Dec 7, 2004
Messages
16,837
Thanks OldMachinist.
Tazza - the bearings themselves are not self aligning, however the bearings have a spherical outer race. There is no "keeper" in the flange. The bearing is set on edge in the bearing insertion slot and rotated into the spherical groove. This groove allows the bearing to be placed out of square with the flange. There is a limit to the amount. I would guess it is 5-10 degrees retaining full radial support.
There is an anti-rotation pin that should stay within the bearing insertion slot.
The actual bearing is a UC205 series. The -16 is 16 sixteenths of an inch or 1 inch.
The Big Bearing Store has quite a selection. These are a general duty bearing.
The pic below should fill in the gaps. I would think you would be able to get the metric equivalent locally.

My friend who helped me has a magnetic drill. I thought about using it however the problem remained of how to insure the bit would accurately pass through both ears.
I had considered welding in my bores and re-boring to factory size. However this is not a large hole and clearance and rigidity of the boring bar become a concern, especially when machining through a weld with slag inclusions. My backup plan was if the bore was bored too oversize, I would just machine my own bushings out of some 4140.
Got ya, thats the setup i was thinking of. I have used ones with a pressed metal flange, but the cast one yours has would be far better, less chance of it flexing when under load. Metric or inperial doesn't bother me, i will just get steel to match :)
That is exactly what i'd do too, its too much work to weld the bore up and machine it out, just make it over size and sleeve it. I find with welding, you rund the risk of hard spots, especially with a stick welder, a MIG seems to be much better, but making a small sleeve is easier. You can then make them suit the hole. If it ends up being a touch larger, it doesn't matter, you make the sleeve that much larger.
 

Tazza

Moderator
Staff member
Joined
Dec 7, 2004
Messages
16,837
Got ya, thats the setup i was thinking of. I have used ones with a pressed metal flange, but the cast one yours has would be far better, less chance of it flexing when under load. Metric or inperial doesn't bother me, i will just get steel to match :)
That is exactly what i'd do too, its too much work to weld the bore up and machine it out, just make it over size and sleeve it. I find with welding, you rund the risk of hard spots, especially with a stick welder, a MIG seems to be much better, but making a small sleeve is easier. You can then make them suit the hole. If it ends up being a touch larger, it doesn't matter, you make the sleeve that much larger.
Well, i finally got some time to work on mine. The one i did previously was very crude and didn't use bearings, i made up cast iron bushes for the rod to run on that gauled up pretty fast, but got the job done, the bearing idea sure made it easy.
I started off with a length of 1" bar, i drilled two holes for tool steel and two set screws. The distance between the two sections i needed to machine were too far apart for the machine i was using to do the work, i was even considering two cutters 180 drgrees apart and drill both ends at once, but i wasn' that motivated. Here are the goodies used. Two self aligning bearings with mounting plates so i could weld them to the bobtach to hold the boring bar. Two tapered sleves to align the bearings for welding. Without them, you will not be asured that the new hole is where the old one was. I simply slid the bar in one end of the bearing, through one side of the bobtach, installed the two guides facing outwards then slid the rod through and installed the last bearing. Holding the guides out into the holes, tack the bearings onto the bobtach. When both are done, slide the bar out and remove the guides. You will notice a 1 1/4" rod with a taper, this fits the machine i used to drill the holes. I cheated and tacked it to the 1" bar.
Image090.jpg

Here is a picture if the drilling machine all hooked up ready for work. The drive unit is an old rail drill. They use them for drilling holes in railway tracks. I removed the petrol engine and put an electric motor on, much quieter and smooth running. It rotates quite slowly, about 60-90 RPM and every rotation the lead screw turns a bout 1/8th of a turn giving a very slow in feed, but an excellent cut.
Image086.jpg

Here you can see the chips it was making, i may have been cutting more than i should, but it cut it with ease, didn't dull the cutter either. I made sure i kept at it with cutting fluid.
Image088.jpg

Image087.jpg

Here is the end result, nice clean cut and it in perfect alignment with each other. As the holes were not the exact same size, i made bushings to fit and pressed them in. It brought it back to 1 1/4". The pin slides in with a slight tap, it doesn't bind so it shows its just right.
Image089.jpg

I had two to do, both worked very well, only took an hour or so, but the preperation took a lot longer. The rail drill needed repairs, the tapered drive shaft for the drill needed making, but its all worth it for the results. I'm planing on using it to bore out my lift arms to install bushings as they are worn and the only way to fix it is to bore them out and make a bushing.
 
OP
OP
TriHonu

TriHonu

Well-known member
Joined
Apr 15, 2007
Messages
486
Well, i finally got some time to work on mine. The one i did previously was very crude and didn't use bearings, i made up cast iron bushes for the rod to run on that gauled up pretty fast, but got the job done, the bearing idea sure made it easy.
I started off with a length of 1" bar, i drilled two holes for tool steel and two set screws. The distance between the two sections i needed to machine were too far apart for the machine i was using to do the work, i was even considering two cutters 180 drgrees apart and drill both ends at once, but i wasn' that motivated. Here are the goodies used. Two self aligning bearings with mounting plates so i could weld them to the bobtach to hold the boring bar. Two tapered sleves to align the bearings for welding. Without them, you will not be asured that the new hole is where the old one was. I simply slid the bar in one end of the bearing, through one side of the bobtach, installed the two guides facing outwards then slid the rod through and installed the last bearing. Holding the guides out into the holes, tack the bearings onto the bobtach. When both are done, slide the bar out and remove the guides. You will notice a 1 1/4" rod with a taper, this fits the machine i used to drill the holes. I cheated and tacked it to the 1" bar.

Here is a picture if the drilling machine all hooked up ready for work. The drive unit is an old rail drill. They use them for drilling holes in railway tracks. I removed the petrol engine and put an electric motor on, much quieter and smooth running. It rotates quite slowly, about 60-90 RPM and every rotation the lead screw turns a bout 1/8th of a turn giving a very slow in feed, but an excellent cut.

Here you can see the chips it was making, i may have been cutting more than i should, but it cut it with ease, didn't dull the cutter either. I made sure i kept at it with cutting fluid.


Here is the end result, nice clean cut and it in perfect alignment with each other. As the holes were not the exact same size, i made bushings to fit and pressed them in. It brought it back to 1 1/4". The pin slides in with a slight tap, it doesn't bind so it shows its just right.

I had two to do, both worked very well, only took an hour or so, but the preperation took a lot longer. The rail drill needed repairs, the tapered drive shaft for the drill needed making, but its all worth it for the results. I'm planing on using it to bore out my lift arms to install bushings as they are worn and the only way to fix it is to bore them out and make a bushing.
Wow, power feed and all; Nice Job!
I agree that the time invested in making the tool took longer than boring the holes. However to bore another job would be fairly quick.
Compared with buying a new Quicktach or taking it to a shop with a line boring rig, it was much cheaper to make my own tool and do the repair myself.
It is nice to have the tool available. I still have some play in the boss that holds the upper end of the tilt cylinder. That will have to wait till spring. It is -15 degrees right now and too cold to do anything outside that isn't absolutely necessary...
 

Tazza

Moderator
Staff member
Joined
Dec 7, 2004
Messages
16,837
Wow, power feed and all; Nice Job!
I agree that the time invested in making the tool took longer than boring the holes. However to bore another job would be fairly quick.
Compared with buying a new Quicktach or taking it to a shop with a line boring rig, it was much cheaper to make my own tool and do the repair myself.
It is nice to have the tool available. I still have some play in the boss that holds the upper end of the tilt cylinder. That will have to wait till spring. It is -15 degrees right now and too cold to do anything outside that isn't absolutely necessary...
The power feed is nice, set it up, then stand back with the cutting oil.
I have an S150 with rams like that, eventually i will take them off and bore them out in the mill and make bushings out if 4140. This way they will be replaceable later if they ever wear. Hopefully the bosses are ok, if not i'll do the same, take a small skim to get them round again.
-15 is just a touch cool, a good time of the year to stay huddled up around the fire place!
 
Top