TriHonu
Well-known member
- Joined
- Apr 15, 2007
- Messages
- 486
Here is the short version of my home built line boring rig that I used to re-bore the pin bosses in my Quicktach. The holes were badly worn and egg shaped. In fact, they had gotten so bad that the cutting edge on my low profile bucket had 4+ inches of slop.
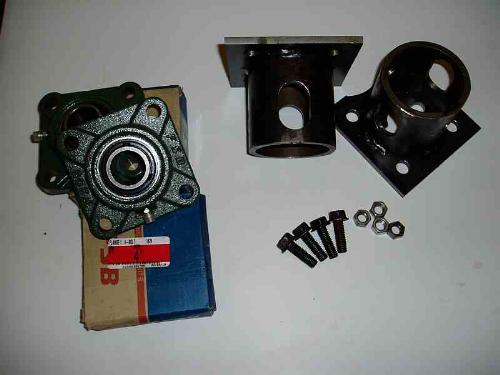
Parts List:
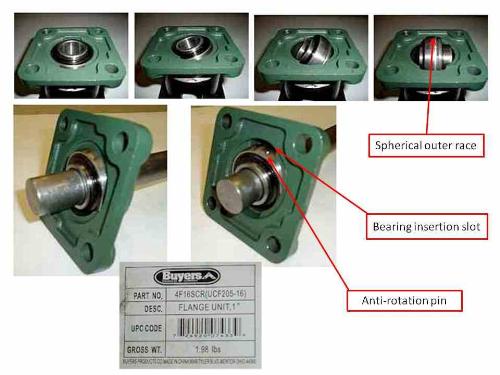
2 - 1 inch bore flange bearings. ($4.41 each)
2 - pieces of plate
2 - 3 inch long by 3 inch OD pieces of pipe.
Bolts and nuts.
1 - 3/8 inch round HSS lathe bit ($3.66 at Enco)
32 inches of 1 inch OD turn ground and polished (TGP) round bar. ($5.25)
To make the cutting bit, I cut about 1.125 inch off with an abrasive wheel mounted in a die grinder. I sharpened it like a lathe bit and ground a flat along its length for the set screw seat. It is held in the boring bar with a 1/4 inch set screw.
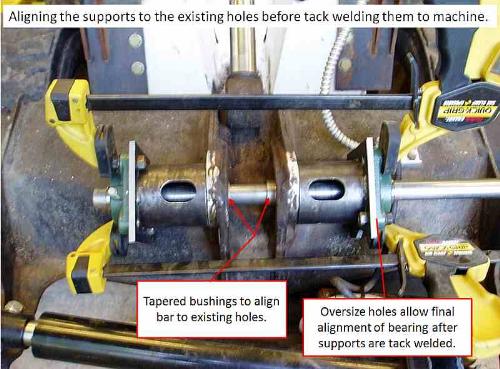
The holes for the flange bearings were drilled over size to allow for final alignment. I also made some tapered bushings to help align the boring bar.
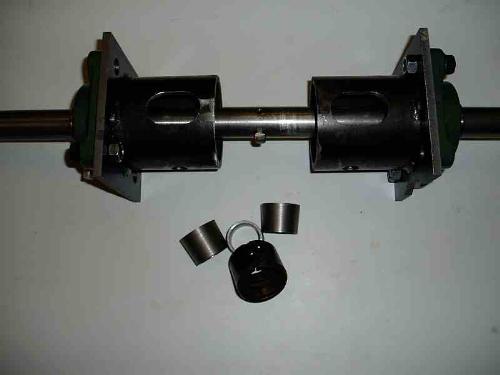
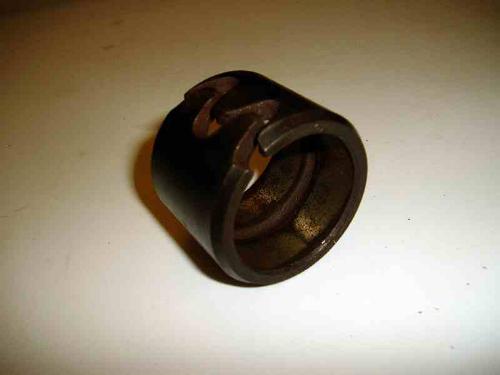
My plan was to over bore the existing holes and install Connex Spring Bushings. I had 6 of them that I removed from a Bradco backhoe bucket that I bought. They are 1.250 ID. The spring bushings will compensate if you bore the holes a little oversize.
I used the tapered bushings to help align the boring bar. Three tack welds hold the pipe supports to the Bobtach ears. Make sure you tack weld where you can grind them off.
I adjusted the tool bit by eye for the first cut. I made sure the bit was out far enough to cut the entire circumference. An interrupted cut can result in the new bore being egg shaped.
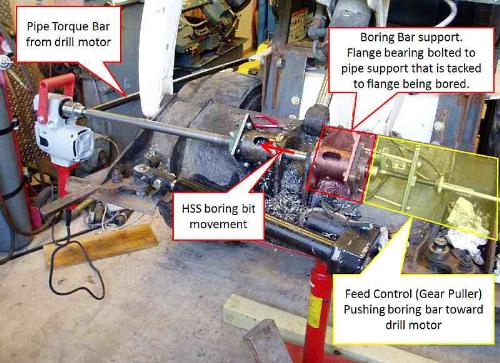
A friend of mine ran the drill at 300 rpm while I slowly tightened the gear puller to feed the bit through the hole. With only one cutting edge, you can not just pull it through by hand. The drill will pull in and out and you won't be able to bore a smooth hole.
I was enlarging the 1.250 bore to 1.620. I took 4 roughing cuts and 1 finish cut per side. It took about an hour to do both sides. Not bad for my first time doing this.
The first bore came out at 1.619. The second side was 1.628 (.008 over). I'm not sure what caused the over cut. It was really making noise on the final pass. I don't recall re-checking the bit stick-out after I tightened the set screw. So it could be the bit moved or the bit got dull and was tearing some extra steel, or the fact that I removed the tapered guide bushing and had not made one to fit the finish bored hole. Either way, It didn't matter since I just grabbed a different bushing that was a little thicker (I had 6 of them).
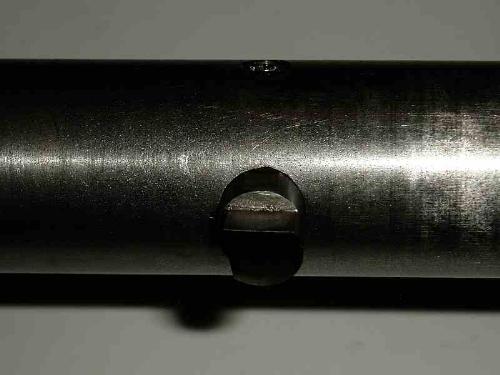
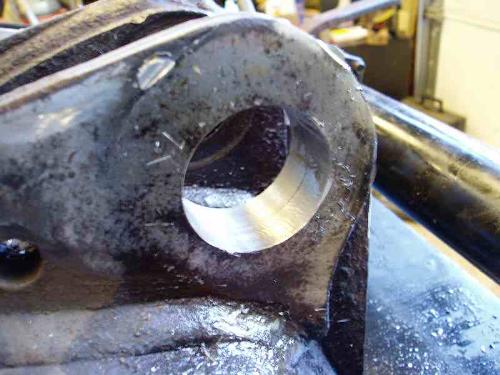
I had sharpened the bit so the cutting edge was 90 degrees to the boring bar. The next time I will angle it back to provide a little lead and direct some force back toward the boring bar. The finish was very smooth. The mark at 2 o'clock is from installing and removing the spring bushing to install a slightly thicker one.
I replaced the rod eye bushing ($7.00). Bobcat wanted $70 for a new pin. I made a replacement from a piece of 1.250 inch 4140 TGP.
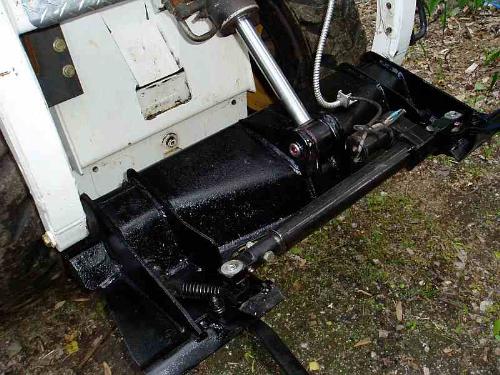
There is no perceivable slop in the new setup.
Bottom line: Yes I have a lathe and milling machine. However, you could do this repair with a slow speed drill, grinder and welder. The only thing that required the lathe was the tapered bushings. I chose to make those to speed up the initial alignment of the boring bar.
The best part is my tilt is tight and I now have a line boring rig for future repairs!
Parts List:
2 - 1 inch bore flange bearings. ($4.41 each)
2 - pieces of plate
2 - 3 inch long by 3 inch OD pieces of pipe.
Bolts and nuts.
1 - 3/8 inch round HSS lathe bit ($3.66 at Enco)
32 inches of 1 inch OD turn ground and polished (TGP) round bar. ($5.25)
To make the cutting bit, I cut about 1.125 inch off with an abrasive wheel mounted in a die grinder. I sharpened it like a lathe bit and ground a flat along its length for the set screw seat. It is held in the boring bar with a 1/4 inch set screw.
The holes for the flange bearings were drilled over size to allow for final alignment. I also made some tapered bushings to help align the boring bar.
My plan was to over bore the existing holes and install Connex Spring Bushings. I had 6 of them that I removed from a Bradco backhoe bucket that I bought. They are 1.250 ID. The spring bushings will compensate if you bore the holes a little oversize.
I used the tapered bushings to help align the boring bar. Three tack welds hold the pipe supports to the Bobtach ears. Make sure you tack weld where you can grind them off.
I adjusted the tool bit by eye for the first cut. I made sure the bit was out far enough to cut the entire circumference. An interrupted cut can result in the new bore being egg shaped.
A friend of mine ran the drill at 300 rpm while I slowly tightened the gear puller to feed the bit through the hole. With only one cutting edge, you can not just pull it through by hand. The drill will pull in and out and you won't be able to bore a smooth hole.
I was enlarging the 1.250 bore to 1.620. I took 4 roughing cuts and 1 finish cut per side. It took about an hour to do both sides. Not bad for my first time doing this.
The first bore came out at 1.619. The second side was 1.628 (.008 over). I'm not sure what caused the over cut. It was really making noise on the final pass. I don't recall re-checking the bit stick-out after I tightened the set screw. So it could be the bit moved or the bit got dull and was tearing some extra steel, or the fact that I removed the tapered guide bushing and had not made one to fit the finish bored hole. Either way, It didn't matter since I just grabbed a different bushing that was a little thicker (I had 6 of them).
I had sharpened the bit so the cutting edge was 90 degrees to the boring bar. The next time I will angle it back to provide a little lead and direct some force back toward the boring bar. The finish was very smooth. The mark at 2 o'clock is from installing and removing the spring bushing to install a slightly thicker one.
I replaced the rod eye bushing ($7.00). Bobcat wanted $70 for a new pin. I made a replacement from a piece of 1.250 inch 4140 TGP.
There is no perceivable slop in the new setup.
Bottom line: Yes I have a lathe and milling machine. However, you could do this repair with a slow speed drill, grinder and welder. The only thing that required the lathe was the tapered bushings. I chose to make those to speed up the initial alignment of the boring bar.
The best part is my tilt is tight and I now have a line boring rig for future repairs!
")


