


1998 LX885 is blowing hydraulic oil out of the dipstick tube in the engine to transmission gearbox. It’s the flywheel housing where the 2 pumps interface w/ the engine. This happened a short time ago. I replaced both pump seals hoping 23 year old rubber was the only problem. I was wrong. Same thing happened a 2nd time. Took the rt side pump & motor to a hydraulic shop. They said the motor was ok, but the pump was shot. I’m no plumber, but the broken internal parts confirmed their story. Replaced it w/ a remanufactured pump & figured all would be good. It was.....for about 30 min’s. Pump seal failed again blowing oil out of that gearbox. Every issue I suspect to be the problem winds up being a symptom of the problem. Or there are several things going on. Hopefully this made sense, & hopefully someone can give me a cheap & easy fix. Both are subjective, but I’ve gotten good @ pulling the pumps. Any help is appreciated, & thanks in advance. Jeremy
You are using an out of date browser. It may not display this or other websites correctly.
You should upgrade or use an alternative browser.
You should upgrade or use an alternative browser.
LX885 blowing hydraulic oil out of engine to transmission gearbox
- Thread starter jpaul
- Start date
That’s what I’ve been thinking about. The internal case pressure must be too high? I’m planning on pulling the case drain lines to check for an occlusion or damage. That’s all I can come up w/ at the moment.If there is a restriction, it's possible it's building up too much pressure and blowing the seal out?
Just wanted to post a followup in case anyone cares or experiences something similar. At some point during production, New Holland added an in line one way check valve to the case drain lines. Suppose to help maintain a small amount of pressure and prevent the pumps from ingesting air into the system. No clue what happened first, but the check valve was completely plugged with metal debris presumably from the failing pump. Wouldn’t open allowing oil to pass through. Pressure would build causing pump seals to fail. Very easy fix once I stumbled upon a service bulletin. May or may not be in service manual depending on when it was printed.That’s what I’ve been thinking about. The internal case pressure must be too high? I’m planning on pulling the case drain lines to check for an occlusion or damage. That’s all I can come up w/ at the moment.
- Joined
- Feb 13, 2023
- Messages
- 22
If you have oil comming out of gearbox the hydrostatic input shaft seals are leaking, you need to pull pumps and replace seals there are no check valves on case drain, also the gear box uses 80W-90 gear lube and hydraulic use 10W-30 diesel oil.


![Pampers Sensitive Baby Wipes, Clinically Proven, Fragrance Free, Unscented, Water Based, Hypoallergenic, Multi-Use, Hand Wipes 336 Wipes Total (6X Flip-Top Packs) [Packaging May Vary]](https://m.media-amazon.com/images/I/41KLBHu9CAL._SL500_.jpg)


As an Amazon Associate we earn from qualifying purchases. Product prices and availability are accurate as of the date/time indicated and are subject to change.
jgeletko79
Member
- Joined
- Apr 25, 2014
- Messages
- 21
The motors and pumps each have a case drain. The motor drains are steel tubes that run under the motors. The pump case drains are 1 of the 2 steel tubes that connect each pump under the seat. Despite what BijouHills54 said, mine had a check valve installed. There’s a T on the lt side pump that the case drain steel tube connected to. The hose coming off the T had a 1 way check valve plumbed in. Parts diagram is 06D07 Hydrostatic Case Drain Check Valve Kit.
When I had my problem, the check valve was not functioning. It was completely plugged w/ metal pieces and crud. Case drain pressure would get to high and blow main pump seals.
When I had my problem, the check valve was not functioning. It was completely plugged w/ metal pieces and crud. Case drain pressure would get to high and blow main pump seals.
jgeletko79
Member
- Joined
- Apr 25, 2014
- Messages
- 21
06D06 & 06D06A show the Hydrostatic Case Drain.The motors and pumps each have a case drain. The motor drains are steel tubes that run under the motors. The pump case drains are 1 of the 2 steel tubes that connect each pump under the seat. Despite what BijouHills54 said, mine had a check valve installed. There’s a T on the lt side pump that the case drain steel tube connected to. The hose coming off the T had a 1 way check valve plumbed in. Parts diagram is 06D07 Hydrostatic Case Drain Check Valve Kit.
When I had my problem, the check valve was not functioning. It was completely plugged w/ metal pieces and crud. Case drain pressure would get to high and blow main pump seals.
Hi jpaul, I seem to have the same problem as you did with my LX885, oil coming out of the flywheel case dipstick tube. I've already changed the control valve thinking the low pressure warning light and sticking aux controls where an indication of a malfunction in it. Wrong! and it was costly. I hadn't even checked the oil level at the gearbox at that point, didn't seem relevant.Just wanted to post a followup in case anyone cares or experiences something similar. At some point during production, New Holland added an in line one way check valve to the case drain lines. Suppose to help maintain a small amount of pressure and prevent the pumps from ingesting air into the system. No clue what happened first, but the check valve was completely plugged with metal debris presumably from the failing pump. Wouldn't open allowing oil to pass through. Pressure would build causing pump seals to fail. Very easy fix once I stumbled upon a service bulletin. May or may not be in service manual depending on when it was printed.
My question to you is, how can I know for sure the issue is within the pumps before I go to the hassle of removing them? Did you do a pressure test? Is there any other way oil could find it's way in there that you considered? The oil did stop flowing out of the dipstick tube but it is clearly still full. Perhaps it leveled off with the hydraulic oil reservoir?
I haven't run it since I found the oil coming out and the warning light shuts the engine down anyway.
I haven't found a check valve yet. The diagram doesn't show exactly where it fits so maybe it's out of sight, and I'll find it when I do the disassembly.
Hoping you can help. (BTW we're both Jeremy with a LX885 with the same issue, weirdly coincidental!)
jgeletko79
Member
- Joined
- Apr 25, 2014
- Messages
- 21
I didn’t do any pressure testing because of a lack of various fittings & lines. I couldn’t think of any other way for hydraulic oil to enter the gearbox other than through the pump seal. No clue how to determine which pump seal failed. Flip a coin & pull one! Good luck. To add to the weird coincidences, my last name starts w/ a G.
OK, many thanks for the reply! I would assume you had the low pressure warning light on for the hydrostatic system? I guess if it were engine oil the level would drop significantly.I didn't do any pressure testing because of a lack of various fittings & lines. I couldn't think of any other way for hydraulic oil to enter the gearbox other than through the pump seal. No clue how to determine which pump seal failed. Flip a coin & pull one! Good luck. To add to the weird coincidences, my last name starts w/ a G.
Did you think there is any advantage in removing one pump before the other? If you have any other bits of info that would make the process easier let me know. Thanks J
jgeletko79
Member
- Joined
- Apr 25, 2014
- Messages
- 21
Can’t say for sure, but the low pressure light probably did come on. As far as the pumps go, does 1 side seam to be weaker than the other? I would start there. Realistically, it’s not much more work to take both off. There worst part is the lower bolt. Can get to it from an access hole underneath. I could only move that bolt like a couple degrees each turn.
Yes, I've seen the lower bolt location, looks tight but doable. There's a large hose connection on the RH pump close to the reservoir that looks very awkward. Did you remove anything for more access. I've been doing some prep and I took out the seat. Did you have to use any special tools? Crowfoot wrenches? I have some jumbo angles.Can't say for sure, but the low pressure light probably did come on. As far as the pumps go, does 1 side seam to be weaker than the other? I would start there. Realistically, it's not much more work to take both off. There worst part is the lower bolt. Can get to it from an access hole underneath. I could only move that bolt like a couple degrees each turn.
I have the machine with the common gear and final drive. Not sure if that makes any difference to the problem or solution?
jgeletko79
Member
- Joined
- Apr 25, 2014
- Messages
- 21
I think I just raised the seat, & removed all the lines & hoses that are in the way. Bolt heads are very close to the pump, so I couldn’t get a socket on them. Wound up just using an open end wrench. Pumps stayed in place once bolts were removed. Had to be a bit of a contortionist to pull them out as there’s not much room. Tilting cab would make it easier, but I was too lazy for all that.
So I have removed both hydraulic servo motors and found one of them to be leaking from the shaft seal while it was just sitting on the bench. I made an inquiry for a hydraulic firm to reseal it using a kit. But all things considered it would be less costly to buy a Reman unit. Considering the age of the machine, I'm wondering if the issue could be managed? The machine is only used for snow plowing and landscaping on my own property.
When I pulled the dip stick out it was only a trickle of oil. I'm guessing under pressure it will be greater.
Just wondering what volume of oil you saw coming out of yours. I'm presuming you had it operating or at least the engine running at the time?
When I pulled the dip stick out it was only a trickle of oil. I'm guessing under pressure it will be greater.
Just wondering what volume of oil you saw coming out of yours. I'm presuming you had it operating or at least the engine running at the time?
tech.35058
Well-known member
- Joined
- Dec 15, 2016
- Messages
- 96
I assume you pulled both servo "pumps" from the gear case on the flywheel end of the engine.
If one shaft seal failed due to old age, the other is probably the same age, & due to fail at any time, so replacing both seals would be appropriate. There is a "new & improved" seal available.
This is not a terrible job after you get the pumps out. it seems like the seals are retained by a snap ring in the pump housing, then pull the seal with a sheetmetal screw end on a slide hammer, or just pull it out with a pair of pliers or "vice grips". it seems like one of mine, "the failed one" just fell out after I got the screw in it. As I recall that seal bore was a couple of thousandths larger than the other so I used some retaining compound around the outside of the seal the second time I did it ( yes, the first time, I rolled the lip of the seal, & flipped out the "garter spring", but it was inside the housing, & I had not made this mistake before , so I missed it. After a very short run time, I had to do it again. It seems like there might have been a thin spacer washer in there with the seal, or maybe I just remember wishing there was ... if there is a seal lip groove worn on the shaft you can try to shift the where the lip rides on the shaft by shifting the location of the spacer to the other side of the seal, or maybe not.
My machine is admittedly a ragged old beast. While you have the pumps out, replace every o-ring boss seal you can get to. be sure to use only "duro-90" or what ever they call the extra firm o-rings for "straight thread o-ring fittings" ( where the fittings thread into the pumps.
Did I mention that my machine is a "rag"? if your steel lines have been replaced with hoses, this would also be a good opportunity to put those "(braided nylon webbing sleeves)" that are recommended for mining operations on all the hoses. ( I got bulk stock off Ebay)
If this has been leaking long, be sure to check the condition of the rubber rear motor support (bushing?) if it collapses, the pumps rest on the cross member & wear holes in the cross member & the pumps. ( mine was developing cracks in the cross member as well. So after I cleaned it to the point that I could weld them up with out setting the machine on fire, I did. Service manual says to disconnect the battery when welding.) If you have the battery hold down clamp loose, be sure you don't "trap" it when you re-secure the engine.
Personally, I drilled a few additional drain holes so that the liquid "stuff" could maybe drain out of the bottom of the machine.
I fabricated a "cab jack" for my machine, and used a hoist arrangement for the pumps. I guess I am a wimp, I cannot imagine pulling them out through the under seat hole.
Good Luck!
Thanks for that detailed reply! Much appreciated.I assume you pulled both servo "pumps" from the gear case on the flywheel end of the engine.
If one shaft seal failed due to old age, the other is probably the same age, & due to fail at any time, so replacing both seals would be appropriate. There is a "new & improved" seal available.
This is not a terrible job after you get the pumps out. it seems like the seals are retained by a snap ring in the pump housing, then pull the seal with a sheetmetal screw end on a slide hammer, or just pull it out with a pair of pliers or "vice grips". it seems like one of mine, "the failed one" just fell out after I got the screw in it. As I recall that seal bore was a couple of thousandths larger than the other so I used some retaining compound around the outside of the seal the second time I did it ( yes, the first time, I rolled the lip of the seal, & flipped out the "garter spring", but it was inside the housing, & I had not made this mistake before , so I missed it. After a very short run time, I had to do it again. It seems like there might have been a thin spacer washer in there with the seal, or maybe I just remember wishing there was ... if there is a seal lip groove worn on the shaft you can try to shift the where the lip rides on the shaft by shifting the location of the spacer to the other side of the seal, or maybe not.
My machine is admittedly a ragged old beast. While you have the pumps out, replace every o-ring boss seal you can get to. be sure to use only "duro-90" or what ever they call the extra firm o-rings for "straight thread o-ring fittings" ( where the fittings thread into the pumps.
Did I mention that my machine is a "rag"? if your steel lines have been replaced with hoses, this would also be a good opportunity to put those "(braided nylon webbing sleeves)" that are recommended for mining operations on all the hoses. ( I got bulk stock off Ebay)
If this has been leaking long, be sure to check the condition of the rubber rear motor support (bushing?) if it collapses, the pumps rest on the cross member & wear holes in the cross member & the pumps. ( mine was developing cracks in the cross member as well. So after I cleaned it to the point that I could weld them up with out setting the machine on fire, I did. Service manual says to disconnect the battery when welding.) If you have the battery hold down clamp loose, be sure you don't "trap" it when you re-secure the engine.
Personally, I drilled a few additional drain holes so that the liquid "stuff" could maybe drain out of the bottom of the machine.
I fabricated a "cab jack" for my machine, and used a hoist arrangement for the pumps. I guess I am a wimp, I cannot imagine pulling them out through the under seat hole.
Good Luck!
My machine is a 99 and in pretty good shape relatively I think. But parts do wear out. I need to check the hours it's done actually. What has you're done? Just trying to get an idea of how worn mine might be and what they are good for.
My machine is just for snow plowing and a bit of home landscaping. No commercial work, so I'm hoping I can keep it going for many years to come.
I bought a Reman LH pump from ConEquip. I wasn't sure what I would find once I opened it up and internal parts don't seem to be available. I know about the seal kit and there is also a bearing kit. I don't know if the Reman has had both done but to buy both kits would have been about the same cost as the Reman. Glad to hear the reseal is doable for the lay mechanic. I guess I should give it a go, just don't want to find I can't complete the job. Does the shaft come all the way out? There looks like some internal bearing arrangement I don't want to have to get into.
I don't know much about o rings. How do you know what size to buy? I was going to get the NH seal kit and hope everything was labeled up. I was told by a hydraulics mechanic that the seal at the front doesn't really do much, it's the one inside that is most important? And you can get to that?
The cab jack sounds interesting. I took the seat out which I'm sure helped a lot, but it was still awkward. I have a forklift that I could probably use for lowering the cab but I wasn't sure how that would work out. The NH one has a locking bracket for part of the boom. Not sure what would happen without it. I will use the forklift to put the pumps back in. Suspend them from a fork and drive them in.
Thanks for the advise on what to check. I'll have to do some extra cleaning and take a look!
tech.35058
Well-known member
- Joined
- Dec 15, 2016
- Messages
- 96
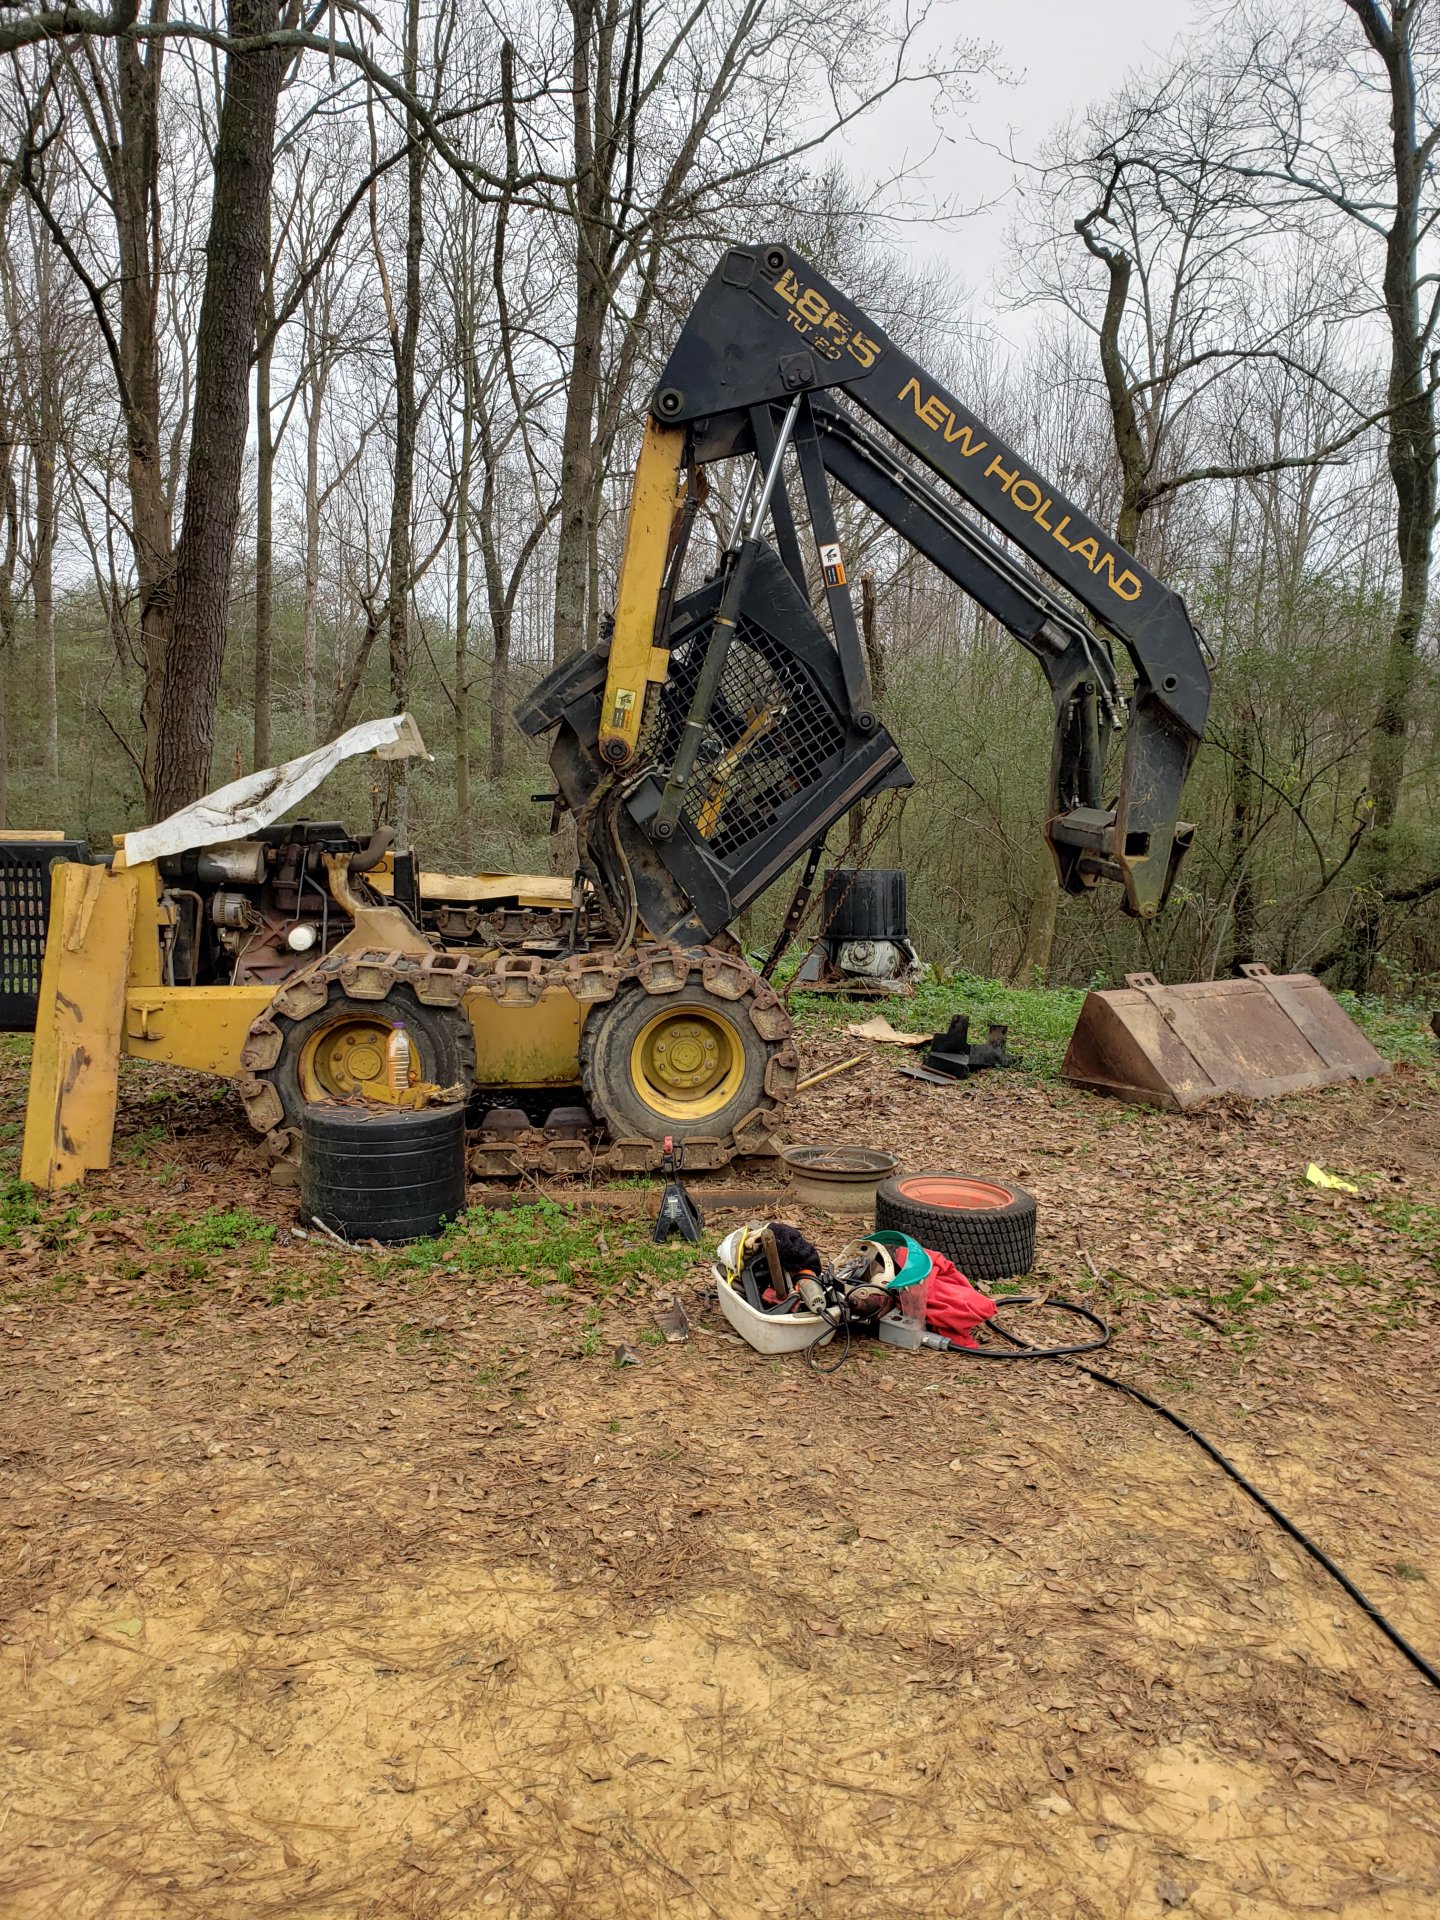
hours on my machine, gee, I don't know. hour meter is built into the "(electronic control thing)". I think mine is wonky, says something like 127 hours. I think it read more than that at one point, but reset itself or something. ( this machine belonged to a timber harvesting operation at one point, so a lot of the safety stuff has been bypassed, some of the bottom skid plates are missing, etc)
A little background on me, I worked for a heavy equipment dealer in the engine rebuild shop for about 30 years, then we had some "business slowdown", & I was farmed out to the hydraulic department, pump, motor & valve shop for about 3 months. This does _not_ make me an expert on hydraulics. We did work on what ever came in, regardless of brand, but not power steering units, and there was one brand that we always just replaced, the supervisor guys said we could not rebuild them successfully.( those might have been Char-lynn?) I did learn that they are not all "just alike inside". The very expensive seal kit does not contain all the seals ( we often reused some of the tiny o-rings not included in the kit), and the main shaft seal is often not included in the kit. I don't think we had issues getting internal parts, but if it got to the point of replacing pistons & barrels, it was cheaper to obtain a reman pump or motor.
With this particular pump,the shaft seal is accessible without disassembling the case. ( with some, the seal is installed from the inside, then the rest of the parts go in, sort of on top of it)
I don't think the shaft comes out of these pumps without a complete disassembly.
regarding a "(seal inside that is most important)" ... this probably goes back to "they are not all the same inside". I looked at the illustrated parts list for this pump at
https://www.messicks.com/nh/148043just to refresh my memory. This shaft seal is all there is. it holds precharge pressure( which actually lubricates the pump mechanism) & case drain pressure.. unless maybe he meant the O-ring seals around the head of the case. After reviewing the parts diagram, I see there is a washer in the cavity with the shaft seal, so it is possible to shift the lip in case of a wear groove.
Messicks also has a diagram showing the msc o-rings in the hydraulic lines with part numbers and descriptions. I must confess that I replaced some of the high pressure (Straight Thread O-Ring aka"STOR") boss seals with generic "butyl rubber o-ring kit" seals. these failed, so then I paid attention to the descriptions. I got an assortment of Gates duro90 seals via E-bay, & later a "no-name" STOR-boss o-ring kit (from Precision Seals in Fultondale, Al ) I also had a collection of msc "left over seals" that could not be returned to the parts dept from my professional mechanic days.
When I realized that I was actually going to have to deal with this leak, I actually purchased the seal kits for the pumps. I just went & looked, these kits do include the shaft seals ( not knowing for sure, I also purchased them separately, so my kits are still "complete" ). and like most of the seal kits we used at work, the part numbers are not printed on the seals, nor tagged.
I was kind of afraid to start this, because of all the times a customer would send in their pump or motor they just wanted to seal up the leaks, we would open it up & the internal parts would be just lumps of brass gravel.
How much was mine leaking ... Well, the bolt holding one of the pumps came loose, so a lot of the excess was leaking from the pump mounting hole, not any coming out the dipstick. but it was extremely expensive to keep filling up the reservoir.
OK, cab jack ... I assume you have seen the pictures in the service manual, looked up the part number & checked availability? around $1000, but no longer available for any price? the dealer has one, but he would not loan, nor rent it to me. ( well, I wont loan nor rent _my_ tools).
I tried to pull the cab over with a farm tractor with a front end loader & a drum full of cement on the back, but the leverage was wrong, the rear wheels would lift, & then no more pull.
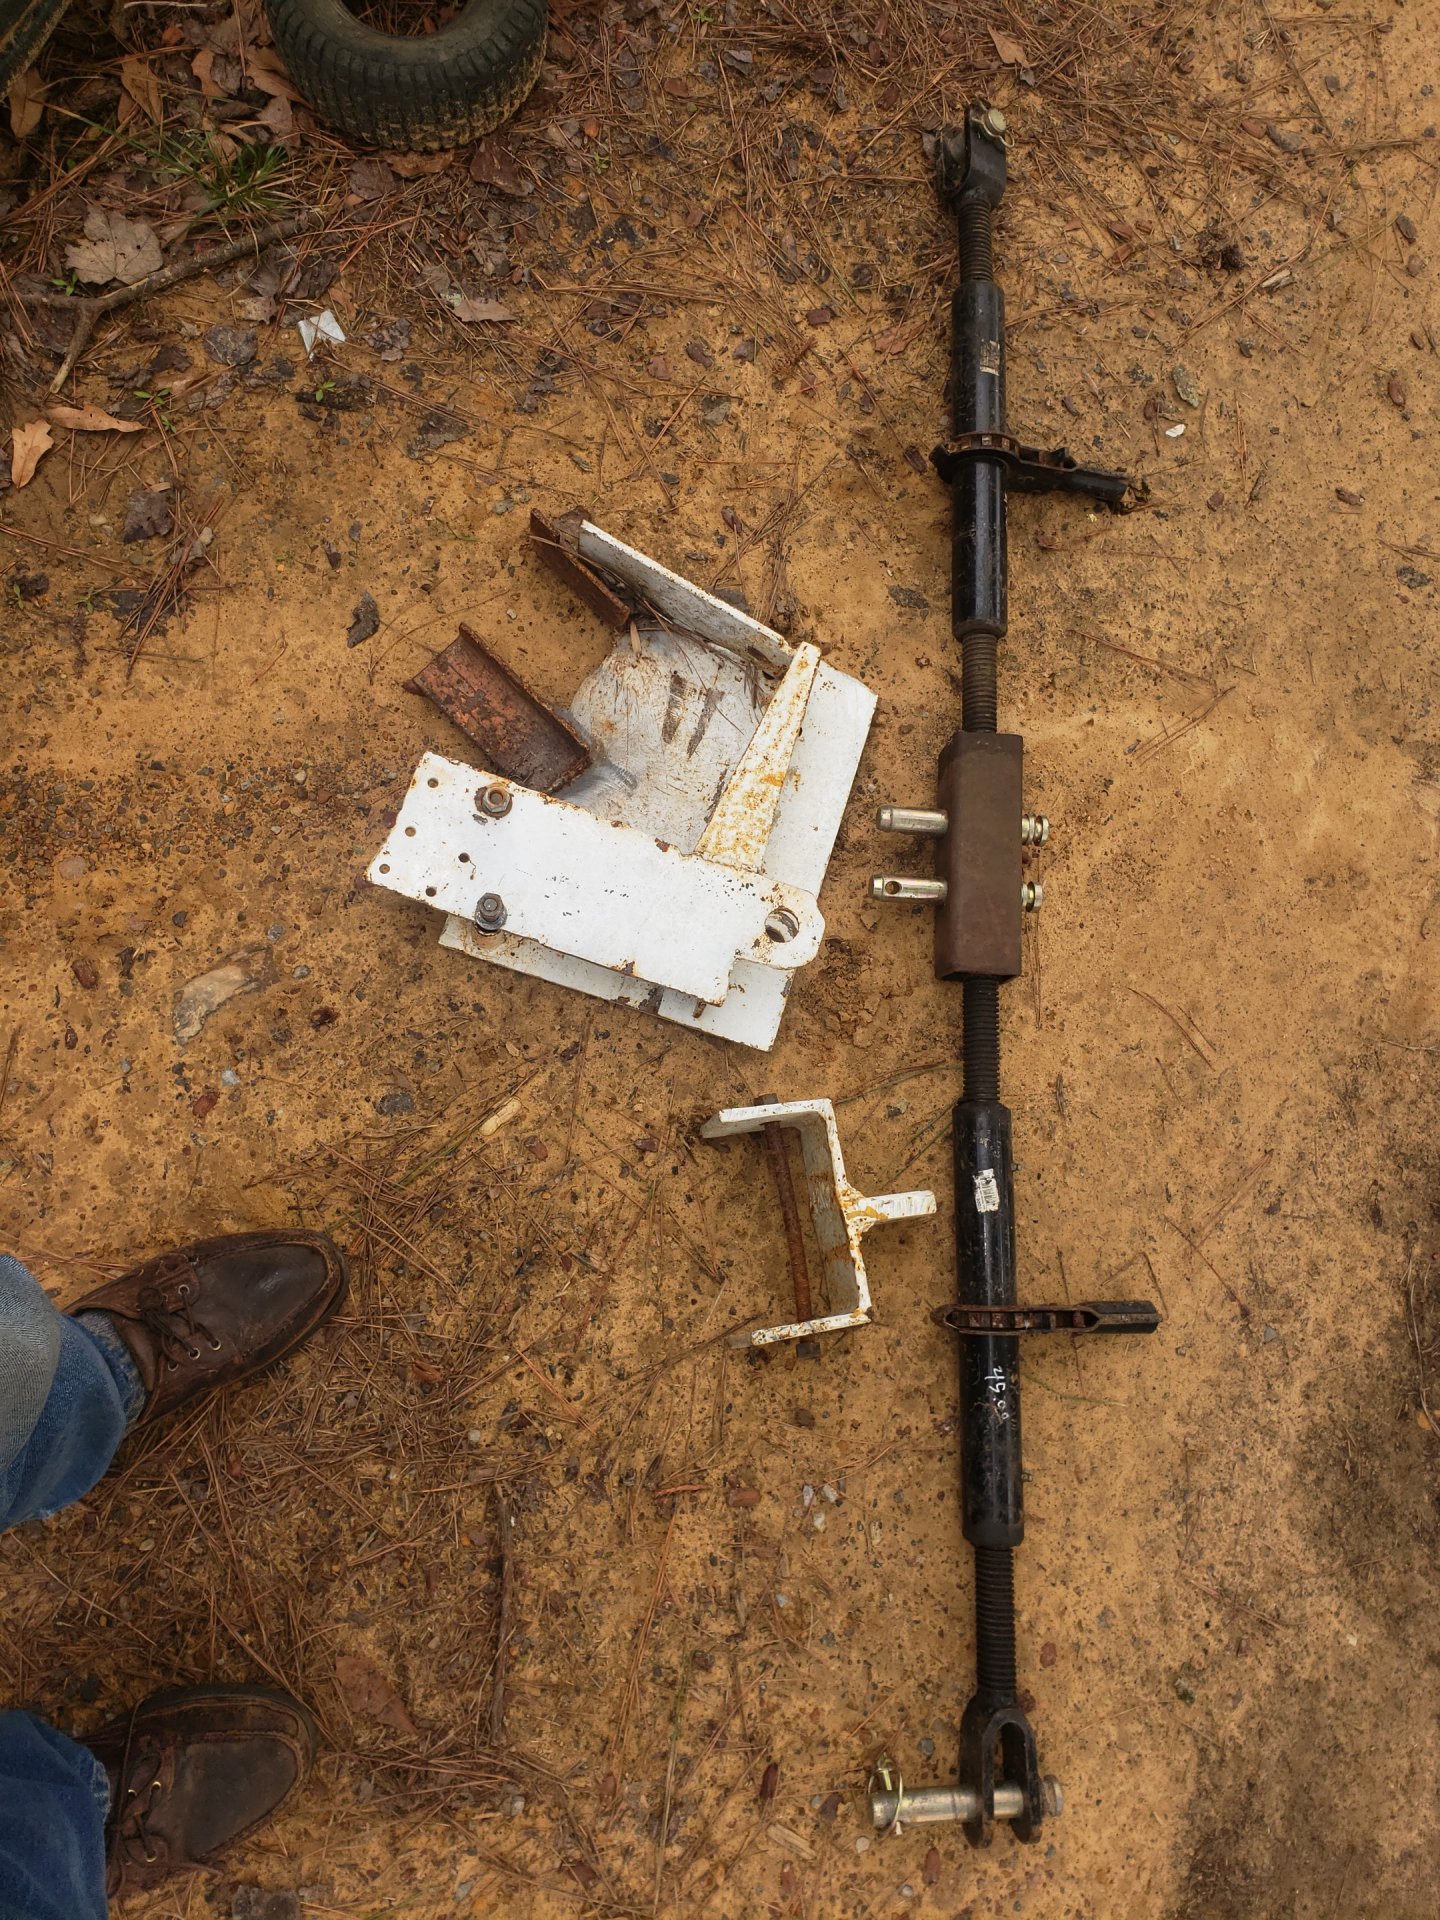
I looked at the pictures in the Service Manual, then made a cardboard pattern, the made the top bracket. You may notice my bottom bracket is different from the one in the service manual. you also notice my bolt holding it on is severely bent, so if you decide to make your own, dont copy mine. it needs to have that hook for the part of the operation where the jack is in tension. My big turn buckles , I do not know what they were originally intended for, I found them at a discount tool store ( K & K Sales, Cullman, Al ). they also had the longer pins to go through the square tubing I used to join the two together. and yes, I needed both of them, one by itself would not have enough travel to fully tip the cab.
Think happy thoughts ... CE
A little background on me, I worked for a heavy equipment dealer in the engine rebuild shop for about 30 years, then we had some "business slowdown", & I was farmed out to the hydraulic department, pump, motor & valve shop for about 3 months. This does _not_ make me an expert on hydraulics. We did work on what ever came in, regardless of brand, but not power steering units, and there was one brand that we always just replaced, the supervisor guys said we could not rebuild them successfully.( those might have been Char-lynn?) I did learn that they are not all "just alike inside". The very expensive seal kit does not contain all the seals ( we often reused some of the tiny o-rings not included in the kit), and the main shaft seal is often not included in the kit. I don't think we had issues getting internal parts, but if it got to the point of replacing pistons & barrels, it was cheaper to obtain a reman pump or motor.
With this particular pump,the shaft seal is accessible without disassembling the case. ( with some, the seal is installed from the inside, then the rest of the parts go in, sort of on top of it)
I don't think the shaft comes out of these pumps without a complete disassembly.
regarding a "(seal inside that is most important)" ... this probably goes back to "they are not all the same inside". I looked at the illustrated parts list for this pump at
https://www.messicks.com/nh/148043just to refresh my memory. This shaft seal is all there is. it holds precharge pressure( which actually lubricates the pump mechanism) & case drain pressure.. unless maybe he meant the O-ring seals around the head of the case. After reviewing the parts diagram, I see there is a washer in the cavity with the shaft seal, so it is possible to shift the lip in case of a wear groove.
Messicks also has a diagram showing the msc o-rings in the hydraulic lines with part numbers and descriptions. I must confess that I replaced some of the high pressure (Straight Thread O-Ring aka"STOR") boss seals with generic "butyl rubber o-ring kit" seals. these failed, so then I paid attention to the descriptions. I got an assortment of Gates duro90 seals via E-bay, & later a "no-name" STOR-boss o-ring kit (from Precision Seals in Fultondale, Al ) I also had a collection of msc "left over seals" that could not be returned to the parts dept from my professional mechanic days.
When I realized that I was actually going to have to deal with this leak, I actually purchased the seal kits for the pumps. I just went & looked, these kits do include the shaft seals ( not knowing for sure, I also purchased them separately, so my kits are still "complete" ). and like most of the seal kits we used at work, the part numbers are not printed on the seals, nor tagged.
I was kind of afraid to start this, because of all the times a customer would send in their pump or motor they just wanted to seal up the leaks, we would open it up & the internal parts would be just lumps of brass gravel.
How much was mine leaking ... Well, the bolt holding one of the pumps came loose, so a lot of the excess was leaking from the pump mounting hole, not any coming out the dipstick. but it was extremely expensive to keep filling up the reservoir.
OK, cab jack ... I assume you have seen the pictures in the service manual, looked up the part number & checked availability? around $1000, but no longer available for any price? the dealer has one, but he would not loan, nor rent it to me. ( well, I wont loan nor rent _my_ tools).
I tried to pull the cab over with a farm tractor with a front end loader & a drum full of cement on the back, but the leverage was wrong, the rear wheels would lift, & then no more pull.
I looked at the pictures in the Service Manual, then made a cardboard pattern, the made the top bracket. You may notice my bottom bracket is different from the one in the service manual. you also notice my bolt holding it on is severely bent, so if you decide to make your own, dont copy mine. it needs to have that hook for the part of the operation where the jack is in tension. My big turn buckles , I do not know what they were originally intended for, I found them at a discount tool store ( K & K Sales, Cullman, Al ). they also had the longer pins to go through the square tubing I used to join the two together. and yes, I needed both of them, one by itself would not have enough travel to fully tip the cab.
Think happy thoughts ... CE
Attachments
tech.35058
Well-known member
- Joined
- Dec 15, 2016
- Messages
- 96
one other thing, these new seals with the rubber like coating on the outer outer rim.
you are supposed to lubricate the out side & just push them in. When they first came out, I destroyed a bunch of them before I caught on about lubricating them.
On my skidsteer pump, I used a piece of pipe that would go over the shaft, but not sit on the delicate part of the seal ( lip) yet still had room to install the snap ring. I would say I used an "H" bar( or a board or something) and a couple of pieces of all-thread in the mounting slots to push the seal in & hold it while I installed the snap ring .
Thanks again! I guessed you probably weren't as much of a lay mechanic as I am!hours on my machine, gee, I don't know. hour meter is built into the "(electronic control thing)". I think mine is wonky, says something like 127 hours. I think it read more than that at one point, but reset itself or something. ( this machine belonged to a timber harvesting operation at one point, so a lot of the safety stuff has been bypassed, some of the bottom skid plates are missing, etc)
A little background on me, I worked for a heavy equipment dealer in the engine rebuild shop for about 30 years, then we had some "business slowdown", & I was farmed out to the hydraulic department, pump, motor & valve shop for about 3 months. This does _not_ make me an expert on hydraulics. We did work on what ever came in, regardless of brand, but not power steering units, and there was one brand that we always just replaced, the supervisor guys said we could not rebuild them successfully.( those might have been Char-lynn?) I did learn that they are not all "just alike inside". The very expensive seal kit does not contain all the seals ( we often reused some of the tiny o-rings not included in the kit), and the main shaft seal is often not included in the kit. I don't think we had issues getting internal parts, but if it got to the point of replacing pistons & barrels, it was cheaper to obtain a reman pump or motor.
With this particular pump,the shaft seal is accessible without disassembling the case. ( with some, the seal is installed from the inside, then the rest of the parts go in, sort of on top of it)
I don't think the shaft comes out of these pumps without a complete disassembly.
regarding a "(seal inside that is most important)" ... this probably goes back to "they are not all the same inside". I looked at the illustrated parts list for this pump at
https://www.messicks.com/nh/148043just to refresh my memory. This shaft seal is all there is. it holds precharge pressure( which actually lubricates the pump mechanism) & case drain pressure.. unless maybe he meant the O-ring seals around the head of the case. After reviewing the parts diagram, I see there is a washer in the cavity with the shaft seal, so it is possible to shift the lip in case of a wear groove.
Messicks also has a diagram showing the msc o-rings in the hydraulic lines with part numbers and descriptions. I must confess that I replaced some of the high pressure (Straight Thread O-Ring aka"STOR") boss seals with generic "butyl rubber o-ring kit" seals. these failed, so then I paid attention to the descriptions. I got an assortment of Gates duro90 seals via E-bay, & later a "no-name" STOR-boss o-ring kit (from Precision Seals in Fultondale, Al ) I also had a collection of msc "left over seals" that could not be returned to the parts dept from my professional mechanic days.
When I realized that I was actually going to have to deal with this leak, I actually purchased the seal kits for the pumps. I just went & looked, these kits do include the shaft seals ( not knowing for sure, I also purchased them separately, so my kits are still "complete" ). and like most of the seal kits we used at work, the part numbers are not printed on the seals, nor tagged.
I was kind of afraid to start this, because of all the times a customer would send in their pump or motor they just wanted to seal up the leaks, we would open it up & the internal parts would be just lumps of brass gravel.
How much was mine leaking ... Well, the bolt holding one of the pumps came loose, so a lot of the excess was leaking from the pump mounting hole, not any coming out the dipstick. but it was extremely expensive to keep filling up the reservoir.
OK, cab jack ... I assume you have seen the pictures in the service manual, looked up the part number & checked availability? around $1000, but no longer available for any price? the dealer has one, but he would not loan, nor rent it to me. ( well, I wont loan nor rent _my_ tools).
I tried to pull the cab over with a farm tractor with a front end loader & a drum full of cement on the back, but the leverage was wrong, the rear wheels would lift, & then no more pull.
I looked at the pictures in the Service Manual, then made a cardboard pattern, the made the top bracket. You may notice my bottom bracket is different from the one in the service manual. you also notice my bolt holding it on is severely bent, so if you decide to make your own, dont copy mine. it needs to have that hook for the part of the operation where the jack is in tension. My big turn buckles , I do not know what they were originally intended for, I found them at a discount tool store ( K & K Sales, Cullman, Al ). they also had the longer pins to go through the square tubing I used to join the two together. and yes, I needed both of them, one by itself would not have enough travel to fully tip the cab.
Think happy thoughts ... CE
Am I right in thinking that the pump seal kit isn't really needed unless you are dismantling the whole thing? So if I just wanted to replace the seal preemptively that's really all I need to buy? As I said I have bought the Reman pump for the left side plus new O rings for both pumps where they fit to the gear casing. Or should I also get the snap rings and washers plus seal if I decide to do the RH?
The RH pump doesn't seem to have any issue so I'm not expecting to find anything wrong once I open it up.
I see that there is quite a lot of info on the O rings & parts etc, thanks for pointing that out. I see their O rings are the Duro 90.
The cab lowering mechanical arrangement does look complicated which is why I didn't attempt it even with a forklift on hand. I was hoping there was a way. Do you think it would be possible to chain up the boom against the cab pins using the turnbuckles so nothing can move? Then lower it with the forklift? I'm assuming once the bolts at the back of the cab are removed the whole thing will fall forwards naturally? I can manage for this job but it would be good to figure out some arrangement for if there's a next time. I don't understand what function the chains have in your arrangement? Just a precaution?
I see you have tire tracks. I was going to buy some chains for next winter, probably a bit cheaper than tracks I guess. On level ground it's fine for plowing but we have a slope, once that gets iced up it's all over the place.
Thanks again I appreciate the time.