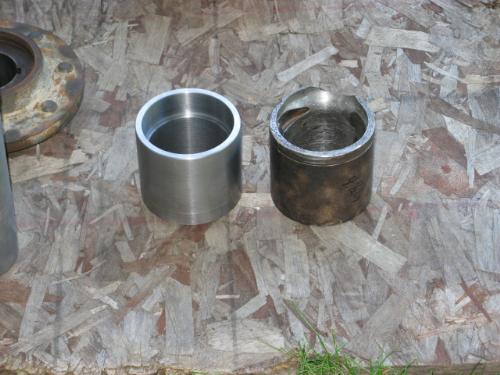
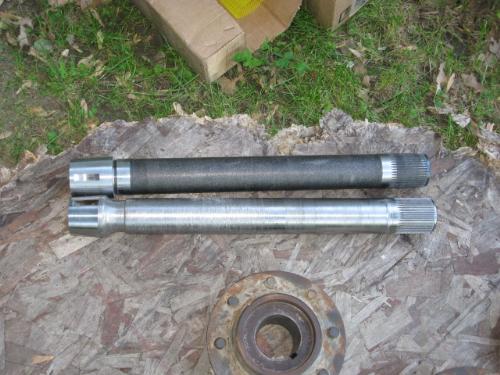
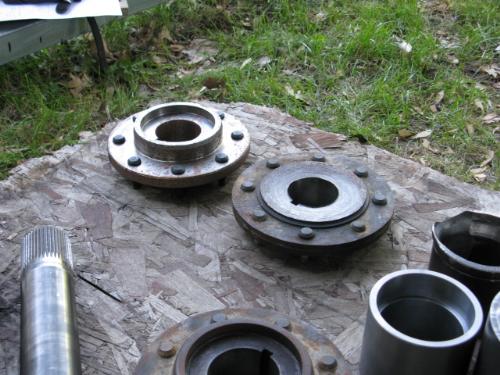
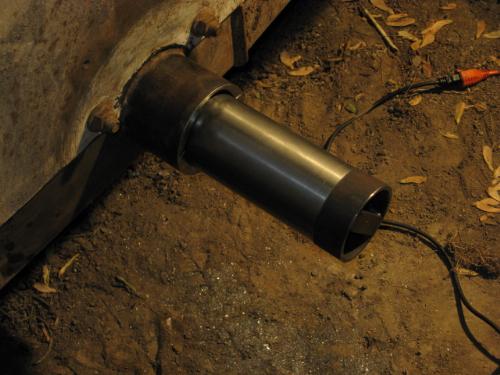
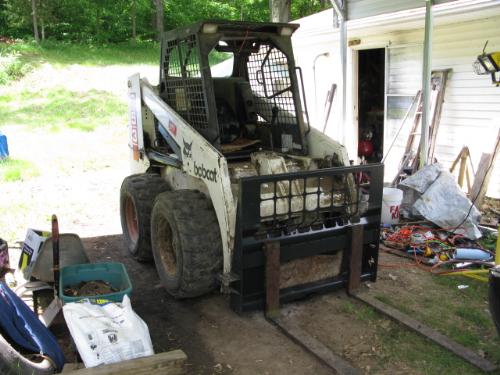
For anyone who followed my questions about an 853 axle repair job about a month ago, this is something you should see: "clr1001 853 axle repair etc" is the name of the photo gallery. Here's a brief run-thru of photos by number: 3260-good tube and axle shaft for comparison, 3262-bad tube and axle shaft, 3279-bad tube cut off, 3363-new machined tube vs old bad tube, 3364-outside sleeve vs inside sleeve (guide), 3365-new tube vs old tube (2nd pic), 3368-new shaft vs old shaft, 3377-old hub vs new hub, 3380-inside sleeve (guide tube), 3384-guide tube w/ new axle tube, 3393-new tube welded on, 3398-new tube w/outside sleeve welded on, 3406-same as 3398 with fresh paint, 3425-an operational 853, 3428-new hub plate bolts. The very condensed version of this is as follows: I took all my damaged parts to my local machine shop. They did an excellent job for me on the new axle tube, inside sleeve guide, and outside sleeve in about 1 week. Price was $400. The shop said for me to buy a new axle shaft and hub because it would cost as much or more to repair the old parts. Price was $800 for axle shaft and hub. I had to grind out a little of the old axle tube still attached to the 853 to get the inside sleeve (guide) to fit, but it was super-snug. I lined everything up and welded it in place, and then pulled the sleeve out, and finished welding it the rest of the way. A professional probably could have done better, but I am a dedicated amateur. I probably weld and ground on this 10 times to get it just so. The outside sleeve was a very tight fit, but I know I had it lined up almost perfectly because it slid right on after I removed a small piece of slag. I welded that on, and then I put the new axles together. I put 2 big round magnets in the chaincase, one at each end, to attract any loose filings.
You are using an out of date browser. It may not display this or other websites correctly.
You should upgrade or use an alternative browser.
You should upgrade or use an alternative browser.
Help Support SkidSteer Forum:
Hopefully this will make things a little easier to read and understand. Thats an amazing job!! I was wondering how strong it would be but after you said you put a sleeve over the join and welded it on i agree it should be more than strong enough. That was some serious wear!!!! How did you get the end play worked out? so the shaft doesn't *float* from end to end?Nice repair clr, I hope it holds up for you.
*********************************************************************
For anyone who followed my questions about an 853 axle repair job about a month ago, this is something you should see: "clr1001 853 axle repair etc" is the name of the photo gallery. Here's a brief run-thru of photos by number:
3260-good tube and axle shaft for comparison
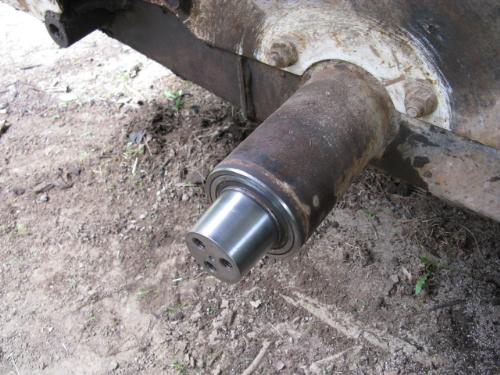
3262-bad tube and axle shaft
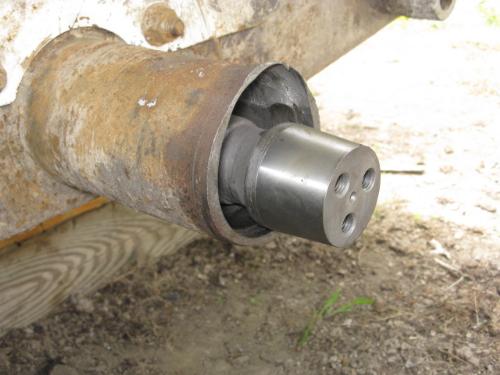
3279-bad tube cut off
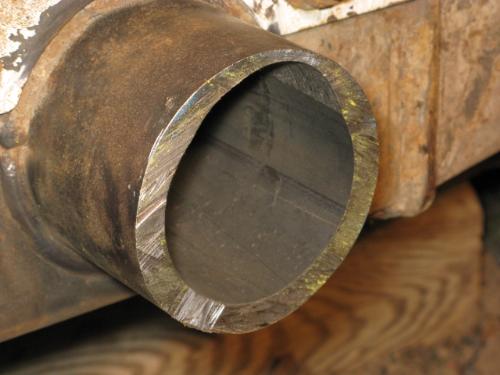
3363-new machined tube vs old bad tube
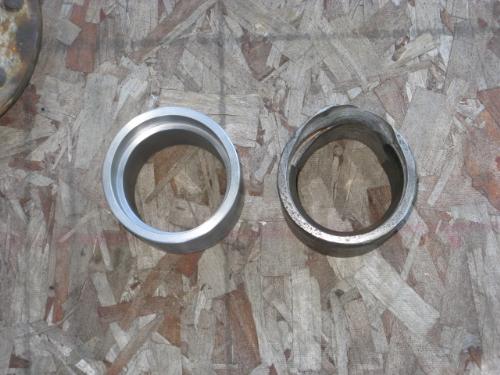
3364-outside sleeve vs inside sleeve (guide)
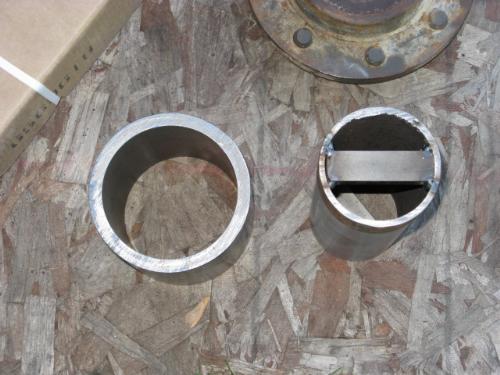
3365-new tube vs old tube (2nd pic)
3368-new shaft vs old shaft
3377-old hub vs new hub
3380-inside sleeve (guide tube)
3384-guide tube w/ new axle tube

3393-new tube welded on

3398-new tube w/outside sleeve welded on
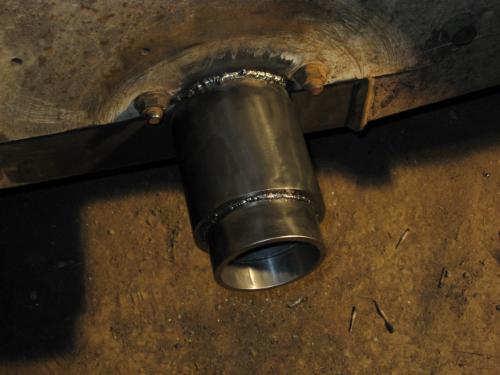
3406-same as 3398 with fresh paint

3425-an operational 853
3428-new hub plate bolts
The very condensed version of this is as follows: I took all my damaged parts to my local machine shop. They did an excellent job for me on the new axle tube, inside sleeve guide, and outside sleeve in about 1 week. Price was $400. The shop said for me to buy a new axle shaft and hub because it would cost as much or more to repair the old parts. Price was $800 for axle shaft and hub. I had to grind out a little of the old axle tube still attached to the 853 to get the inside sleeve (guide) to fit, but it was super-snug. I lined everything up and welded it in place, and then pulled the sleeve out, and finished welding it the rest of the way. A professional probably could have done better, but I am a dedicated amateur. I probably weld and ground on this 10 times to get it just so. The outside sleeve was a very tight fit, but I know I had it lined up almost perfectly because it slid right on after I removed a small piece of slag. I welded that on, and then I put the new axles together. I put 2 big round magnets in the chaincase, one at each end, to attract any loose filings.
Thanks. I'll keep you posted on how things holds up. It's an older machine, so I expect to do some maintenance on it. I just hope nothing major (like pumps) goes wrong, and I'll be in good shape.Nice repair clr, I hope it holds up for you.
skidsteer.ca
Well-known member
- Joined
- Jan 20, 2006
- Messages
- 3,853
If you have the confidence to tackle this you don't need to worry much about the rest of the machine!Thanks. I'll keep you posted on how things holds up. It's an older machine, so I expect to do some maintenance on it. I just hope nothing major (like pumps) goes wrong, and I'll be in good shape.
The 853 are pretty heavy duty old loader to begin with. Tried and true. Likely even if something else has a high rate of wear, it will still last most non commercial users a long time.
As you said pumps and engine are the 2 big ticket items, but they last for 1000's of hours. With a skidsteer all you big projects will be done in a heartbeat and those hours don'r pile up too fast.
Ken
I forgot to address this in the earlier thread: Even with the wear on the top of the old axle tube, it was still 1/4" thick at the thinnest point. The normal wall thickness of the axle tube is about 1/2" thick. I added that outside sleeve, and that increased the total wall thickness by 1/2", bringing the thinnest point to 3/4", and the majority of the axle tube is now 1" thick. I don't think I'll have any problems with the axle now, but I will definitely let you know if I do. I also didn't have room earlier to write about installing the new bearings and the speedy-sleeve: I found a piece of pipe (about 5' long) just a little bit bigger in diameter than the diameter of the axle shaft. I stood the axle shaft on its head, and I used this pipe as a slide-hammer to drive the new bearing on. It really worked slick. For the speedy-sleeve for the axle seal, I used the hub itself as a slide hammer to press the sleeve on, but lacked about 1/4" from getting it completely seated. Luckily, I ordered 2 sleeves in case I messed something up. I put the 2nd sleeve next to the first sleeve, and used the hub to press the 1st sleeve the remaining 1/4". I used a very sharp wood chisel and gently went around the crack between the 2 sleeves and separated them and popped the 2nd sleeve off. If anybody else does this, be very careful for a couple reasons: 1st, the sleeves are $17 each. 2nd, the sleeves are very soft. I started the 1st sleeve on with a brass punch, and it actually burred the edge of the sleeve a little bit. I cleaned it up with a needle file, and it was just fine. 3rd, if you use the same procedure I did, you have to be careful not to chisel into the axle shaft while removing the 2nd speedy-sleeve.Thanks. I'll keep you posted on how things holds up. It's an older machine, so I expect to do some maintenance on it. I just hope nothing major (like pumps) goes wrong, and I'll be in good shape.
One more thing: You asked about end-play and float. Believe it or not, it appears that this lined up almost perfectly with the original axle tube and clearances. It sure looked right and felt right putting it together. I compared the undamaged side with the damaged side, and then matched the new parts to the old undamaged parts. I guess you could say this was one of the benefits to having the parts taken to a machine shop and made to exact dimensions. Even a blind sow gets an acorn every now and then...I forgot to address this in the earlier thread: Even with the wear on the top of the old axle tube, it was still 1/4" thick at the thinnest point. The normal wall thickness of the axle tube is about 1/2" thick. I added that outside sleeve, and that increased the total wall thickness by 1/2", bringing the thinnest point to 3/4", and the majority of the axle tube is now 1" thick. I don't think I'll have any problems with the axle now, but I will definitely let you know if I do. I also didn't have room earlier to write about installing the new bearings and the speedy-sleeve: I found a piece of pipe (about 5' long) just a little bit bigger in diameter than the diameter of the axle shaft. I stood the axle shaft on its head, and I used this pipe as a slide-hammer to drive the new bearing on. It really worked slick. For the speedy-sleeve for the axle seal, I used the hub itself as a slide hammer to press the sleeve on, but lacked about 1/4" from getting it completely seated. Luckily, I ordered 2 sleeves in case I messed something up. I put the 2nd sleeve next to the first sleeve, and used the hub to press the 1st sleeve the remaining 1/4". I used a very sharp wood chisel and gently went around the crack between the 2 sleeves and separated them and popped the 2nd sleeve off. If anybody else does this, be very careful for a couple reasons: 1st, the sleeves are $17 each. 2nd, the sleeves are very soft. I started the 1st sleeve on with a brass punch, and it actually burred the edge of the sleeve a little bit. I cleaned it up with a needle file, and it was just fine. 3rd, if you use the same procedure I did, you have to be careful not to chisel into the axle shaft while removing the 2nd speedy-sleeve.
skidsteer.ca
Well-known member
- Joined
- Jan 20, 2006
- Messages
- 3,853
You'll never bust that. The other 3 axels will break off at the frame b4 that breaks with the sleeve over top reinforcing it. Cutting it off in the middle was a good idea too as the high stree point is back at the frame, not in the middle of the tube.One more thing: You asked about end-play and float. Believe it or not, it appears that this lined up almost perfectly with the original axle tube and clearances. It sure looked right and felt right putting it together. I compared the undamaged side with the damaged side, and then matched the new parts to the old undamaged parts. I guess you could say this was one of the benefits to having the parts taken to a machine shop and made to exact dimensions. Even a blind sow gets an acorn every now and then...
Ken
Thanks to everybody who contributed to this project. I don't want to forget anybody. If you have any other questions, please let me know. I almost forgot--original thanks probably should have been to PERRY for telling me about the forum when I talked to him the first time on the phone.You'll never bust that. The other 3 axels will break off at the frame b4 that breaks with the sleeve over top reinforcing it. Cutting it off in the middle was a good idea too as the high stree point is back at the frame, not in the middle of the tube.
Ken
looks good , we do it another way , weld and line bore , after it is dissassembled the mobile line bore guy sets up and welds all the missing metal back into place then line bores the race and seal seats back in , he charges from $300 up depending how much is messed up and it takes him about 3 hours on a bad one
skidsteer.ca
Well-known member
- Joined
- Jan 20, 2006
- Messages
- 3,853
One of the local equipment dealers has a setup like that, heard it was about 40k. Use it mostly for repair pin bosses on heavy equipment. They would bore the hole round, then weld it down to size and bore the ID to suit.looks good , we do it another way , weld and line bore , after it is dissassembled the mobile line bore guy sets up and welds all the missing metal back into place then line bores the race and seal seats back in , he charges from $300 up depending how much is messed up and it takes him about 3 hours on a bad one
Unfortunately they will only do there own equipment with it and won't do just the re bore for any other repair shops. So it don't get used much. It would be a great business opportunity for the right individual.
Ken
mllud
Well-known member
- Joined
- Jun 29, 2007
- Messages
- 635
I would think they wont do the re bore for other repair shop to keep from damaging and destroying cutting bits. When you follow a partial repair done by someone else if they used the wrong rod the will end up loosing money.One of the local equipment dealers has a setup like that, heard it was about 40k. Use it mostly for repair pin bosses on heavy equipment. They would bore the hole round, then weld it down to size and bore the ID to suit.
Unfortunately they will only do there own equipment with it and won't do just the re bore for any other repair shops. So it don't get used much. It would be a great business opportunity for the right individual.
Ken
I have a freind that ownse a machine shop that wont touch anything that someone else has messed with.
This repair Job was a good example of a job well done
thetool
Well-known member
- Joined
- Mar 22, 2008
- Messages
- 516
I found this fascinating and impressive. A nice piece of work.
It really proves that no matter how badly something is damaged, there is a way to fix it!I found this fascinating and impressive. A nice piece of work.
I trust you are happy with how the repair went? you didn't encounter any real problems?
Thanks for all the kudos, guys. I really appreciate it. I grew up on a farm in IL, and we didn't have much money, so we had to learn to fix stuff ourselves. It wasn't all #9 wire and duct tape and bungie cords, but we did have to improvise a lot. My dad taught me to stick-weld and run a torch, and I taught myself to MIG, TIG, and do minor machine work by reading welding and machinist books and manuals and trial-and-error. Before this project started, I didn't even know how to get at the chain case by lifting the seat! I bought the operators and service manual (which by the way, next time, just buy the service manual--most of the operators manual IS IN the service manual) and read them every nite before bed. Tazza asked if I ran into any snags. There were 3 pretty big ones: I had to put 24 tons of gear puller on the axle hubs to get them off--2 six-ton hydraulic jacks behind against the frame pushing, and 1 12-ton gear puller on the front pulling is what it took to get those pesky hubs off! I figured they hadn't been off since the machine was built. Next, until I figured out how to make that slide hammer out of the 5' section of pipe, I had been trying to drive the bearings on with a brass hammer and brass punch. That was taking forever. The speedy-sleeve went a little better because I already thot of the slide-hammer method with the bearings. The last thing was the hydraulic filters. This machine has 2 of them. I hate to say it, but the previous owner did NOT service this machine as they claimed. Both filters were over 1300 (you read right) hours overdue for changing! The back filter hadn't been changed since 1998! I had to cut the filter off and slot the collar and pound it off with a punch and hammer! I was trying to be really careful with it, so it took me about 6 hours from start to finish to get it. That was not a very productive 1/2 day, I can tell ya. But I got it, and only knicked up 2 threads which I repaired with a needle file. As for the machining rigs you guys were talking about, I think I know why nobody wants to work on anybody else's stuff. It's probably the product liability. I work in insurance, and product liability is a very big issue for repair shops. It's very expensive, and a lot of companies don't want to write the coverage. I ran into this last year quoting a welding risk. Insurance companies don't like welders, either. My minimum premium for a new risk is $5000/year. The sky is the limit after that. Anyway, thanks again for all the input from everybody.It really proves that no matter how badly something is damaged, there is a way to fix it!
I trust you are happy with how the repair went? you didn't encounter any real problems?
I totally understand the 24 tonne of pressure to remove the hubs. I had to remove the axle hubs on my 751, i had a 12 tonne jack and 2 x 2 tonne ones pushing from the back of the frame against the hub. I pumped them up then used a copper hammer to strike the back of the hub to get it to come free, worked REALLY well, only needed say 2-3 sharp hits and PING the hub came free.... but proceeded to land of my foot! I knew to step aside for the other 3!!!Thanks for all the kudos, guys. I really appreciate it. I grew up on a farm in IL, and we didn't have much money, so we had to learn to fix stuff ourselves. It wasn't all #9 wire and duct tape and bungie cords, but we did have to improvise a lot. My dad taught me to stick-weld and run a torch, and I taught myself to MIG, TIG, and do minor machine work by reading welding and machinist books and manuals and trial-and-error. Before this project started, I didn't even know how to get at the chain case by lifting the seat! I bought the operators and service manual (which by the way, next time, just buy the service manual--most of the operators manual IS IN the service manual) and read them every nite before bed. Tazza asked if I ran into any snags. There were 3 pretty big ones: I had to put 24 tons of gear puller on the axle hubs to get them off--2 six-ton hydraulic jacks behind against the frame pushing, and 1 12-ton gear puller on the front pulling is what it took to get those pesky hubs off! I figured they hadn't been off since the machine was built. Next, until I figured out how to make that slide hammer out of the 5' section of pipe, I had been trying to drive the bearings on with a brass hammer and brass punch. That was taking forever. The speedy-sleeve went a little better because I already thot of the slide-hammer method with the bearings. The last thing was the hydraulic filters. This machine has 2 of them. I hate to say it, but the previous owner did NOT service this machine as they claimed. Both filters were over 1300 (you read right) hours overdue for changing! The back filter hadn't been changed since 1998! I had to cut the filter off and slot the collar and pound it off with a punch and hammer! I was trying to be really careful with it, so it took me about 6 hours from start to finish to get it. That was not a very productive 1/2 day, I can tell ya. But I got it, and only knicked up 2 threads which I repaired with a needle file. As for the machining rigs you guys were talking about, I think I know why nobody wants to work on anybody else's stuff. It's probably the product liability. I work in insurance, and product liability is a very big issue for repair shops. It's very expensive, and a lot of companies don't want to write the coverage. I ran into this last year quoting a welding risk. Insurance companies don't like welders, either. My minimum premium for a new risk is $5000/year. The sky is the limit after that. Anyway, thanks again for all the input from everybody.
wrenchin80
Member
- Joined
- May 9, 2008
- Messages
- 6
Every time I have to pop a hub off, the first thing is leave the hub bolts threaded in a few threads. This will keep the hub from flying off and landing on your foot. Then I use a 4 ton bottle jack on the backside of the hub and a 14 lb. sledgehammer on the frontside. If you can get a good swing with that, they'll pop loose everytime.I totally understand the 24 tonne of pressure to remove the hubs. I had to remove the axle hubs on my 751, i had a 12 tonne jack and 2 x 2 tonne ones pushing from the back of the frame against the hub. I pumped them up then used a copper hammer to strike the back of the hub to get it to come free, worked REALLY well, only needed say 2-3 sharp hits and PING the hub came free.... but proceeded to land of my foot! I knew to step aside for the other 3!!!
I did work out leaving the bolt attached with some slack to allow it to *pop* but i thought about it too late to save myself from a bit of pain....Every time I have to pop a hub off, the first thing is leave the hub bolts threaded in a few threads. This will keep the hub from flying off and landing on your foot. Then I use a 4 ton bottle jack on the backside of the hub and a 14 lb. sledgehammer on the frontside. If you can get a good swing with that, they'll pop loose everytime.
wrenchin80
Member
- Joined
- May 9, 2008
- Messages
- 6
Sorry to hear about you pain, Tazza, but at least you got it figured out for next time.I did work out leaving the bolt attached with some slack to allow it to *pop* but i thought about it too late to save myself from a bit of pain....