S220 Removed the bob-tach and am in process of replacing lower loader arm pins/bushings. I do not have a parts breakdown for my loader. I know there are bushings on the lower part of the bob-tach, but are there tapered bushings for the tapered part of lower pins that are attached to the lower loader arms???? Also the reamer You guys are talking about.... does it just "true" up the taper of the lower attach point to accept the new pins? Mine were not too bad but I want to do it right. Got another idea on removing the lower bushings from the Bob-tach, pictures to follow. Ice
You are using an out of date browser. It may not display this or other websites correctly.
You should upgrade or use an alternative browser.
You should upgrade or use an alternative browser.
Help Support SkidSteer Forum:
The taper is in the lower part of the lift arm. I unscrew the bolt a turn or two then hit it with a hammer to crack the seal of the taper.
The reamer is only ever needed if the machine is run for some time with a loose bolt/pin causing it to damage the taper. If it was nice and tight with no wear signs, just replace the pins.
The reamer is only ever needed if the machine is run for some time with a loose bolt/pin causing it to damage the taper. If it was nice and tight with no wear signs, just replace the pins.
Roger that, thanks just finished. When I put the new tapered lower pin in it felt nice and tight. No wobble so that job is done. Now she is tight, tight, tight. .................. Came up with a easy way of removing the lower bob-tach bushings. only used half a welding rod.... pics tomorrow, getting late. When do you ever find time to get anything done Tazza? 10,000 posts WOW thanks for helping us green guys out. I'm confident I speak for all when I say a big THANK YOU to you and the other "good info Guys" (you know who you are). Good deeds never go to waste. BTW -20F tonight ... brrrThe taper is in the lower part of the lift arm. I unscrew the bolt a turn or two then hit it with a hammer to crack the seal of the taper.
The reamer is only ever needed if the machine is run for some time with a loose bolt/pin causing it to damage the taper. If it was nice and tight with no wear signs, just replace the pins.
said I would post some pics of lower bobtach pin replacement. Now if I can just figure this out.....Roger that, thanks just finished. When I put the new tapered lower pin in it felt nice and tight. No wobble so that job is done. Now she is tight, tight, tight. .................. Came up with a easy way of removing the lower bob-tach bushings. only used half a welding rod.... pics tomorrow, getting late. When do you ever find time to get anything done Tazza? 10,000 posts WOW thanks for helping us green guys out. I'm confident I speak for all when I say a big THANK YOU to you and the other "good info Guys" (you know who you are). Good deeds never go to waste. BTW -20F tonight ... brrr
Good to hear it's all done.said I would post some pics of lower bobtach pin replacement. Now if I can just figure this out.....
As for finding time, i'm not easily finding any time to do things these days, a few hours here and there is all i really get.
Pictures, host them online with a place like photobucket, open the file, right click copy then right click then paste into your message. It should appear.
If you can get them hosted on the internet somewhere and can't get the images to load, email me the link and i'll do it for you.
I haven't forgot about the photos but am having a hard time uploading them. I run a Mac and it no like it. I am going to try to email them to myself and then copy paste........ standby IceGood to hear it's all done.
As for finding time, i'm not easily finding any time to do things these days, a few hours here and there is all i really get.
Pictures, host them online with a place like photobucket, open the file, right click copy then right click then paste into your message. It should appear.
If you can get them hosted on the internet somewhere and can't get the images to load, email me the link and i'll do it for you.
I had a heck of a time getting one of the upper pins out, finally just beat the snot out of it after liberal soaking with Kroil. It finally came out. on the reinstall of all pins I buttered each pin and inside bushings with anti-seize. the grease pushed some of it out but I thought it wouldn't hurt to keep them from seizing in the future. time will tell ......I haven't forgot about the photos but am having a hard time uploading them. I run a Mac and it no like it. I am going to try to email them to myself and then copy paste........ standby Ice
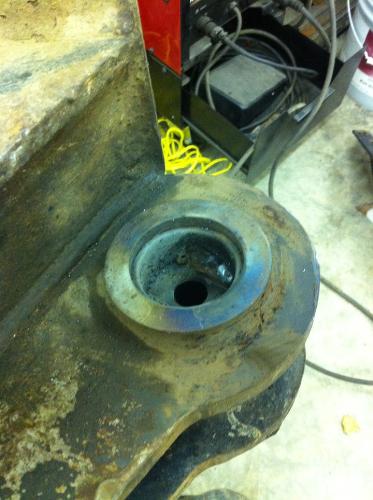
Since the lower bobtach bushings are "shouldered" inside the lower opening they can only be driven out from the outside to the inside direction. So I took the old tapered lower pins, flipped them around, re-inserted them back into the opening, and stick welded them to the bushings to be removed. The pin was welded about 3/4 inch below flush to the bushing so I had enough pin length to hammer it through the length of the opening without using a punch or rod. Before welding them I cleaned up the opening and heated the old bushings quite liberally with a torch. I don't know if it was necessary but thought it wouldn't hurt.I had a heck of a time getting one of the upper pins out, finally just beat the snot out of it after liberal soaking with Kroil. It finally came out. on the reinstall of all pins I buttered each pin and inside bushings with anti-seize. the grease pushed some of it out but I thought it wouldn't hurt to keep them from seizing in the future. time will tell ......
Then I just took a 3 lb hammer and 4-5 whacks the bushings came out nicely.Since the lower bobtach bushings are "shouldered" inside the lower opening they can only be driven out from the outside to the inside direction. So I took the old tapered lower pins, flipped them around, re-inserted them back into the opening, and stick welded them to the bushings to be removed. The pin was welded about 3/4 inch below flush to the bushing so I had enough pin length to hammer it through the length of the opening without using a punch or rod. Before welding them I cleaned up the opening and heated the old bushings quite liberally with a torch. I don't know if it was necessary but thought it wouldn't hurt.
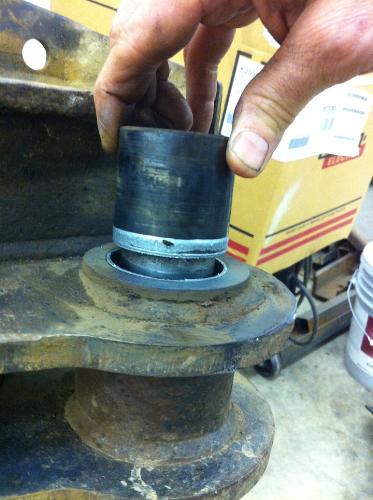
I cleaned up the inside a bit, buttered with anti-seize and used my old pin/bushing "tool" to guide the new bushing into the bobtach. It worked well, I didn't hit it very hard and I alternated hits around the old bushing to drive the new bushing in without getting it off kilter and risking deformation. The old pin centered the new bushing under the old and gave a safe and steady point to hammer the new bushing into its opening. while pounding it in, you will hear/feel when you have the bushing seated correctly. then I put it back together.Then I just took a 3 lb hammer and 4-5 whacks the bushings came out nicely.
CORRECTION...... THEY CAN ONLY BE DRIVEN OUT FROM THE INSIDE TO OUTSIDE DIRECTION.Since the lower bobtach bushings are "shouldered" inside the lower opening they can only be driven out from the outside to the inside direction. So I took the old tapered lower pins, flipped them around, re-inserted them back into the opening, and stick welded them to the bushings to be removed. The pin was welded about 3/4 inch below flush to the bushing so I had enough pin length to hammer it through the length of the opening without using a punch or rod. Before welding them I cleaned up the opening and heated the old bushings quite liberally with a torch. I don't know if it was necessary but thought it wouldn't hurt.
Still trying to get the pics posted. the email thing did not work........ don't have photobucket .....CORRECTION...... THEY CAN ONLY BE DRIVEN OUT FROM THE INSIDE TO OUTSIDE DIRECTION.
Ha Got It! I think.... nope. Can some one go to the photo gallery and retrieve/post my pics to this thread, I hate following links to pics. I must be a dummy and I can't find my teenager to help me..... .. they are in the folder labeled "Bob tach pins bushings replace" ....... .. I can't seem to do the HTML thing either..... IceStill trying to get the pics posted. the email thing did not work........ don't have photobucket .....
OldMachinist
Well-known member
- Joined
- May 24, 2006
- Messages
- 2,748
Ha Got It! I think.... nope. Can some one go to the photo gallery and retrieve/post my pics to this thread, I hate following links to pics. I must be a dummy and I can't find my teenager to help me..... .. they are in the folder labeled "Bob tach pins bushings replace" ....... .. I can't seem to do the HTML thing either..... Ice


Ice - did you put the neva-seze compound on the taper of the pin? you really should never oil these tapers, just like a drill press with a taper. It should be free of all grease and oil. The taper lock is what you want to happen, it's there so it will not rotate and wear the mating surfaces out. If they were to wear, you are in a whole lot of trouble trying to fix that.Thanks OM. Again, you are part of the problem that makes this forum so good. Ice
Hopefully it will hold in place well enough to not turn when under load.
That is exactly why I mentioned all the details of what I did, to get feedback from you experts...... I don't think I did but I will be easy to check when I get home in a few days. thanks! ........ IceIce - did you put the neva-seze compound on the taper of the pin? you really should never oil these tapers, just like a drill press with a taper. It should be free of all grease and oil. The taper lock is what you want to happen, it's there so it will not rotate and wear the mating surfaces out. If they were to wear, you are in a whole lot of trouble trying to fix that.
Hopefully it will hold in place well enough to not turn when under load.
Ok, I removed the lower pins and I DID use anti-seize on the tapered surfaces. ... I'm glad I checked but I found a potential problem. ... on one side the outer seal for the lower bushing was mashed and distorted on one side and is unusable. ... After cleaning up the grease and the lower pins I dry fitted them and they do wobble a bit. ... the mashed seal side wobbles more than the other side. And after about 1 hour of use, I can see uneven wear marks on the new pin. ... . ... When I initially took it apart, I noticed when the last guy (probably the factory because the machine only had about 800 hrs when purchased) installed the pins, it appeared they did not seat the bolt into the recess of the pin correctly. Unless it loosened on its own through use and then distorted the recess portion of the pin. ... I suspect the pin was loose when I initially took it apart, but it being the first time I did this didn't pay much attention to it. ... I assumed all was well and replaced and reinstalled. Obviously I will need to address this issue ... ... sunday right now so will call dealer tomorrow morning to see if they can ream it true. ... ... HOW MUCH CAN THEY "TRUE" IT UP? not even sure if they have the tool. Is it part of maintenance schedule to check the torque on the lower pins periodically to head off these issues in future? I guess if a guy finds them loose he might want to look at it closer. ... thanks ... ICEThat is exactly why I mentioned all the details of what I did, to get feedback from you experts...... I don't think I did but I will be easy to check when I get home in a few days. thanks! ........ Ice
Just how much do they wobble? I'd like to put a pin in with the bobtach off, smack it with a hammer to seat it, see if it moves. Get the bolt and knock it out, see how tight it is. Hopefully the movement was just because it was not really pulled into place.Ok, I removed the lower pins and I DID use anti-seize on the tapered surfaces. ... I'm glad I checked but I found a potential problem. ... on one side the outer seal for the lower bushing was mashed and distorted on one side and is unusable. ... After cleaning up the grease and the lower pins I dry fitted them and they do wobble a bit. ... the mashed seal side wobbles more than the other side. And after about 1 hour of use, I can see uneven wear marks on the new pin. ... . ... When I initially took it apart, I noticed when the last guy (probably the factory because the machine only had about 800 hrs when purchased) installed the pins, it appeared they did not seat the bolt into the recess of the pin correctly. Unless it loosened on its own through use and then distorted the recess portion of the pin. ... I suspect the pin was loose when I initially took it apart, but it being the first time I did this didn't pay much attention to it. ... I assumed all was well and replaced and reinstalled. Obviously I will need to address this issue ... ... sunday right now so will call dealer tomorrow morning to see if they can ream it true. ... ... HOW MUCH CAN THEY "TRUE" IT UP? not even sure if they have the tool. Is it part of maintenance schedule to check the torque on the lower pins periodically to head off these issues in future? I guess if a guy finds them loose he might want to look at it closer. ... thanks ... ICE
A little wear on the pin may not be the taper, it could be a slight bend in the arm or bobtach and running it for a while may bed it in.
I'm not sure if the dealer woudl have the reamer, i'd suspect they would though, your machine wouldn't be the only one out there with this issue.