610 - My manually operated variable sheave

Help Support SkidSteer Forum:

alchemysa

Well-known member
Joined
Mar 29, 2016
Messages
203
As mentioned in a previous thread my 610 'project' had no operating variable sheave system and had simply been permanently fixed at a slow ground speed thanks to a chunk of pipe shoved into the piston.
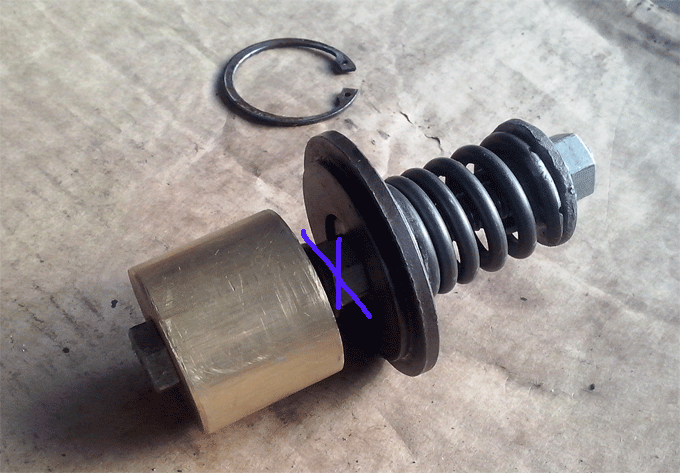
I'm not likely to find a replacement hydraulic sheave system at a reasonable price in the near future so I've come up with this assembly that lets me fairly easily alter the speed while the engine is switched off. I must admit I have only run this in the workshop so far but it seems to work OK. It could be refined for sure but I need to get some other things sorted out before I can really give it a workout.
A heavy duty spring mounted on the outside of the sheave applies pressure which then forces the belt to move to either a larger diameter (higher ground speed), or allows it to shrink to a smaller diameter (lower ground speed). Basically its a manually operated version of the spring loaded 'driven sheave' thats at the other end of the belt. Its necessary to stop and start the engine about 3 times in order to go from one extreme to the other. Its not perfect but I should be able to find a setting that suits me for most jobs around my block and I'll still have the option of a higher speed if I really do have to travel some distance.
Total cost in parts was about $30. The pics here show the basic setup but note that a couple of things changed along the way. The final assembly used a longer bolt and had a much heavier spring. (In fact it has two springs, one inside the other, as can just be seen in the last pic). The thing is that this spring assembly has to be stronger than the big spring on the driven sheave or it wont work. I was lucky enough to find a spring maker in town who had boxes of oddments so I was able to get a half dozen assorted springs for $10.
The other tricky bit to track down was the piece of brass bar. Its 1-7/8" (47.63mm) diameter and fits inside the sheave perfectly. In fact I think its the size that the original gland inside the sheave is machined from. Although its a stock size its not really common. A metal merchant put me onto an engineering place that had a few offcuts lying around. This bit cost me $20 and they lathed a hole through the middle to take the M12 metric bolt. The length of the bar isn't critical. This one is about 2"
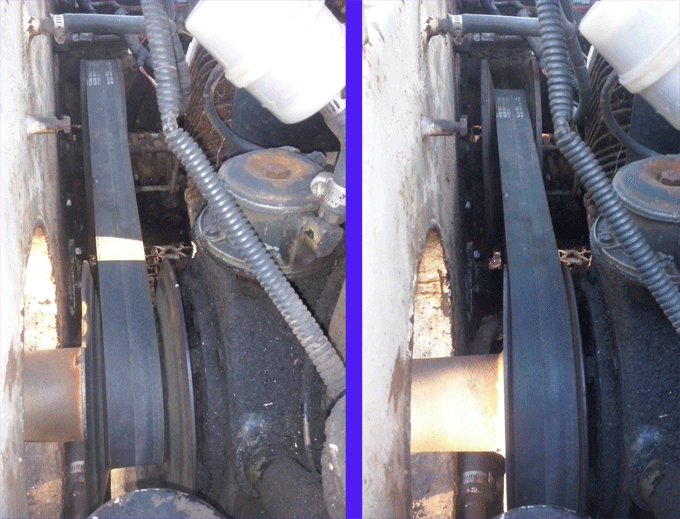
If anyone wants any more details sing out. But for now I have a question. Can someone please tell me the distance from the outer edge of the drive sheave to the belt when the belt is in the high and low speed positions? At the moment I don't know how much 'travel' between high and low is ideal. I hope that makes sense.
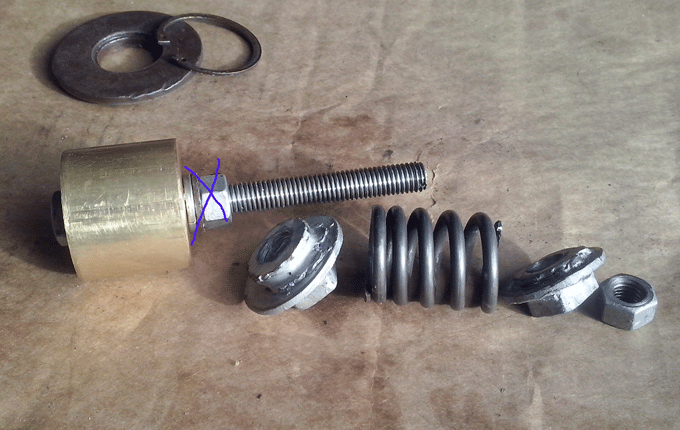
 photo Parts_zps9gtlli6f.gif
 photo Assembly_zpsktr5bxza.gif
 photo Loaded_zps90mxzeds.jpg
 photo Sheavepair_zpsnuspzjvm.gif
 

Tazza

Moderator
Staff member
Joined
Dec 7, 2004
Messages
16,839
That is a clever way of doing it. Shame you couldn't repair it to work as it was designed to though.
 

6brnorma

Well-known member
Joined
Jul 13, 2011
Messages
882
That is a clever way of doing it. Shame you couldn't repair it to work as it was designed to though.
I've seen everything from 'welded' in place to a couple with similar setups but I think yours is the cleanest I've seen…..especially the brass stock idea. Very nice.
 
OP
OP
alchemysa

alchemysa

Well-known member
Joined
Mar 29, 2016
Messages
203
I've seen everything from 'welded' in place to a couple with similar setups but I think yours is the cleanest I've seen…..especially the brass stock idea. Very nice.
Thanks 6brnorma. I've got a little refining to do yet but I'm please with the the way it works so far.
Tazza. I went to the local Bobcat dealer and asked about parts. Unfortunately I was about 6 months too late for a 'cleanout' they had had. They offloaded bits for the 610 variable sheave at below cost just to get rid of them! Thats typically my luck. Now I'd probably looking at the best part of $1000 to get it to original condition unless I'm lucky enough to score good second hand parts. Anyway, I've got quite a bit of restoration work ahead of me before i can really give it a trial and decide how essential the variable sheave is for me.
 

Tazza

Moderator
Staff member
Joined
Dec 7, 2004
Messages
16,839
Thanks 6brnorma. I've got a little refining to do yet but I'm please with the the way it works so far.
Tazza. I went to the local Bobcat dealer and asked about parts. Unfortunately I was about 6 months too late for a 'cleanout' they had had. They offloaded bits for the 610 variable sheave at below cost just to get rid of them! Thats typically my luck. Now I'd probably looking at the best part of $1000 to get it to original condition unless I'm lucky enough to score good second hand parts. Anyway, I've got quite a bit of restoration work ahead of me before i can really give it a trial and decide how essential the variable sheave is for me.
Isn't it always the way?
You need to have a machinist buddy that could have possibly restored the old one.
 
OP
OP
alchemysa

alchemysa

Well-known member
Joined
Mar 29, 2016
Messages
203
Isn't it always the way?
You need to have a machinist buddy that could have possibly restored the old one.
"You need to have a machinist buddy that could have possibly restored the old one."
There wasn't much to restore. Many of the necessary (and expensive) bits were completely missing. But I did once have a friend who was a machinist and could probably have made everything I needed just from looking at pics or a parts diagram. I could use him now.
I had even considered buying one of those mini-lathes on Ebay and having a go myself. It looks they can do some good stuff on soft metals like brass and bronze. But thats a learning curve I don't have time for right now. Maybe another day.
 

Tazza

Moderator
Staff member
Joined
Dec 7, 2004
Messages
16,839
"You need to have a machinist buddy that could have possibly restored the old one."
There wasn't much to restore. Many of the necessary (and expensive) bits were completely missing. But I did once have a friend who was a machinist and could probably have made everything I needed just from looking at pics or a parts diagram. I could use him now.
I had even considered buying one of those mini-lathes on Ebay and having a go myself. It looks they can do some good stuff on soft metals like brass and bronze. But thats a learning curve I don't have time for right now. Maybe another day.
Yeah, that makes it a little more difficult. If the parts are there you stand a chance, but without..... Not quite so simple.
 

Unicam

Well-known member
Joined
Jul 7, 2016
Messages
47
"You need to have a machinist buddy that could have possibly restored the old one."
There wasn't much to restore. Many of the necessary (and expensive) bits were completely missing. But I did once have a friend who was a machinist and could probably have made everything I needed just from looking at pics or a parts diagram. I could use him now.
I had even considered buying one of those mini-lathes on Ebay and having a go myself. It looks they can do some good stuff on soft metals like brass and bronze. But thats a learning curve I don't have time for right now. Maybe another day.
Alchemysa, can you please send me pictures and an update if this is a viable fix for the drive sheave? I can't see any pictures and am not sure what holds the brass thing into the clutch. Thank you. [email protected] thank you
 

Unicam

Well-known member
Joined
Jul 7, 2016
Messages
47
Alchemysa, can you please send me pictures and an update if this is a viable fix for the drive sheave? I can't see any pictures and am not sure what holds the brass thing into the clutch. Thank you. [email protected] thank you
I should note that I have a fixed driven sheave. Do you think this Will this create enough spring tension to keep from slipping?
 
OP
OP
alchemysa

alchemysa

Well-known member
Joined
Mar 29, 2016
Messages
203
I should note that I have a fixed driven sheave. Do you think this Will this create enough spring tension to keep from slipping?
Unicam. The Bobcat is in pieces at the moment because I am restoring it so I'm a bit fuzzy on the exact details. This sheave setup worked quite well for the brief time I used it. I was able to adjust from high to low speed quite easily by stopping the motor once or twice.
These are early pics. First pic shows the parts. All of the parts may not have been used in the final version. The brass rod was an offcut of a standard size. I think it was 2" diameter. The length doesn't really matter much. Ignore the crosses. I'm not sure if I ultimatey used that nut or not.
Image and video hosting by TinyPic
The second pic shows the parts assembled.
Image and video hosting by TinyPic
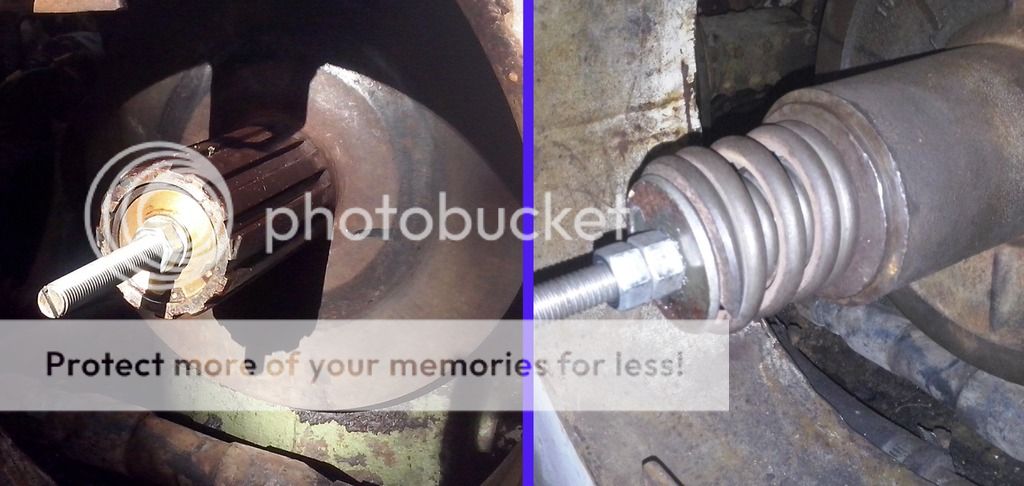
Below, on the left, shows the brass rod inserted and held in place with the standard circlip. On the right shows how the parts are fitted after the outer sheave has been slipped in. NOTE how in this final pic I am using 2 springs (one inside the other) because I discovered one spring alone did not supply sufficient pressure. Adjusting the sheave was simply a matter of stopping the engine and winding the nut in or out as required. The pic shows 2 nuts but only one was required in the end. The spring pressure kept it tight.
Image and video hosting by TinyPic
 
OP
OP
alchemysa

alchemysa

Well-known member
Joined
Mar 29, 2016
Messages
203
Unicam. The Bobcat is in pieces at the moment because I am restoring it so I'm a bit fuzzy on the exact details. This sheave setup worked quite well for the brief time I used it. I was able to adjust from high to low speed quite easily by stopping the motor once or twice.
These are early pics. First pic shows the parts. All of the parts may not have been used in the final version. The brass rod was an offcut of a standard size. I think it was 2" diameter. The length doesn't really matter much. Ignore the crosses. I'm not sure if I ultimatey used that nut or not.

The second pic shows the parts assembled.

Below, on the left, shows the brass rod inserted and held in place with the standard circlip. On the right shows how the parts are fitted after the outer sheave has been slipped in. NOTE how in this final pic I am using 2 springs (one inside the other) because I discovered one spring alone did not supply sufficient pressure. Adjusting the sheave was simply a matter of stopping the engine and winding the nut in or out as required. The pic shows 2 nuts but only one was required in the end. The spring pressure kept it tight.
Thinking about this, I dont think I used any of those welded nut/washer thingys you see in the top pic. When I progressed to the 'spring inside spring' arrangement all I needed was one big washer on the end.
 

Unicam

Well-known member
Joined
Jul 7, 2016
Messages
47
Thinking about this, I dont think I used any of those welded nut/washer thingys you see in the top pic. When I progressed to the 'spring inside spring' arrangement all I needed was one big washer on the end.
Thank you
 

Latest posts

Top