


LittleMontana
Member
- Joined
- Dec 27, 2019
- Messages
- 14
CASE 1816B Repower
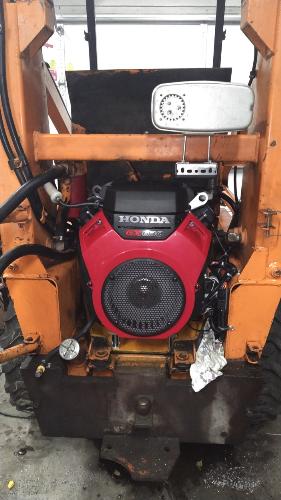
Initial conditions:
CASE 1816B Late model (Hydraulic filter on left not right)
Originally powered by Tecumseh had been repowered with Onan P224.
Kit:
Onan P224 kit with Aluminum riser mounts.
Challenges:
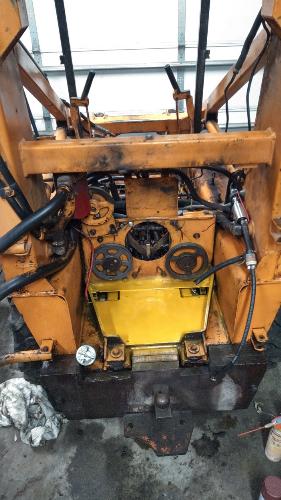
1 - WHICH WAY TO USE THE RISER:
When the original owner repowered with the P224, they had cut the Case engine mount out and ground the surface flat.
Using the Aluminum riser on the short side place the output shaft too low and interfered with the pullies.
Placing the aluminum riser on the long sides allowed the output shaft to be in the same location as the Onan. However, this places the output shaft high in the compartment and slightly to the right side, making belt replacement a challenge. A 1.5” spacer would have been perfect but I chose to go with the 2” and keep it “how it was” . The original repower had the threaded hole in the base slightly off and were 3/8” instead of 5/16”, so I had to open the hole in the aluminum riser just a bit – about a 1/16”, and get new bolts.
2 – HYDRAULIC FILTER:
When I mounted the engine, it interfered with the Left mounted hydraulic filter. I could have gone with a shorter filter but I am hesitant to do so on a hydraulic system (I hate changing filters more than I need too). Instead I cut the mounting tab for the filter and moved the entire assembly outboard 1”. This caused my filter gauge to interfere with the left tower, I simply added a 90-degree elbow and extended the gauge out beyond the tower (A better place for it anyhow).

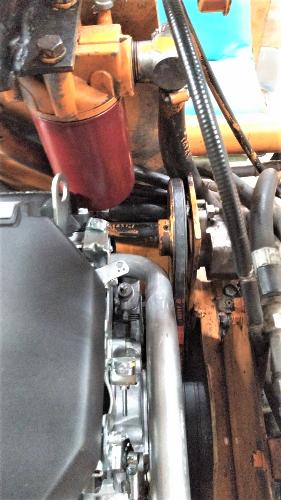
3 – OUTPUT SHAFT PULLIES AND PRIMARY EQUIPMENT BELT AND PULLEY
Once the engine was mounted, I noticed that the output shaft pully was very close to the primary equipment pulley and belt. Discussed this with tech support. Was informed to NOT wrap the exhaust but instead see if I could move the pully out on the output shaft and move the engine back some. The engine is already as far back as the mount plate will allow and the output pully is flush with the output shaft. Honda specs seem to indicate that the output pully could overhang by a quarter inch and tech support indicated that I could machine the mount plate to move back further.
For now, I left everything the way it is and ran the engine, allowing everything to come up to temperature, along with exercising the hydraulics. Since that pulley and belt are in constant motion they never seemed to gain much of the heat energy from the exhaust. Temperature check of the exhaust manifold was showing temperatures in excess of 400-degrees, the flexible exhaust pipe and U-bolts were in excess of 550-degress, the equipment pully and belt were maintaining temperatures in the range of 75-degrees to 90-degrees. The 90-degrees was after shutdown and the belt had stopped moving.
4 – Rear Gate
With the rear gate closed the hydraulic cooler was very close to the fan housing on the motor, again about a ¼”. I was concerned with the possibility of the cooler hitting the fan cover as well as providing enough air flow to the engine while providing enough air draw through the cooler. Contacted tech and got their opinion. I then decided to extend the brackets for the rear gate by 2”. I will monitor hydraulic temp and see how this works out.
5 – USE OF REMOTE OIL FILTER
I chose not to use the remote oil filter as there is sufficient room to change the filter by using a filter socket. If it turns out that I need to relocate the filter I will address it then. I like the idea of the remote filter but finding a convenient and safe place for the mount proved to be a challenge.
6 – Electrical
The electrical all went well, fairly clear and concise instructions. On a side note; since I had my machine apart, I decided to completely rewire the entire machine. To make my life easier in the future I decided to use weather pack connectors (GM style) this way I can remove my dash by simply disconnecting 1 connector and a few bolts instead of multiple wires all going to different gauges. To make things a little nicer, I wish the electrical wires (white [low oil], blue, and green) from the engine to my power wires had been a couple of feet longer. The white to solenoid was perfect.

Initial conditions:
CASE 1816B Late model (Hydraulic filter on left not right)
Originally powered by Tecumseh had been repowered with Onan P224.
Kit:
Onan P224 kit with Aluminum riser mounts.
Challenges:
1 - WHICH WAY TO USE THE RISER:
When the original owner repowered with the P224, they had cut the Case engine mount out and ground the surface flat.
Using the Aluminum riser on the short side place the output shaft too low and interfered with the pullies.
Placing the aluminum riser on the long sides allowed the output shaft to be in the same location as the Onan. However, this places the output shaft high in the compartment and slightly to the right side, making belt replacement a challenge. A 1.5” spacer would have been perfect but I chose to go with the 2” and keep it “how it was” . The original repower had the threaded hole in the base slightly off and were 3/8” instead of 5/16”, so I had to open the hole in the aluminum riser just a bit – about a 1/16”, and get new bolts.
2 – HYDRAULIC FILTER:
When I mounted the engine, it interfered with the Left mounted hydraulic filter. I could have gone with a shorter filter but I am hesitant to do so on a hydraulic system (I hate changing filters more than I need too). Instead I cut the mounting tab for the filter and moved the entire assembly outboard 1”. This caused my filter gauge to interfere with the left tower, I simply added a 90-degree elbow and extended the gauge out beyond the tower (A better place for it anyhow).
3 – OUTPUT SHAFT PULLIES AND PRIMARY EQUIPMENT BELT AND PULLEY
Once the engine was mounted, I noticed that the output shaft pully was very close to the primary equipment pulley and belt. Discussed this with tech support. Was informed to NOT wrap the exhaust but instead see if I could move the pully out on the output shaft and move the engine back some. The engine is already as far back as the mount plate will allow and the output pully is flush with the output shaft. Honda specs seem to indicate that the output pully could overhang by a quarter inch and tech support indicated that I could machine the mount plate to move back further.
For now, I left everything the way it is and ran the engine, allowing everything to come up to temperature, along with exercising the hydraulics. Since that pulley and belt are in constant motion they never seemed to gain much of the heat energy from the exhaust. Temperature check of the exhaust manifold was showing temperatures in excess of 400-degrees, the flexible exhaust pipe and U-bolts were in excess of 550-degress, the equipment pully and belt were maintaining temperatures in the range of 75-degrees to 90-degrees. The 90-degrees was after shutdown and the belt had stopped moving.
4 – Rear Gate
With the rear gate closed the hydraulic cooler was very close to the fan housing on the motor, again about a ¼”. I was concerned with the possibility of the cooler hitting the fan cover as well as providing enough air flow to the engine while providing enough air draw through the cooler. Contacted tech and got their opinion. I then decided to extend the brackets for the rear gate by 2”. I will monitor hydraulic temp and see how this works out.
5 – USE OF REMOTE OIL FILTER
I chose not to use the remote oil filter as there is sufficient room to change the filter by using a filter socket. If it turns out that I need to relocate the filter I will address it then. I like the idea of the remote filter but finding a convenient and safe place for the mount proved to be a challenge.
6 – Electrical
The electrical all went well, fairly clear and concise instructions. On a side note; since I had my machine apart, I decided to completely rewire the entire machine. To make my life easier in the future I decided to use weather pack connectors (GM style) this way I can remove my dash by simply disconnecting 1 connector and a few bolts instead of multiple wires all going to different gauges. To make things a little nicer, I wish the electrical wires (white [low oil], blue, and green) from the engine to my power wires had been a couple of feet longer. The white to solenoid was perfect.