New Holland L-555

Help Support SkidSteer Forum:

Bearscratch

Member
Joined
Sep 15, 2013
Messages
15
Hello, I'm new to posting here, although been reading posts here for quite a while. Here's what I've got. I have a 1993 New Holland L555 Deluxe that I'm going to be starting in the next couple of days to swap the motor in. It at the time has the Kubota v1902 and I'm going to be putting in a v2203. Yes, I have read all the posts about not going bigger on the motor due to stress on the pumps, but I have decided I'm going to take that gamble. The price difference of getting a good used v1902 vs the v2203 really is what made my mind up. So far from everything I've found through research I would end up swapping oil pans and possibly manifolds either way unless I was able to get lucky and find one that came out of a new holland anyway, so I really found the $1,000 I got in price differences a no brainier. Also, it looks like I might be able to make a few bucks off selling the 1902 core when I'm done, or rebuilding it for a spare. Anyways, the order is in for the new engine, and it probably will be a couple days until I get to starting the dismantling on my machine, but I plan to take pictures to post along the way. Anyone that has any experience in this swap or any advice to offer, please feel free to chime in. One thing I do have going for me to start is that I was able to get the boom up and locked before the other motor went out, so that does save me a big step in the process of just getting to the engine compartment. Well till I get some time to get started on this project, wish me luck. Keith
 

SkidRoe

Well-known member
Joined
Dec 10, 2009
Messages
1,885
Wishing you luck!! I wish I could offer you more than luck, but I am not that familiar with your machine.
I think that you will be fine with the V2203 - there is only a 4 hp difference.
Post lots of pictures!! Cheers!
 
OP
OP
B

Bearscratch

Member
Joined
Sep 15, 2013
Messages
15
Wishing you luck!! I wish I could offer you more than luck, but I am not that familiar with your machine.
I think that you will be fine with the V2203 - there is only a 4 hp difference.
Post lots of pictures!! Cheers!
Sorry for the delay in a follow up here, but here it is anyway. I took lots of pictures, but haven't got on a computer to deal with them at all yet. I had about 6 hours into getting the old motor out and a couple into cleaning everything up so far. Biggest hassle was getting to the bolts holding the hydraulic pump to the engine. Had to take out the steering controls and a couple hoses to get at them. My biggest problem there was that I got a bit rammy and had hands full of grease and bypassed taking any pictures of how it looked before I tore it apart. Hope I can figure out how to get it back together easily. The machine looked really ratty from age and use so since I had it part way stripped down, I decided it was time to throw a coat of paint on her. I didn't do a total restore style job. I simply took out the disc sander and knocked down all the big rust bubbles and hit it with some cat yellow paint. It looks ok from about 10 feet and does look much better than it did when I started. After I got all that done I went ahead and stripped the alternator, fan, manifolds, flywheel, bell housing, dipstick, and oil pan off my engine and cleaned them up a bit. I'm now patiently waiting for the new engine to be delivered which is supposed to be tomorrow. I'll update more when the project gets further underway.
 
OP
OP
B

Bearscratch

Member
Joined
Sep 15, 2013
Messages
15
Sorry for the delay in a follow up here, but here it is anyway. I took lots of pictures, but haven't got on a computer to deal with them at all yet. I had about 6 hours into getting the old motor out and a couple into cleaning everything up so far. Biggest hassle was getting to the bolts holding the hydraulic pump to the engine. Had to take out the steering controls and a couple hoses to get at them. My biggest problem there was that I got a bit rammy and had hands full of grease and bypassed taking any pictures of how it looked before I tore it apart. Hope I can figure out how to get it back together easily. The machine looked really ratty from age and use so since I had it part way stripped down, I decided it was time to throw a coat of paint on her. I didn't do a total restore style job. I simply took out the disc sander and knocked down all the big rust bubbles and hit it with some cat yellow paint. It looks ok from about 10 feet and does look much better than it did when I started. After I got all that done I went ahead and stripped the alternator, fan, manifolds, flywheel, bell housing, dipstick, and oil pan off my engine and cleaned them up a bit. I'm now patiently waiting for the new engine to be delivered which is supposed to be tomorrow. I'll update more when the project gets further underway.
Engine showed up today, and I just had a little time to get started. Figured I'd go after the part that looked to be the biggest pain in the ass first. Changing the bell housing. Well I did find mine was the same as I saw someone else write about. The bell housing hole to the oil seal is a little bit smaller on mine than on the new engine. This doesn't look like its going to be any fun. I'm picturing a big mess if I try to burn it bigger, so I'm thinking lots of grinding with an angle grinder. It's about a 7" diameter circle that needs to be made 1/4" bigger all the way around in cast iron. If anyone has any tips here please chime in. I have to work a 12 hour shift again tomorrow, so I'm not figuring I'll get much done with it, but possibly I'll come across some advice at work. Outside of that all I took a try at was the exhaust manifold, which didn't go too well either. Didn't break any studs off yet, but they're pretty damn tight. I sprayed them down with some blaster and I'll try that again tomorrow. Need to round up some bolts to mount her up to my engine stand too so I can go after changing out the sump. I'm going to have to punch a hole for the dipstick in the block while its torn down too, which shouldn't be much of a problem.
 
OP
OP
B

Bearscratch

Member
Joined
Sep 15, 2013
Messages
15
Engine showed up today, and I just had a little time to get started. Figured I'd go after the part that looked to be the biggest pain in the ass first. Changing the bell housing. Well I did find mine was the same as I saw someone else write about. The bell housing hole to the oil seal is a little bit smaller on mine than on the new engine. This doesn't look like its going to be any fun. I'm picturing a big mess if I try to burn it bigger, so I'm thinking lots of grinding with an angle grinder. It's about a 7" diameter circle that needs to be made 1/4" bigger all the way around in cast iron. If anyone has any tips here please chime in. I have to work a 12 hour shift again tomorrow, so I'm not figuring I'll get much done with it, but possibly I'll come across some advice at work. Outside of that all I took a try at was the exhaust manifold, which didn't go too well either. Didn't break any studs off yet, but they're pretty damn tight. I sprayed them down with some blaster and I'll try that again tomorrow. Need to round up some bolts to mount her up to my engine stand too so I can go after changing out the sump. I'm going to have to punch a hole for the dipstick in the block while its torn down too, which shouldn't be much of a problem.
Looks like I'm talking to myself here but because I'm seeing some views I'll continue to update. I had a little time to give some thought about cutting that hole bigger and a regular jigsaw with some good Bosch metal blades did the trick quite well. I just have a tiny bit of touch up with the angle grinder and I'll be all set after I red till the bolt holes. I did get an email from another board member from a different thread that did a similar swap in a different machine. He said a local machine shop did his for about $200. I thought about going that route too, but really I don't want to throw another $200 at this machine because I'm already in to it a bit more than its worth. Just hoping this used engine works well when this job is done. I've got the day off tomorrow, so should be able to get a bunch done on it. Biggest problem I've got now is that the guy I bought the engine from did not send me the oil pan gasket he promised. I ordered one from someone else today just to make sure I've got one on the way, but I don't see getting it before the weekend. I'll update more once I dive in to it some more.
 
OP
OP
B

Bearscratch

Member
Joined
Sep 15, 2013
Messages
15
Looks like I'm talking to myself here but because I'm seeing some views I'll continue to update. I had a little time to give some thought about cutting that hole bigger and a regular jigsaw with some good Bosch metal blades did the trick quite well. I just have a tiny bit of touch up with the angle grinder and I'll be all set after I red till the bolt holes. I did get an email from another board member from a different thread that did a similar swap in a different machine. He said a local machine shop did his for about $200. I thought about going that route too, but really I don't want to throw another $200 at this machine because I'm already in to it a bit more than its worth. Just hoping this used engine works well when this job is done. I've got the day off tomorrow, so should be able to get a bunch done on it. Biggest problem I've got now is that the guy I bought the engine from did not send me the oil pan gasket he promised. I ordered one from someone else today just to make sure I've got one on the way, but I don't see getting it before the weekend. I'll update more once I dive in to it some more.
Please pardon me, doing posts from my phone and autocorrect gets me often. I'm not going to red till any bolt holes. I am going to re drill them though.
 

Tazza

Moderator
Staff member
Joined
Dec 7, 2004
Messages
16,837
Please pardon me, doing posts from my phone and autocorrect gets me often. I'm not going to red till any bolt holes. I am going to re drill them though.
You're not talking to your self, i do read it but have nothing to add so i sush.
Good work on the jigsaw, the only other way i'd have done would have been with a dir grinder and bur, i think your way would have been much faster.
Worst case, you could have used automotive silicone to seal the sump pan, still, the person you got the engine off should have supplied you with the gasket if he said he was going to.
 
OP
OP
B

Bearscratch

Member
Joined
Sep 15, 2013
Messages
15
You're not talking to your self, i do read it but have nothing to add so i sush.
Good work on the jigsaw, the only other way i'd have done would have been with a dir grinder and bur, i think your way would have been much faster.
Worst case, you could have used automotive silicone to seal the sump pan, still, the person you got the engine off should have supplied you with the gasket if he said he was going to.
Thought about using the silicone gasket but figured I don't want any reason to have to pull this engine again in the near future.
 
OP
OP
B

Bearscratch

Member
Joined
Sep 15, 2013
Messages
15
Thought about using the silicone gasket but figured I don't want any reason to have to pull this engine again in the near future.
Anyway update for today since its now quitting time. I got all the parts swapped, and I had a few bolts on the "new" engine decide they were going to break rather than come out nice so that set me back a bit, but got them all taken care of minus one exhaust manifold stud I'm going to have to round up tomorrow. Now it looks like I'm going to be waiting until Tuesday for the gasket to arrive to do much more. One project I do have before then is going to be making a mount for the fuel filter. On the old engine it bolted to the side of the fuel pump housing, but this one has a primer bolted up in that place, so I'm going to have to round up a piece of metal and make a bracket for it. One of these days I'll add some pictures when I get time to get on the computer. A question I do have if anyone knows anything about it is there's some sort of fuel on off solenoid or something going in to the fuel pump that I didn't have before. It has 2 wires coming from it that I'm guessing I'm going to have to figure out what to hook them to. If anyone has any pointers let me know.
 

SkidRoe

Well-known member
Joined
Dec 10, 2009
Messages
1,885
Anyway update for today since its now quitting time. I got all the parts swapped, and I had a few bolts on the "new" engine decide they were going to break rather than come out nice so that set me back a bit, but got them all taken care of minus one exhaust manifold stud I'm going to have to round up tomorrow. Now it looks like I'm going to be waiting until Tuesday for the gasket to arrive to do much more. One project I do have before then is going to be making a mount for the fuel filter. On the old engine it bolted to the side of the fuel pump housing, but this one has a primer bolted up in that place, so I'm going to have to round up a piece of metal and make a bracket for it. One of these days I'll add some pictures when I get time to get on the computer. A question I do have if anyone knows anything about it is there's some sort of fuel on off solenoid or something going in to the fuel pump that I didn't have before. It has 2 wires coming from it that I'm guessing I'm going to have to figure out what to hook them to. If anyone has any pointers let me know.
If it is on the fuel filter, it could also be a heating element to keep any colleced water from freezing in the bottom (during the winter obviously), and subsequently blocking the flow of fuel.
If it is heater, and if you are located in a warm year-round climate, you may not need to connect it.
HTH
 
OP
OP
B

Bearscratch

Member
Joined
Sep 15, 2013
Messages
15
Anyway update for today since its now quitting time. I got all the parts swapped, and I had a few bolts on the "new" engine decide they were going to break rather than come out nice so that set me back a bit, but got them all taken care of minus one exhaust manifold stud I'm going to have to round up tomorrow. Now it looks like I'm going to be waiting until Tuesday for the gasket to arrive to do much more. One project I do have before then is going to be making a mount for the fuel filter. On the old engine it bolted to the side of the fuel pump housing, but this one has a primer bolted up in that place, so I'm going to have to round up a piece of metal and make a bracket for it. One of these days I'll add some pictures when I get time to get on the computer. A question I do have if anyone knows anything about it is there's some sort of fuel on off solenoid or something going in to the fuel pump that I didn't have before. It has 2 wires coming from it that I'm guessing I'm going to have to figure out what to hook them to. If anyone has any pointers let me know.
 photo null_zps0b2379c0.jpg

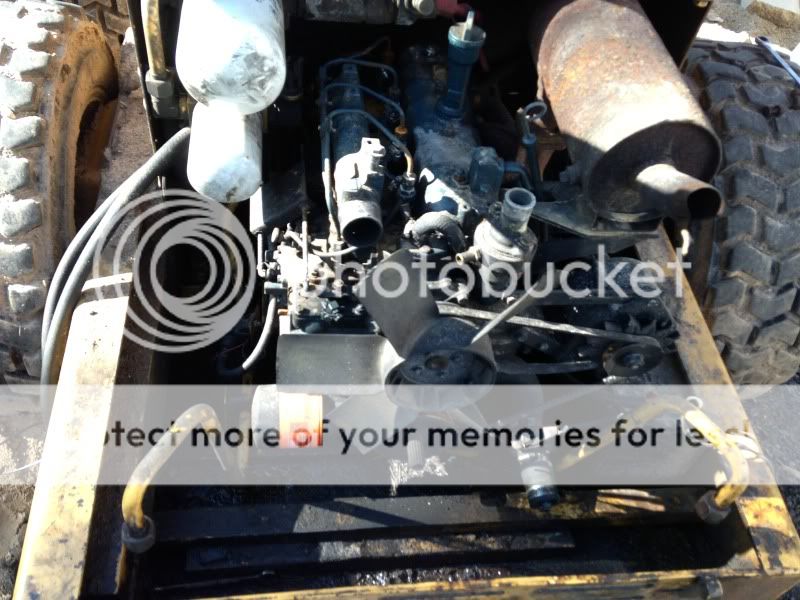
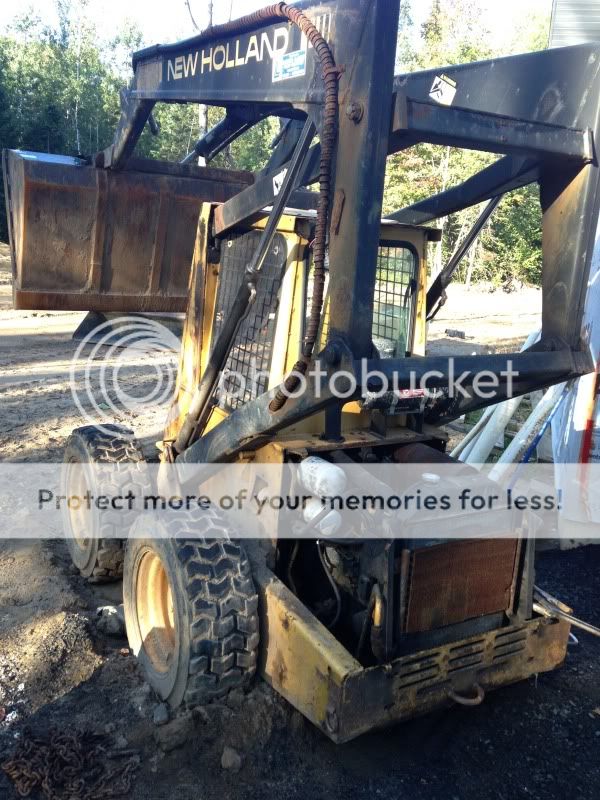
Here is a before picture of the project. I was lucky that as soon as the engine started acting up that I raised the boom and locked it out. Would have been a whole other project to raise the boom to get access to the engine compartment.
 photo null_zps1c6c3436.jpg

First, I removed the engine cover, then the radiator. The oil cooler lines were a bugger to get loose, and made me take a trip to my storage unit to grab my torches, which ended up being used quite a few times along the way in the project.
 photo null_zpsa613d2ba.jpg

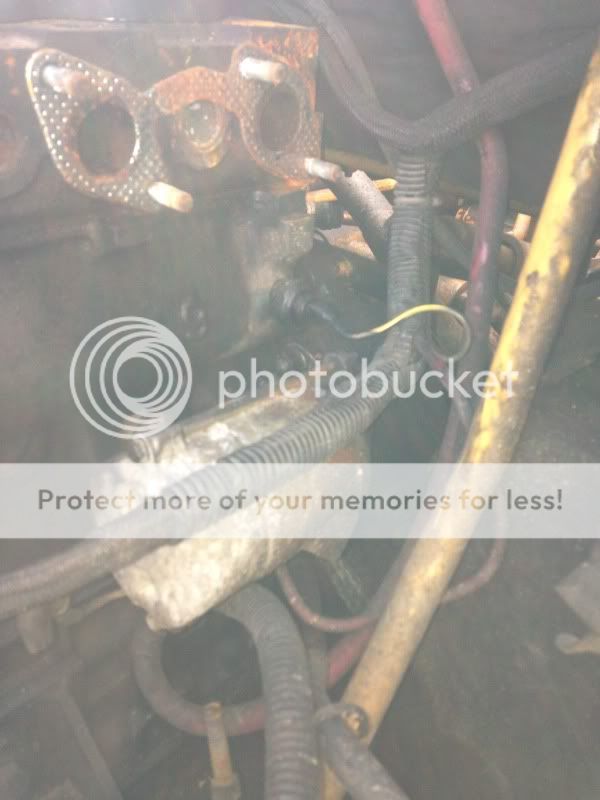
I tried to take quite a few pictures along the way to keep track of wiring locations and such as I started taking things apart.
 photo null_zpsfd1c953f.jpg

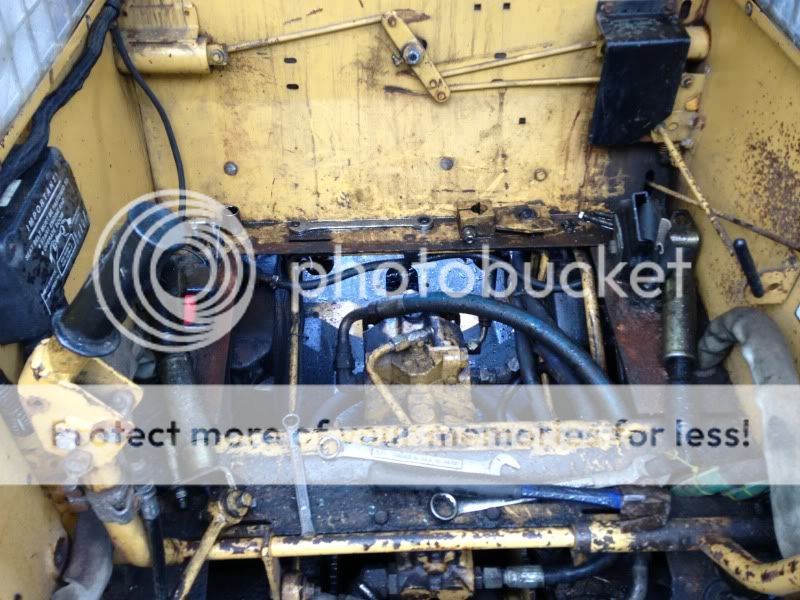
I got ahead of myself on taking pictures and forgot to get any of the steering components before I took them apart to get access to the 2 bolts that hold the engine to the pump. Did get a picture afterward so someone can see where they are and how access is found to them. A bit more probably have been taken apart to gain better access though. It really was a bugger to get them out from this point.
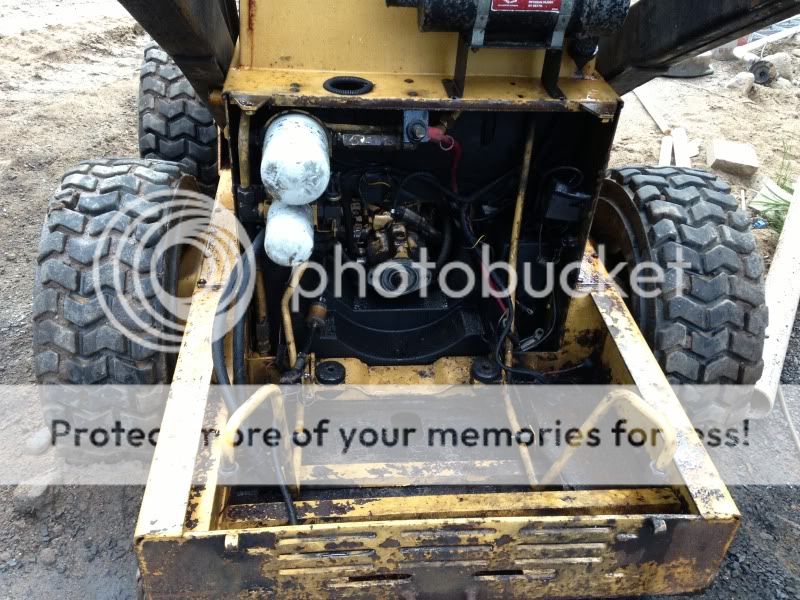
 photo null_zps26ddbf75.jpg

Here is a picture of the engine out, after I took a pressure washer and got most of the crud out from inside of the engine compartment. After cleaning it up a little bit, I decided since I have some time until the new engine shows up I would throw a little fresh paint at the machine. Really, I wish I had enough time, and a shop set up to tear the machine down further at this point and do a nice job, but I havent said yet that this engine catastrophe happened to me when I am in the middle of building my own house, and I am in total disarray with all of my tools things scattered all over the place, and no shop to work in at the time, which I have been rather spoiled with over the years.
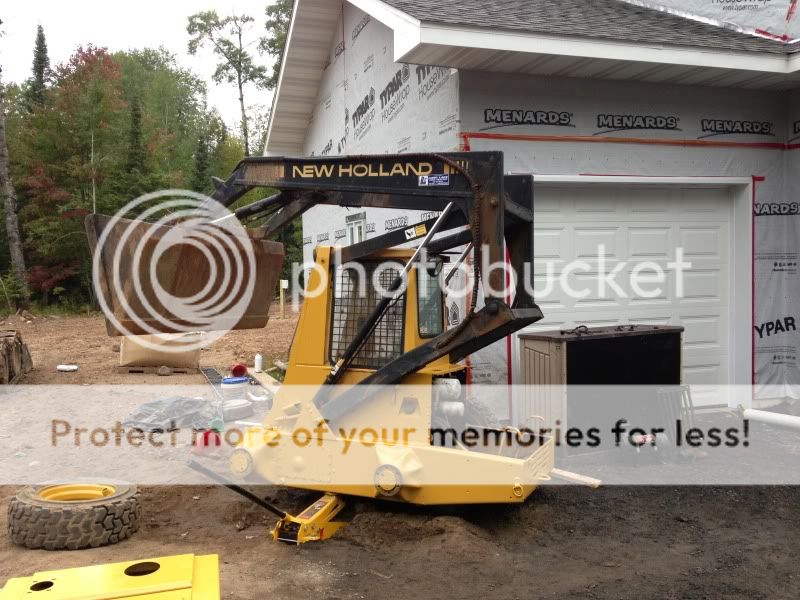
 photo null_zps28549bfc.jpg

Here is a picture of one side with a coat of paint on it. I went to the local farm and fleet store and first came back with a couple spray cans marked New Holland yellow. Apparently these were for some kind of tractor because they were no where near the same yellow as the machine, were like a real light canary yellow. I went back and got a gallon of New Cat yellow and bought a cheap spray gun from Menards. As for the painting, I used a air orbital sander and some 80 grit discs and simply knocked down all the really bubbly spots and as much loose paint as I could. I used some rust olem spray can primer and sprayed the cat yellow on top. Since I was doing just a real quick crappy job, I went right over the stickers and all, masked off nothing, just used paper towels with paint thinner to clean off as much overspray as I could. I went around what the lift arms were covering, and probably will hit those some time after the machine is back up and running. It does look 10 times better than it did when I started, so I will call it a success of some sort anyway.
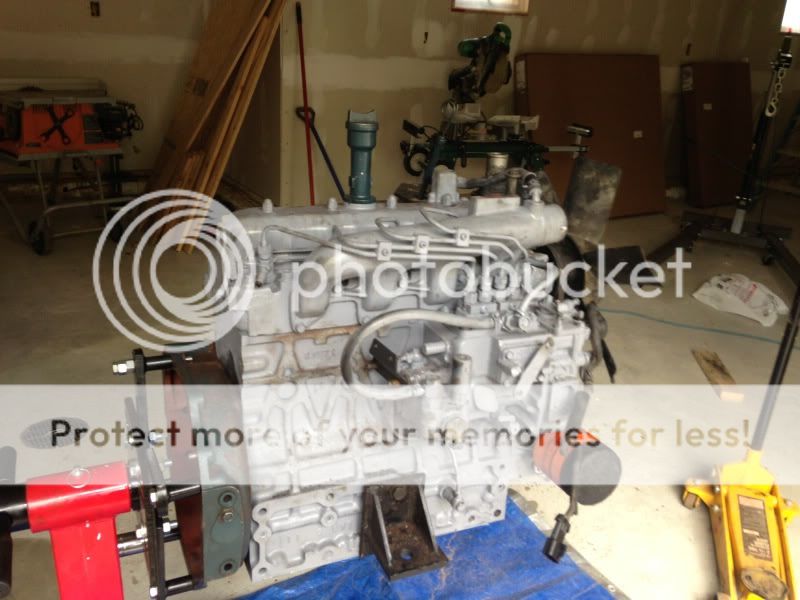
 photo null_zpsef799fe2.jpg

Here is a picture of the intake side of the new engine after I have got it prepped and got the parts I need off the old engine put on it. Waiting until I go to the store and get a couple more nuts to mount the fuel filter.
 photo null_zps897b1465.jpg

Picture of the front of the engine with the parts installed.
 photo null_zps20fde970.jpg

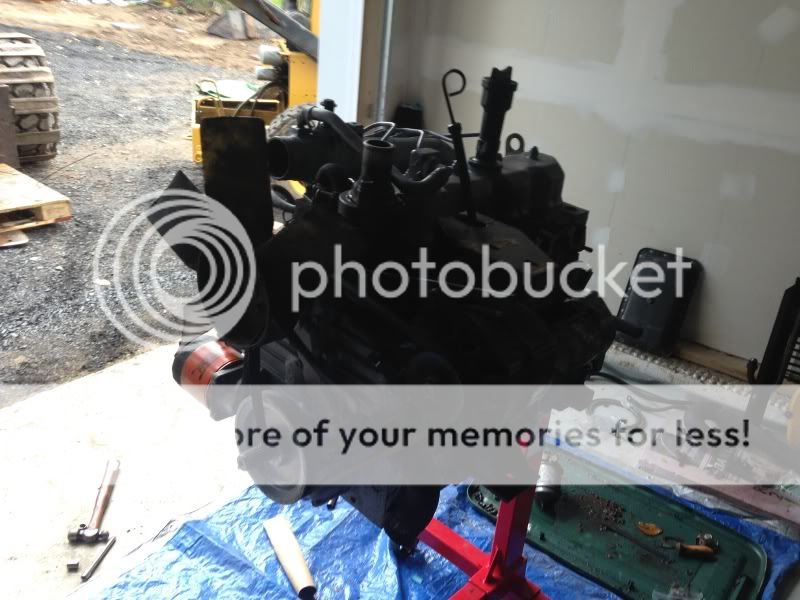
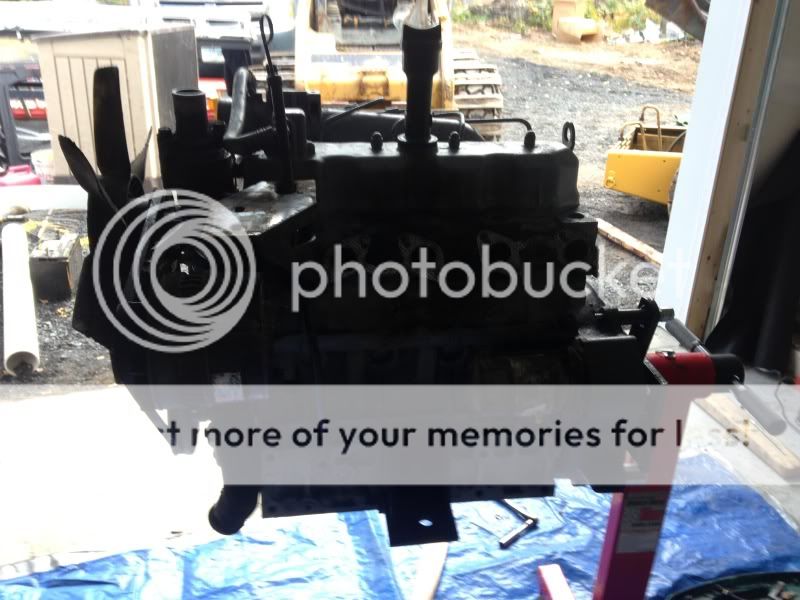
Picture of the exhaust side of the engine. I am going to install the exhaust manifold after the engine is in, because I do not want to bust off the bolts that are rusted real good holding the muffler to it. I really struggled getting the exhaust manifold off the "new" engine, and had to replace a stud that I had no choice but to burn off. I took a die and cleaned up the threads on all the other studs, and they should work much better going back together.

Sorry for the delay on the pictures, but I really dont get much time to get to the computer, most of my posts come from my phone. I will try my best to get pictures of the reassembly and post another picture update once this is done.
 

Tazza

Moderator
Staff member
Joined
Dec 7, 2004
Messages
16,837
Here is a before picture of the project. I was lucky that as soon as the engine started acting up that I raised the boom and locked it out. Would have been a whole other project to raise the boom to get access to the engine compartment.

First, I removed the engine cover, then the radiator. The oil cooler lines were a bugger to get loose, and made me take a trip to my storage unit to grab my torches, which ended up being used quite a few times along the way in the project.

I tried to take quite a few pictures along the way to keep track of wiring locations and such as I started taking things apart.

I got ahead of myself on taking pictures and forgot to get any of the steering components before I took them apart to get access to the 2 bolts that hold the engine to the pump. Did get a picture afterward so someone can see where they are and how access is found to them. A bit more probably have been taken apart to gain better access though. It really was a bugger to get them out from this point.

Here is a picture of the engine out, after I took a pressure washer and got most of the crud out from inside of the engine compartment. After cleaning it up a little bit, I decided since I have some time until the new engine shows up I would throw a little fresh paint at the machine. Really, I wish I had enough time, and a shop set up to tear the machine down further at this point and do a nice job, but I havent said yet that this engine catastrophe happened to me when I am in the middle of building my own house, and I am in total disarray with all of my tools things scattered all over the place, and no shop to work in at the time, which I have been rather spoiled with over the years.

Here is a picture of one side with a coat of paint on it. I went to the local farm and fleet store and first came back with a couple spray cans marked New Holland yellow. Apparently these were for some kind of tractor because they were no where near the same yellow as the machine, were like a real light canary yellow. I went back and got a gallon of New Cat yellow and bought a cheap spray gun from Menards. As for the painting, I used a air orbital sander and some 80 grit discs and simply knocked down all the really bubbly spots and as much loose paint as I could. I used some rust olem spray can primer and sprayed the cat yellow on top. Since I was doing just a real quick crappy job, I went right over the stickers and all, masked off nothing, just used paper towels with paint thinner to clean off as much overspray as I could. I went around what the lift arms were covering, and probably will hit those some time after the machine is back up and running. It does look 10 times better than it did when I started, so I will call it a success of some sort anyway.

Here is a picture of the intake side of the new engine after I have got it prepped and got the parts I need off the old engine put on it. Waiting until I go to the store and get a couple more nuts to mount the fuel filter.

Picture of the front of the engine with the parts installed.

Picture of the exhaust side of the engine. I am going to install the exhaust manifold after the engine is in, because I do not want to bust off the bolts that are rusted real good holding the muffler to it. I really struggled getting the exhaust manifold off the "new" engine, and had to replace a stud that I had no choice but to burn off. I took a die and cleaned up the threads on all the other studs, and they should work much better going back together.

Sorry for the delay on the pictures, but I really dont get much time to get to the computer, most of my posts come from my phone. I will try my best to get pictures of the reassembly and post another picture update once this is done.
Look'in good
The fuel shut off solenoid, it should be pretty simple to hook up.
One should be pull, the other should be hold. The way i'd test it is to hook the -ve terminal to the engine then one at a time put 12V into each terminal of the coil. One should make it snap back, the other shouldn't move, but it will give a small spark when you bruch past it. The one that makes it snap is the pull coil, the other holds it in place.
The cheap way to wire it is to wire the pull wire to the starter terminal so when you turn the key and crank, the coil pulls. Wire the hold to the switched power wire.
Hopefully some of that makes sense.
 
OP
OP
B

Bearscratch

Member
Joined
Sep 15, 2013
Messages
15
Look'in good
The fuel shut off solenoid, it should be pretty simple to hook up.
One should be pull, the other should be hold. The way i'd test it is to hook the -ve terminal to the engine then one at a time put 12V into each terminal of the coil. One should make it snap back, the other shouldn't move, but it will give a small spark when you bruch past it. The one that makes it snap is the pull coil, the other holds it in place.
The cheap way to wire it is to wire the pull wire to the starter terminal so when you turn the key and crank, the coil pulls. Wire the hold to the switched power wire.
Hopefully some of that makes sense.
Thanks tazza! I apologie that I put the entire thing back together without taking any pictures. Mail lady brought the gasket and I went right to town getting everything back together. It all went pretty well, getting the engine hooked up to the pump was a royal pain in the ass though. I had a steel bar in the bottom of the engine bay that I'm pretty sure was only there for extra weight, which I do believe looked placed by the factory, that I had to cut out to get enough room to wiggle the engine in. I skipped the electric fuel shutoff for now just to get it up and going, but now that I have the info on it it should be rather easy to hook up. I am having trouble adjusting the steering now though after it was all taken apart and put back together. There were a couple rubber bushings that were totally worn out, that I'm going to have to order new ones for and it should be much easier to adjust. Anyway to leave this post, if anyone is undertaking this swap, feel free to email me for any questions. Bearscratchtrail at yahoo is my email. Keith
 

Tazza

Moderator
Staff member
Joined
Dec 7, 2004
Messages
16,837
Thanks tazza! I apologie that I put the entire thing back together without taking any pictures. Mail lady brought the gasket and I went right to town getting everything back together. It all went pretty well, getting the engine hooked up to the pump was a royal pain in the ass though. I had a steel bar in the bottom of the engine bay that I'm pretty sure was only there for extra weight, which I do believe looked placed by the factory, that I had to cut out to get enough room to wiggle the engine in. I skipped the electric fuel shutoff for now just to get it up and going, but now that I have the info on it it should be rather easy to hook up. I am having trouble adjusting the steering now though after it was all taken apart and put back together. There were a couple rubber bushings that were totally worn out, that I'm going to have to order new ones for and it should be much easier to adjust. Anyway to leave this post, if anyone is undertaking this swap, feel free to email me for any questions. Bearscratchtrail at yahoo is my email. Keith
Once you get the steering sorted, let's hope you get years of trouble free operation out of it.
 
Top