I have a Bobcat 600 that needs the system flushed out BEFORE the motor goes back in. I bought a new filter cartridge, but when I pulled the old one out there was black slimy crud (looked like motor sludge) in it and the fluid was milky. I don't really want to put it back together until I can get it cleaned out. Any thoughts on the best way to do this??? I can drain it, but that won't get the crud out of it. I'm not in a big hurry to get it going, I plan on rebuilding all 4 cylinders and doing some other stuff to it, but I would like to get the motor back in first. Any help would be appreciated  Thx
Thx
You are using an out of date browser. It may not display this or other websites correctly.
You should upgrade or use an alternative browser.
You should upgrade or use an alternative browser.

Help Support SkidSteer Forum:
I would take the side covers off the chain cases and take the drain plugs out, the drain plugs are the forward ones underneath the case in the back on both sides, clean the cases really good even if you use a little pump and parts cleaner as they are your hydraulic sump. Then if you disconnect the lines to the cylinders and empty them the only bad oil left should be what is in the lines and maybe some compressed air would get some of that out. There may be others here who know of a simpler way.
I don't believe there is a simple way. When i do mine, i have all the lines and cylinders out, i run diesel and compressed air through them. To re-prime i operate the hydraulics while extending and retracting the lift cylinders. It pulls oil through the pump and into the lines, i had a lot of success doing this on my 743's i have done.I would take the side covers off the chain cases and take the drain plugs out, the drain plugs are the forward ones underneath the case in the back on both sides, clean the cases really good even if you use a little pump and parts cleaner as they are your hydraulic sump. Then if you disconnect the lines to the cylinders and empty them the only bad oil left should be what is in the lines and maybe some compressed air would get some of that out. There may be others here who know of a simpler way.
I'm almost afraid to take the side covers off......but I will. Have to check the chains, sprockets, and clutch adjustment yet. Previous owner put new clutches in, but he was kinda a "Gomer" so I'll double check just to make sure. Thanks for the direction, I'll do like you said and blow the lines out as well. Might run diesel through them depending on what they look like. Just want to make everything as clean as I can before it goes back together otherwise it just wastes time and money. To give you an idea of how grungy this this was, there is a 8-10" pile of greasy dirt on the floor underneath it from wheel to wheel, front to back that I had scraped out of just the engine area. Couldn't even make out there were valves underneath the machine, and you couldn't see the hydraulic filter or the lines other than where they came out to hook to the pump. Big sticks and a few rocks came out as well. Not pretty. I don't know why people spend good money on a machine then do that. More money than sense I guess. Anyway, thanks for the info. Good idea working the cylinders Taz, I'll do that as well so I don't start it dry. THXI don't believe there is a simple way. When i do mine, i have all the lines and cylinders out, i run diesel and compressed air through them. To re-prime i operate the hydraulics while extending and retracting the lift cylinders. It pulls oil through the pump and into the lines, i had a lot of success doing this on my 743's i have done.
I have had machines like that, so much caked up crud it was insane! It doesn't take much to keep it clean. Seriously, once a week get a can of degreaser and a garden hose if you have a leak that you can't be bothered fixing. It will keep it respectable and keep the crud from building up.I'm almost afraid to take the side covers off......but I will. Have to check the chains, sprockets, and clutch adjustment yet. Previous owner put new clutches in, but he was kinda a "Gomer" so I'll double check just to make sure. Thanks for the direction, I'll do like you said and blow the lines out as well. Might run diesel through them depending on what they look like. Just want to make everything as clean as I can before it goes back together otherwise it just wastes time and money. To give you an idea of how grungy this this was, there is a 8-10" pile of greasy dirt on the floor underneath it from wheel to wheel, front to back that I had scraped out of just the engine area. Couldn't even make out there were valves underneath the machine, and you couldn't see the hydraulic filter or the lines other than where they came out to hook to the pump. Big sticks and a few rocks came out as well. Not pretty. I don't know why people spend good money on a machine then do that. More money than sense I guess. Anyway, thanks for the info. Good idea working the cylinders Taz, I'll do that as well so I don't start it dry. THX
I have a machine with a slight leak, i give it a clean every few months, it only makes a small mess and easy to keep under control.
Yep. Thanks Jerry. Got it all drained...... Blocked it up and pulled the wheels off. That made things much easier. The right side was pretty clean. Then I opened the left...... Found the mysterious black goo, small pieces of metal (looks like old cotter keys), a 3/8" ball bearing, half of an old clutch disc, and..........a chisel. I think the ball bearing was a remnant of a bearing change, one has been replaced. Was puzzled when I first pulled it out though, had to sit for a minute and go through my mental manual and try to think of where it might have came from. The chisel was quite a shock! It's about 7" long. Not really a desirable item to have bouncing around with a bunch of spinning gears and chains. I don't think so anyway. But I did find a split chain. Not broken yet, but one link had split. And I need to replace 2 idler gears. One the teeth are about gone, and the other the teeth are so worn they look like toothpicks. Everything else on both sides looks surprisingly good. Almost new. So the idler gears and the chain have been added to my shopping list. Have to drain and clean the lines yet, probably do that today. Thanks again for the help. Greatly appreciated!!Bob, you may know already but just in case be aware that the rearmost drain plug on the chain case is for the gas tank.
O_O that is one thing I'd never expect to hear someone find in a chain case! Someone must have dropped it and thought, na too much effort to retrieve.Yep. Thanks Jerry. Got it all drained...... Blocked it up and pulled the wheels off. That made things much easier. The right side was pretty clean. Then I opened the left...... Found the mysterious black goo, small pieces of metal (looks like old cotter keys), a 3/8" ball bearing, half of an old clutch disc, and..........a chisel. I think the ball bearing was a remnant of a bearing change, one has been replaced. Was puzzled when I first pulled it out though, had to sit for a minute and go through my mental manual and try to think of where it might have came from. The chisel was quite a shock! It's about 7" long. Not really a desirable item to have bouncing around with a bunch of spinning gears and chains. I don't think so anyway. But I did find a split chain. Not broken yet, but one link had split. And I need to replace 2 idler gears. One the teeth are about gone, and the other the teeth are so worn they look like toothpicks. Everything else on both sides looks surprisingly good. Almost new. So the idler gears and the chain have been added to my shopping list. Have to drain and clean the lines yet, probably do that today. Thanks again for the help. Greatly appreciated!!
Good to hear the condition isn't too bad. The goo is wear, when i clean out chain cases there is this coo at the bottom, its full if sharp metal particles too from chain and sprocket wear. Simply mop it all out.
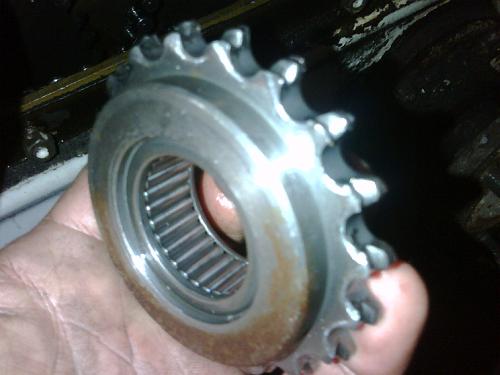
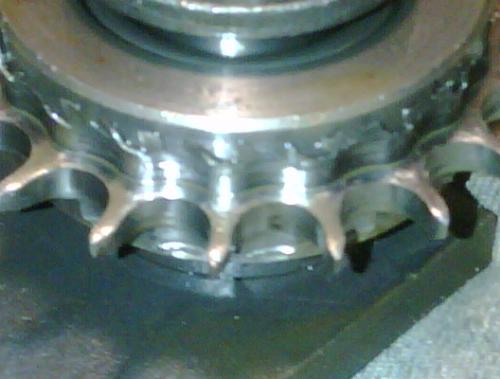
It took me about 5 minutes to get the chisel out of there. Luckily I had an extendable magnetic wand (the ones you rarely ever use), which did the trick after a few attempts. There are score marks on 2 sides of it where the chain was rubbing on it. Anyway, I took a couple pics of the idlers I pulled off and thought I would share, be warned......they aren't pretty...O_O that is one thing I'd never expect to hear someone find in a chain case! Someone must have dropped it and thought, na too much effort to retrieve.
Good to hear the condition isn't too bad. The goo is wear, when i clean out chain cases there is this coo at the bottom, its full if sharp metal particles too from chain and sprocket wear. Simply mop it all out.
Left side.......

Right side........the hub is supposed to be round......

I stumbled across some replacements locally today
Ok, the first one looks ok to me, the second doesn't look too healthy! i'm amazed you found some to replace them with so cheap, nice find.It took me about 5 minutes to get the chisel out of there. Luckily I had an extendable magnetic wand (the ones you rarely ever use), which did the trick after a few attempts. There are score marks on 2 sides of it where the chain was rubbing on it. Anyway, I took a couple pics of the idlers I pulled off and thought I would share, be warned......they aren't pretty...
Left side.......
Right side........the hub is supposed to be round......
I stumbled across some replacements locally today$10 each. They have ball bearings instead of needle bearings, but for my use they should be fine. Got to get it all back together then figure out how to get the slop out of the control arms. They have a pinchbolt setup, but the splines are worn down to points on the shafts, and the internal splines in the arms themselves are all rounded... I'll figure something out though. Enjoy......