L555 Hydraulic Motor Leak

Help Support SkidSteer Forum:

chrisepp

Active member
Joined
Jun 15, 2021
Messages
35
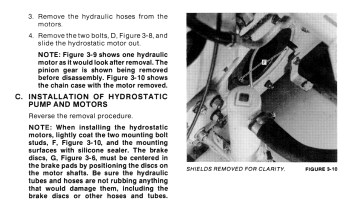
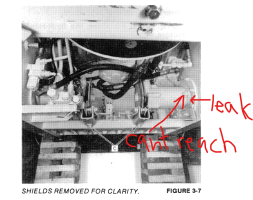
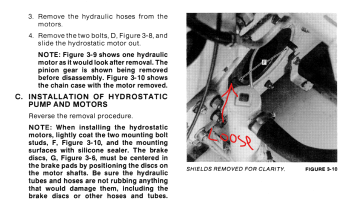
Found another issue with the L555 skidsteer we got. (After all the digging, it was very poorly maintained sadly...). One of the hydrostatic motor bolts were loose and it leaked hydraulic fluid, and also let water in. (one was totally loose) I tightened it back up (front bolt) but it still leaks. I can't get to the rear one because the fuel tank is in the way. Anyone know if the fuel tank can be loosen and shifted enough to get at the rear bolt to tighten it? And will it need to come off totally and have RTV put in there to seal it properly? (or backed off enough we can get some in all the way around? Really hoping this doesn't need dropping the tank. Have not found any details on that, doesn't seem to cover the fuel tank at all in the service manual.
 

Ivan

Well-known member
Joined
Jan 14, 2011
Messages
215
DO NOT DROP YOUR tank. That is your fuel tank. If you are tlking abot the 2 bolts that hold the hydro to the motor I don't think you can get them without removing the moto or at least sliding it back. Your hyd pump sits in front of the hyros behind your feet then back behind that is the first hyro held to the next one with 2 bolts. and so forth to the motor. If oil is coming out of this area on any of them you probably have a bad seal. The one that connects to the motor could be the hydro seal or seal on the motor its self. Motor is not a bad job to remove as 4 bolts hold it in place. If you need to know how to do thatlet me know mine out and waiting for me to put it back after I rebuilt it
 
OP
OP
chrisepp

chrisepp

Active member
Joined
Jun 15, 2021
Messages
35
DO NOT DROP YOUR tank. That is your fuel tank. If you are tlking abot the 2 bolts that hold the hydro to the motor I don't think you can get them without removing the moto or at least sliding it back. Your hyd pump sits in front of the hyros behind your feet then back behind that is the first hyro held to the next one with 2 bolts. and so forth to the motor. If oil is coming out of this area on any of them you probably have a bad seal. The one that connects to the motor could be the hydro seal or seal on the motor its self. Motor is not a bad job to remove as 4 bolts hold it in place. If you need to know how to do thatlet me know mine out and waiting for me to put it back after I rebuilt it
I'm referring to the drive motor where it bolts to the side (the hydraulic reservoir). One of the two carriage bolts the nut was totally free so there was a gap between the motor and the other plate it bolts to. (and that plate then bolts to the frame/tank). So oil was coming out of the space, and that allowed water to drain into the tank also. I tighted it back up to spec, but the rear bolt is blocked mostly by the fuel tank. I would have to shift the fuel tank back about an inch to get a socket on there with a long extension to get to the middle. It seems tight, but it still leaks there. When installed originally I believe an RTV was used around all of these and at the bolts. But I can't get to the rear bolt. I can try and send a pic later.
 
OP
OP
chrisepp

chrisepp

Active member
Joined
Jun 15, 2021
Messages
35
OK, I found this. This is a pic of the motor where the leak is. The two bolts removed is where it would bolt. The front nut was completely loose and it was leaking around the flange where the motor bolts on. The rear bolt is blocked partially by the fuel tank (which is removed in this picture). Manual states that they would put silicon sealant on the bolts and flange. So I expect I have to loosen and squeeze silicon around the edge (or RTV) and then righten it back up to seal it. But I still can't get onto the rear nut with the fuel tank there.

The pic that says can't reach in my mouse writing, is from below looking to the front. That's the one the fuel tank is blocking. It seems like simply tightening up didn't stop leaking. But I don't know how loose the rear is, finger can't move it, but there was a big gap at the front of the mating surfaces are where the front nut was loose (by loose, I mean not touching the motor anymore)
 

Attachments

  • Screenshot 2022-06-19 130506.png
    Screenshot 2022-06-19 130506.png
    700.1 KB · Views: 117
  • leak.png
    leak.png
    502.9 KB · Views: 108
  • loosebolt.png
    loosebolt.png
    703.5 KB · Views: 103

Ivan

Well-known member
Joined
Jan 14, 2011
Messages
215
OK, I found this. This is a pic of the motor where the leak is. The two bolts removed is where it would bolt. The front nut was completely loose and it was leaking around the flange where the motor bolts on. The rear bolt is blocked partially by the fuel tank (which is removed in this picture). Manual states that they would put silicon sealant on the bolts and flange. So I expect I have to loosen and squeeze silicon around the edge (or RTV) and then righten it back up to seal it. But I still can't get onto the rear nut with the fuel tank there.

The pic that says can't reach in my mouse writing, is from below looking to the front. That's the one the fuel tank is blocking. It seems like simply tightening up didn't stop leaking. But I don't know how loose the rear is, finger can't move it, but there was a big gap at the front of the mating surfaces are where the front nut was loose (by loose, I mean not touching the motor anymore)
My mistake. I think in this case you have to move the fuel take which is something i am not sure what you have to do. It looks to e like you will have to also lower you hyr fluid level in the chain case. Could use a box end wrench and get that into there. Here is a problem yo will have by removing the fuel tank. The filler neck will come off.I can tell you first hand that thing is a bear to get back on. Mine came off because my tank was not bolted in on that side. I ended up going to at o parts store and they had a hose that was the same size which I then cut and after a lot of colorful words I got it on. I do know that many places they had special wrenches for things like this. I have a few and a few that was made by them My son went to school for NH equit for the place he use to work at. I think these machines were older thathe worked on
 
OP
OP
chrisepp

chrisepp

Active member
Joined
Jun 15, 2021
Messages
35
My mistake. I think in this case you have to move the fuel take which is something i am not sure what you have to do. It looks to e like you will have to also lower you hyr fluid level in the chain case. Could use a box end wrench and get that into there. Here is a problem yo will have by removing the fuel tank. The filler neck will come off.I can tell you first hand that thing is a bear to get back on. Mine came off because my tank was not bolted in on that side. I ended up going to at o parts store and they had a hose that was the same size which I then cut and after a lot of colorful words I got it on. I do know that many places they had special wrenches for things like this. I have a few and a few that was made by them My son went to school for NH equit for the place he use to work at. I think these machines were older thathe worked on
Ya that's what I am afraid of. (having to remove tank). I was hoping I could shift it enough to get something on that nut enough to loosen it off so i can squeeze insome rtv around the mounting surfaces and retighten. My hydraulic fluid is not full yet, so raising that side should drain enough over to the other side to be able to do it. But I need to move it to more space to work and clean up really well down there first... I already have the lower plates off and stuff but still need to get in there. I don't think smearing silicon around that joint on the outside will work for very long at all unless I get some in between the mating surfaces...
 

Ivan

Well-known member
Joined
Jan 14, 2011
Messages
215
Ya that's what I am afraid of. (having to remove tank). I was hoping I could shift it enough to get something on that nut enough to loosen it off so i can squeeze insome rtv around the mounting surfaces and retighten. My hydraulic fluid is not full yet, so raising that side should drain enough over to the other side to be able to do it. But I need to move it to more space to work and clean up really well down there first... I already have the lower plates off and stuff but still need to get in there. I don't think smearing silicon around that joint on the outside will work for very long at all unless I get some in between the mating surfaces...
The motor is out of mine yet. I will have to take a look at it tomorrow and see what could maybe be done. If you could get it loose maybe spread the motor flange out and spray brake cleaner in there to clean it up and fill with silcone so it squeezes back down on it. Id there anyway if you shaped a box end wrench and bent it that you could loosen it up. These things are not ment to be worked on very easy are they
 
OP
OP
chrisepp

chrisepp

Active member
Joined
Jun 15, 2021
Messages
35
The motor is out of mine yet. I will have to take a look at it tomorrow and see what could maybe be done. If you could get it loose maybe spread the motor flange out and spray brake cleaner in there to clean it up and fill with silcone so it squeezes back down on it. Id there anyway if you shaped a box end wrench and bent it that you could loosen it up. These things are not ment to be worked on very easy are they
I had to take mine out and rebuild it (V1902 Kubota) I wish I had know this at that time... I got it used from a Neighbor who thought it just had a blown head gasket... I found out he doesn't maintain anything, and whoever was his mechanic was worse. Ya, if I can just loosen the rear one up I think I can squeeze in silicon around the whole thing and clamp it in. Do you know if the front metal cross piece the seat sits on comes out or is welded in? I didn't look at that. It is what blocks the top from getting in a wrench via the top. Certain parts are certainly a real pain to get at on this thing for sure. They didn't think some of that through at all for service... For such a simple machine they could have worked a bit on that... Box end wrench might work. it would be a pain, could only get 1/8 of a turn at a time but it could still be doable. Underside is blocked by the return on the frame that the bottom skid plate bolts to... How can one nut I can see and touch be such a nightmare. haha
 

Ivan

Well-known member
Joined
Jan 14, 2011
Messages
215
I had to take mine out and rebuild it (V1902 Kubota) I wish I had know this at that time... I got it used from a Neighbor who thought it just had a blown head gasket... I found out he doesn't maintain anything, and whoever was his mechanic was worse. Ya, if I can just loosen the rear one up I think I can squeeze in silicon around the whole thing and clamp it in. Do you know if the front metal cross piece the seat sits on comes out or is welded in? I didn't look at that. It is what blocks the top from getting in a wrench via the top. Certain parts are certainly a real pain to get at on this thing for sure. They didn't think some of that through at all for service... For such a simple machine they could have worked a bit on that... Box end wrench might work. it would be a pain, could only get 1/8 of a turn at a time but it could still be doable. Underside is blocked by the return on the frame that the bottom skid plate bolts to... How can one nut I can see and touch be such a nightmare. haha
On mine that bar is welded in. Your hd pump and front hydrostat hangs off that by 2 bolts
 
OP
OP
chrisepp

chrisepp

Active member
Joined
Jun 15, 2021
Messages
35
On mine that bar is welded in. Your hd pump and front hydrostat hangs off that by 2 bolts
I got an angled wrench and cut it down short enough that I could get in there and loosen it. Can't move the motor a lot but we squeezed in some RTV, hopefully enough around the motor and the two bolts and tightened it back up. We'll see tomorrow if it worked...
 
Top