I have been searching unsuccessfully for days for an answer to this issue on my bobcat. When applying down pressure with my T-180, there is a hesitation where it acts like it is in float mode before it applies more down pressure. For instance, if you have enough down pressure to lift the front of the machine off of the ground and you try to apply more down pressure, it lets the machine down before lifting it back up again. All other hydraulics work strong and there are no codes. Hopefully one of you knowledgeable fellas can help me out here. Thanks!
You are using an out of date browser. It may not display this or other websites correctly.
You should upgrade or use an alternative browser.
You should upgrade or use an alternative browser.
Help Support SkidSteer Forum:
SkidRoe
Well-known member
- Joined
- Dec 10, 2009
- Messages
- 1,885
Sounds like a problem with one of the load holding valves in the loader control. There is a valve in the output port of the control that prevents the load from dropping when you have the bucket raised and go to raise it some more. With an open center hydraulic system, it takes a split second for the system to react to an incoming load and build pressure, hence without the holding valves, the load will drop a bit before it begins to raise
Conversely, they also work in the same manner when applying down pressure. If that valve is stuck open, even partially, the loader will react like you describe.
HTH - SR
Conversely, they also work in the same manner when applying down pressure. If that valve is stuck open, even partially, the loader will react like you describe.
HTH - SR
SkidRoe
Well-known member
- Joined
- Dec 10, 2009
- Messages
- 1,885
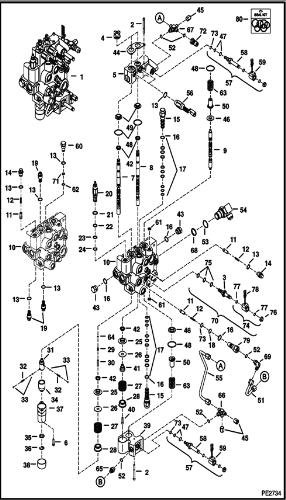
Item 7 is the boom lift spool, items 11 &12 are the load check valves (load holding vlaves) and the seats. There are 2 sets shown, the ones on the right are for the bucket tilt, the ones on the left are for the boom lift.
HTH - SR
Thanks for the info SkidRoe! That makes sense to me. Are these check valves something that just need taken apart and cleaned up or is it something that I need to replace? Also, can I get to them without removing the main valve body from the machine? Thanks again for the tips, I am anxious to get this fixed!Item 7 is the boom lift spool, items 11 &12 are the load check valves (load holding vlaves) and the seats. There are 2 sets shown, the ones on the right are for the bucket tilt, the ones on the left are for the boom lift.
HTH - SR
I believe the control block can stay in place. They un-screw so you can check them for wear or bad Orings. They are essentially poppets with springs behind them. They don't generally wear, but the orings can go bad causing them to leak down.Thanks for the info SkidRoe! That makes sense to me. Are these check valves something that just need taken apart and cleaned up or is it something that I need to replace? Also, can I get to them without removing the main valve body from the machine? Thanks again for the tips, I am anxious to get this fixed!
Thanks for the info Tazza. I'll try to take a closer look at it on my next day off. I'll post a reply with my findings!I believe the control block can stay in place. They un-screw so you can check them for wear or bad Orings. They are essentially poppets with springs behind them. They don't generally wear, but the orings can go bad causing them to leak down.
I was able to remove all three check valves without removing the control block. I cleaned up and inspected each check valve. The above diagram is not the control block that I have in my machine. Mine is a one piece casting. According to the repair manual I have, it is the one piece casting, foot control assembly. Same concept as the above check valves though. Now to the point. On my assembly, the load check valve for the lift function and the BICS check valve are combined. When I removed the plug out of the end of this valve and inspected the inner workings of it, I noticed that the ball/seat seal inside of the check valve appears to be worn. The ball has a well defined groove worn around where it should seal. Could this be part of my problem and does it need replaced? Also, I noticed that the poppet in the end of the BICS valve was a lot looser fit inside of its sleeve than the other check poppets were (it is however a different style of poppet than the others). Is this normal to have some extra slop in this poppet or should I be looking into completely replacing the BICS/Lift check assembly?Thanks for the info Tazza. I'll try to take a closer look at it on my next day off. I'll post a reply with my findings!
It could be your issue, but over time they will all get marks in them. You could try replacing the poppets, but you can't change the seats as i think they are part of the control block, they would need machining.I was able to remove all three check valves without removing the control block. I cleaned up and inspected each check valve. The above diagram is not the control block that I have in my machine. Mine is a one piece casting. According to the repair manual I have, it is the one piece casting, foot control assembly. Same concept as the above check valves though. Now to the point. On my assembly, the load check valve for the lift function and the BICS check valve are combined. When I removed the plug out of the end of this valve and inspected the inner workings of it, I noticed that the ball/seat seal inside of the check valve appears to be worn. The ball has a well defined groove worn around where it should seal. Could this be part of my problem and does it need replaced? Also, I noticed that the poppet in the end of the BICS valve was a lot looser fit inside of its sleeve than the other check poppets were (it is however a different style of poppet than the others). Is this normal to have some extra slop in this poppet or should I be looking into completely replacing the BICS/Lift check assembly?
The bics load check may be supposed to be like that, i wouldn't condem it just yet.
Just how bad is this wear? i guess it is possible they are not seating correctly allowing it to drop. The cylinders don't leak down when you have them in the air do they?
I think that the poppets are fine, they do not seem to show any abnormal wear. The only thing on the poppets that concerned me was the poppet for the lift function (located in the end of the BICS check valve assembly) is somewhat loose fitting in its sleeve compared to the other poppets. It is a slightly different design than the other poppets and it does not look worn, so I am guessing that this is normal. The main concern I have with wear is on the ball/seat check inside of the BICS/Lift check valve assembly. I attempted to post a picture with no success. I cannot get the HTML editor to work. I will try more later. There is an album in the media section called "Combination BICS and Lift Function Check Valve Assembly" which contains two pictures of the BICS/Lift check valve that I am working with. The item showing wear is item #2 in the second picture. It has a defined groove worn around the ball surface that I can snag a fingernail on. I would venture to say that if that piece is meant to seal fluid completely off that it is not working properly. I've done a lot of carb work, and if a needle and seat looked like this, it would not hold gas back. I am still working on getting o-rings to replace and I hope that works. I priced out the entire BICS/Lift check through B-Cat.....$415.59!!!!!! Yikes. Also, I checked the leak down. They do leak down very slowly. Probably about 1/8" per hour measuring on the cylinder.It could be your issue, but over time they will all get marks in them. You could try replacing the poppets, but you can't change the seats as i think they are part of the control block, they would need machining.
The bics load check may be supposed to be like that, i wouldn't condem it just yet.
Just how bad is this wear? i guess it is possible they are not seating correctly allowing it to drop. The cylinders don't leak down when you have them in the air do they?
Looking at that load check, it doesn't look like any i have seen, i wonder if you are right and it's wrong. The price from the dealer is insane, it shows that they sell very few of them.I think that the poppets are fine, they do not seem to show any abnormal wear. The only thing on the poppets that concerned me was the poppet for the lift function (located in the end of the BICS check valve assembly) is somewhat loose fitting in its sleeve compared to the other poppets. It is a slightly different design than the other poppets and it does not look worn, so I am guessing that this is normal. The main concern I have with wear is on the ball/seat check inside of the BICS/Lift check valve assembly. I attempted to post a picture with no success. I cannot get the HTML editor to work. I will try more later. There is an album in the media section called "Combination BICS and Lift Function Check Valve Assembly" which contains two pictures of the BICS/Lift check valve that I am working with. The item showing wear is item #2 in the second picture. It has a defined groove worn around the ball surface that I can snag a fingernail on. I would venture to say that if that piece is meant to seal fluid completely off that it is not working properly. I've done a lot of carb work, and if a needle and seat looked like this, it would not hold gas back. I am still working on getting o-rings to replace and I hope that works. I priced out the entire BICS/Lift check through B-Cat.....$415.59!!!!!! Yikes. Also, I checked the leak down. They do leak down very slowly. Probably about 1/8" per hour measuring on the cylinder.
Are you able to swap them around on the lift section? i think there would be one for up and one for down, but i'm not 100% on that.
1/8" of drop per hour is nothing to worry about.
Sorry it's been so long, I have been away from home due to work for the past few weeks. I finally got around to working on this again. I changed out all of the o-rings on the check valves, and it still does the same thing. Tazza, as far as I can tell, there is only one check valve for the lift section possibly only one controls up and down.... I did a little more testing tonight. When I have the front of the machine off of the ground, I can gently roll my left foot forward and find a point where if I hold the valve in that position, it will relieve almost all of the pressure off of the loader arms and set the machine back down. If I go just slightly past this point, pressure is reapplied and the arms begin to lower again. Could this possibly be a problem with the spool valve controlling lift or am I still looking at a check valve issue?Looking at that load check, it doesn't look like any i have seen, i wonder if you are right and it's wrong. The price from the dealer is insane, it shows that they sell very few of them.
Are you able to swap them around on the lift section? i think there would be one for up and one for down, but i'm not 100% on that.
1/8" of drop per hour is nothing to worry about.