You are using an out of date browser. It may not display this or other websites correctly.
You should upgrade or use an alternative browser.
You should upgrade or use an alternative browser.
Help Support SkidSteer Forum:
mllud
Well-known member
- Joined
- Jun 29, 2007
- Messages
- 635
You always have to consider drainage. slope the dirt away from foundations. think about where the water will flow and direct it where it should go. Dont leave any low areas for water to lay. cut off the high spots to fill the lows.. If you think you could have dirt washing onto somone elses property you should put up that erosion control fencing. Some areas are very strict on dirt washing onto somone elses property or into a creek or drainage ditch. Water will be your worst enemy until the seed takes hold.
sterlclan
Well-known member
- Joined
- May 1, 2004
- Messages
- 528
trust your seat........with some exp. you will "feel"the dips and highs in your butt learn to trust it.......JeffYou always have to consider drainage. slope the dirt away from foundations. think about where the water will flow and direct it where it should go. Dont leave any low areas for water to lay. cut off the high spots to fill the lows.. If you think you could have dirt washing onto somone elses property you should put up that erosion control fencing. Some areas are very strict on dirt washing onto somone elses property or into a creek or drainage ditch. Water will be your worst enemy until the seed takes hold.
TriHonu
Well-known member
- Joined
- Apr 15, 2007
- Messages
- 486
If you can't determine what the grade is doing from the operators seat, pick up an inexpensive Recreational Vehicle Level and mount it in the cab.trust your seat........with some exp. you will "feel"the dips and highs in your butt learn to trust it.......Jeff
I purchased a set of grade levels from SlopeMeter These levels are specifically designed for heavy equipment. They are made of aluminum. The black ball is contained in a glass tube that is filled with alcohol and dampens the movement. The one below measures Grade. They also make them that measure in Percent Grade (Rise per 100 feet). They are about $150 per level. You can get cheaper grade levels on Ebay for $75. Search for "Slope Meter" on Ebay. Most RV dealers also have these curved vial levels. They are inexpensive and not calibrated to tell you the actual grade.
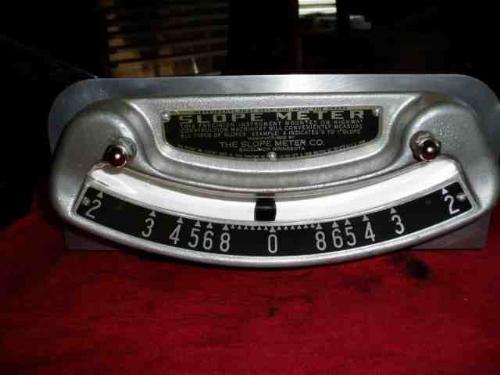
I mounted them to 250 lb pull magnets so I could quickly attach them to the loader and remove them when not needed.
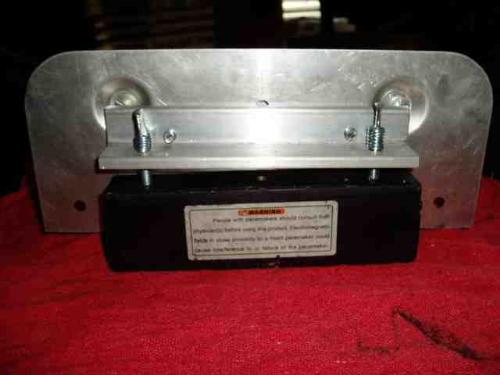
The black square is the magnet. The two set screws allow me to zero the level. To zero you park the machine on a relatively level spot. Check the reading on the level. Drive away and turn around and drive back to the same spot facing the opposite direction. If the level has the same reading it is zeroed. If not adjust the set screws to take out half the difference of the two readings.
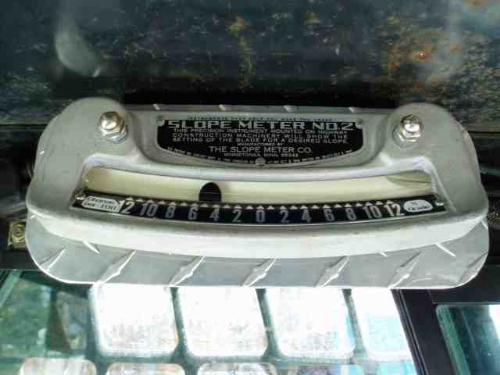
This is the SlopeMeter #2 that measures Percent Grade. It currently shows the grade falls to the right at about 1 foot of fall per 100 feet.
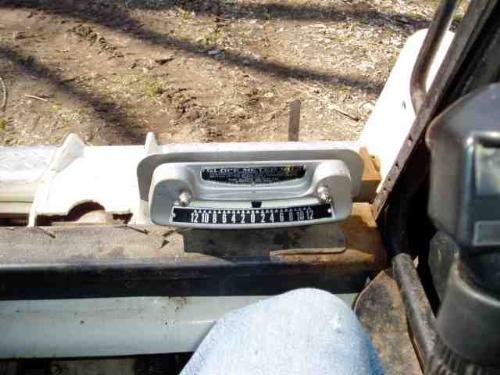
This one is attached to the roof of the cab showing the grade is down hill ahead of me falling at about 4 1/2 feet per 100 feet forward.
One trick an old man showed me to gauge slope, was to stand 180 degrees from your project, bend over and look through your legs. I know it sounds strange but for some reason, you can see dips, rises and slope much better.If you can't determine what the grade is doing from the operators seat, pick up an inexpensive Recreational Vehicle Level and mount it in the cab.
I purchased a set of grade levels from SlopeMeter These levels are specifically designed for heavy equipment. They are made of aluminum. The black ball is contained in a glass tube that is filled with alcohol and dampens the movement. The one below measures Grade. They also make them that measure in Percent Grade (Rise per 100 feet). They are about $150 per level. You can get cheaper grade levels on Ebay for $75. Search for "Slope Meter" on Ebay. Most RV dealers also have these curved vial levels. They are inexpensive and not calibrated to tell you the actual grade.
I mounted them to 250 lb pull magnets so I could quickly attach them to the loader and remove them when not needed.
The black square is the magnet. The two set screws allow me to zero the level. To zero you park the machine on a relatively level spot. Check the reading on the level. Drive away and turn around and drive back to the same spot facing the opposite direction. If the level has the same reading it is zeroed. If not adjust the set screws to take out half the difference of the two readings.
This is the SlopeMeter #2 that measures Percent Grade. It currently shows the grade falls to the right at about 1 foot of fall per 100 feet.
This one is attached to the roof of the cab showing the grade is down hill ahead of me falling at about 4 1/2 feet per 100 feet forward.
bobcat_ron
Well-known member
- Joined
- Aug 6, 2007
- Messages
- 334
Just make sure you aren't wearing a kilt!!!One trick an old man showed me to gauge slope, was to stand 180 degrees from your project, bend over and look through your legs. I know it sounds strange but for some reason, you can see dips, rises and slope much better.
I will try that sometime, sounds fun too!!!
skidsteer.ca
Well-known member
- Joined
- Jan 20, 2006
- Messages
- 3,853
I just use a home made water level.Just make sure you aren't wearing a kilt!!!
I will try that sometime, sounds fun too!!!
Take a 5 gal plastic bucket, drill a hole in the side, down at the bottom that a tire valve stem will fit in. Install the stem with silicone around the base to make sure it seals.
Remove the valve core. Now attach a 3/8" clear vynyl hose over the other end of the valve stem and clamp it on. The hose needs to be long enough that you can place the pail in the middle of your project and reach the edges with the other end.
Fill the pail with water and let it run out the hose until you have the air purged. Plug the end of the hose.
Now attach the out side hose end to a 1" x 2" 8 ft long, with the plug at the top end of the board.
Top the pail up with water if necessary and place it in the middle of your job site on top of something so the top of the water level is about waist high.
Stand your 1 by 2 on end and remove the plug. The water in the hose will equalize with the water level in the pail.
Mark the board 0 at that height.
Now as you walk around the job site if the water rises above 0 , you are going below grade, and vice versa. Plug the end of the hose when your done making your checks, to be sure you don't lose any water.
Its not technically perfect as the water in the pail lowers a tiny amount as you fill more length of hose. (important not to use to large of diameter or hose) Cost less the $30 for mine with 75' of hose.
Here is a link to one with pictures.
http://www.buildeazy.com/fp_waterlevel.html
Ken
bobcat_ron
Well-known member
- Joined
- Aug 6, 2007
- Messages
- 334
That method also works for the house levellers, when Lasers can't shoot through or around walls.I just use a home made water level.
Take a 5 gal plastic bucket, drill a hole in the side, down at the bottom that a tire valve stem will fit in. Install the stem with silicone around the base to make sure it seals.
Remove the valve core. Now attach a 3/8" clear vynyl hose over the other end of the valve stem and clamp it on. The hose needs to be long enough that you can place the pail in the middle of your project and reach the edges with the other end.
Fill the pail with water and let it run out the hose until you have the air purged. Plug the end of the hose.
Now attach the out side hose end to a 1" x 2" 8 ft long, with the plug at the top end of the board.
Top the pail up with water if necessary and place it in the middle of your job site on top of something so the top of the water level is about waist high.
Stand your 1 by 2 on end and remove the plug. The water in the hose will equalize with the water level in the pail.
Mark the board 0 at that height.
Now as you walk around the job site if the water rises above 0 , you are going below grade, and vice versa. Plug the end of the hose when your done making your checks, to be sure you don't lose any water.
Its not technically perfect as the water in the pail lowers a tiny amount as you fill more length of hose. (important not to use to large of diameter or hose) Cost less the $30 for mine with 75' of hose.
Here is a link to one with pictures.
http://www.buildeazy.com/fp_waterlevel.html
Ken
A laser is much easier than the water technique. Especially, if I'm digging footers, a laser is a must. Spectra Precision lasers are awesome, although they are pricey. I have the LL500 which is great all around laser. It can be set up in about a minute once you get used to it, with NiCd batteries or D batteries.That method also works for the house levellers, when Lasers can't shoot through or around walls.
The LL400 is self leveling, and I will probably buy that one if I ever need a new one. They are both good to 1/16" at 1000 feet! You'll be spending about 1500 on a new one, but it will pay for itself in labor savings and time in no time!
Similar threads
- Replies
- 0
- Views
- 250